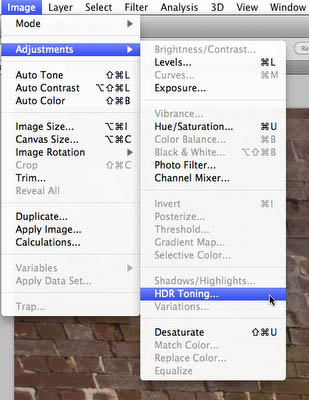
Once it is again the time when Adobe releases a new version of Photoshop: Photoshop CS5 (Version 12). We want to talk about some of the main new features that we find interesting for photographers (we skip 3D entirely).
Goodbye Mac with Power PC
This is the first version of Photoshop that won't support our trusty Quad Mac with Power PC. It got relegated as our printing machine using Mac OS X 10.4, Photoshop CS4 and Lightroom 2.x. Our main workstation is a MacPro for some time now becasue more and more tools require Mac Intel (e.g. Final Cut Pro).
64 Bit for Mac
On the Mac you can now use Photoshop CS5 in 64 bit and 32 bit. Adobe had to re-write lots of code to allow this to happen as the basic UI platform for 64 bit changed. The 64 bit version allows you to utilize more memory. Be aware that many of your plugins won't work in 64 bit. That is why we use the 32 bit version right now.
Content-Aware Healing
The Healing Brush was always a key feature in Photoshop for some years. CS5 added a new mode that makes it even better.
Content-Aware Healing Brush
CS5 adds a new mode to the Healing Brush: Content-Aware

Here is a sample:

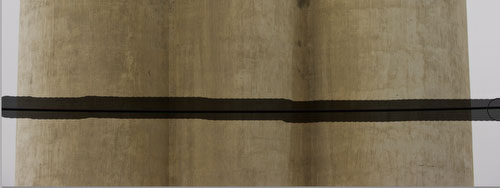
Crop from a Scene (Silos)
As outdoor photographers we find wires everywhere. We actually did not miss the wire while shooting but planned to remove them later.
Brush over the wire (in Content-Aware mode of course)
here is the result:

Result
The result is by no means perfect but most of the work is done quite well. We use the normal Cloning Brush to do the rest:

Before Fix

After Fix
In the end the new Content-Aware Healing Brush saved us quiet some time. This was actually a very simple sample but it can work in even more difficult situations.
Content-Aware Fill
There is a companion tool called: Content-Aware Fill. Again a simple sample:
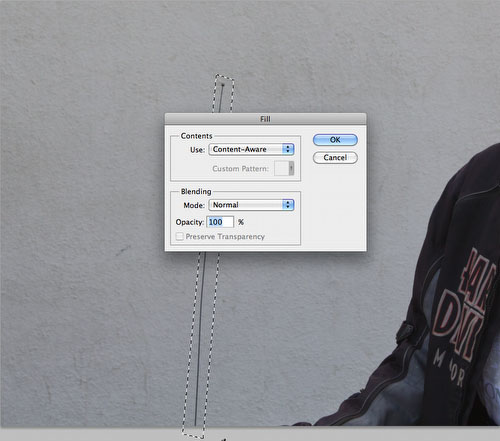
We wanted to remove the antenna sticking into the image:
- Select the antenna
- Select Edit->Fill and use the Content-Aware mode
- Hit OK

Result
The Content-Aware Brush and Fill help to make retouching faster and easier. For some they maybe worth the upgrade to CS5 alone. We are very happy about this new feature.
Camera Raw 6.0
If you use Lightroom 3 Beta 2 you actually get the same functionality. The raw processing and noise removal got improved. We hardly use Camera Raw directly anymore but use the same engine via Lightroom 3 Beta 2.
Automatic Lens Correction
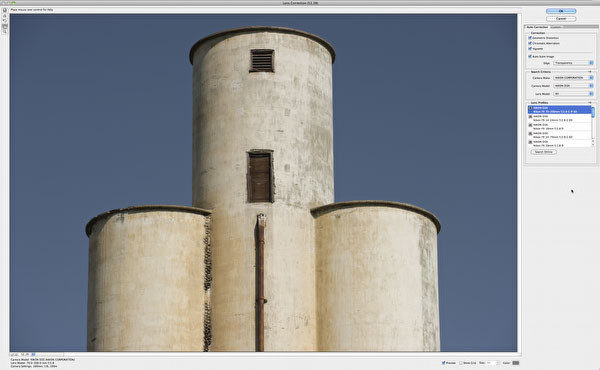
Improved Lens Correction Tool
When you call the first time CS5 (first time during an editing session) you may see this message:

CS5 loads lens profiles for use in the new updated Lens Correction tool. The Lens Correction in CS5 now also supports profile based Lens/Camera profiles. These profiles can then be selected in the Lens Correction dialog:
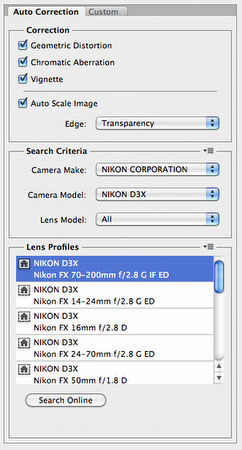
The profiles store information about:
- Geometric Distortion
- Chromatic Aberration
- Vignetting
If your lens/camera combination is supported it makes the correction process very simple.
Right now the cameras/lenses supported are quite limited. This will change over time. Adobe also delivers a free tool that allows you to create your own profiles with the Adobe Lens Profile Creator and the Adobe Camera Calibration Chart.
Intelligent selection technology
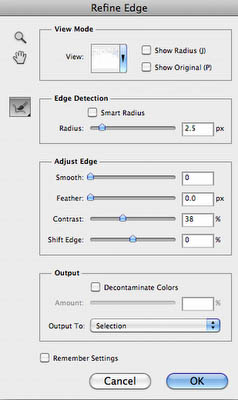
The Refine Edges dialog got enhanced to allow more precise masking (e.g. with hair and other fine details). We did not test it in detail as we rarely make fine detailed masks.
Improved HDR Support
Merge to HDR Pro
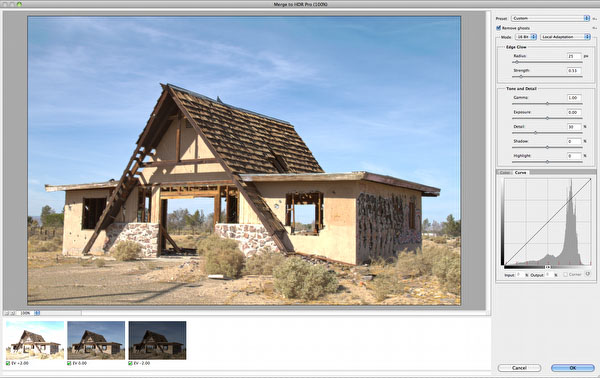
Overall improvements are:
- Fewer artifacts (at least the old ones are gone) than merging to HDR in CS4 (we always used Photomatix for this)
- Allows de-ghosting: We did not try this yet but heard positive comments
You can directly tonemap in this dialog. We don't do this for 2 reasons:
- The preview does not allow 100% inspection
- If you don't have the best settings found you need to go back and merge again to HDR
We use the 32 bit option
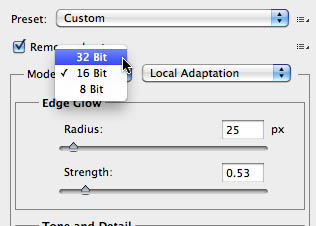
to keep the image in 32 bit. Here we can save the HDR file and use the new "HDR Toning" tool to perform the tonemapping.
HDR Toning
Not sure why Adobe selected this name (we would call it HDR Tonemapping because it reminds us to much of B&W toning).
Tonemapping in CS5 can now be performed in two ways:
- The classic "Convert to 16 bit"
- The new HDR Toning tool
The new HDR Toning tool keeps the result in 32 bit:
HDR Toning is a new adjustment tool
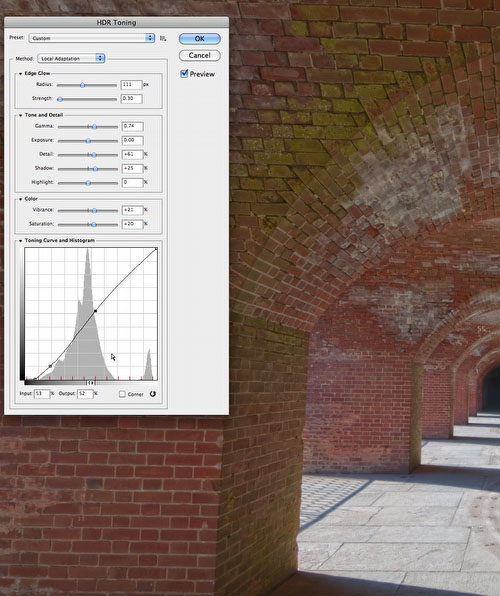
HDR Toning Dialog
The "Local Adaptation" mode is completely changed and way more usable than in CS4. Be careful not to select to high "Detail" settings as this may introduce nasty artifacts. If needed we perform extra detail extraction with our DOP Detail Extractor script.
To get a proper impression of your images in 32 bit you better set proper "32-bit Preview Options".
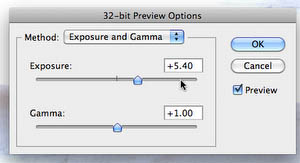
Off values
Exposure should be set to 0 and Gamma to 1.
If you finally convert to 16 bit you need to do a simple Exposure:0 and Gamma:1 conversion (this leaves the image unchanged).
Overall "HDR Toning" is not really simple to use as the interaction of the many sliders make it complex. Best to save the current settings used as a new Preset because "HDR Toning" does not support any "Previous" option (which we consider a major omission).
Puppet Warp
Puppet Warp is a fun tool but many photographers may not see much use of it. We personally used Warp in the past and Puppet Warp is a warp tool on steroids.
Here is an example that illustrates how Puppet Warp can help even Photographers.
Start
The blue area in the bottom right corner is distracting. Yes, you could crop the image but that is not a really good option. We show how Puppet Warp can help.
- Copy the background layer (Puppet Warp needs to work on a layer)
- Call Edit->Puppet Warp
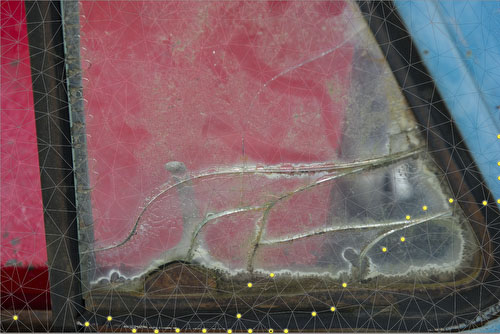
Puppet Warp Mesh with marked Nodes
We mark the Nodes to prevent the warping to influence areas beyond these borders (best you try yourself).
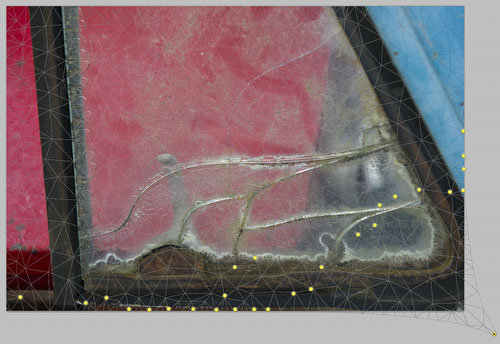
Warp the corner area
We warp the corner so that the blue area is outside the image. The rest of the image does not get warped much or at all.
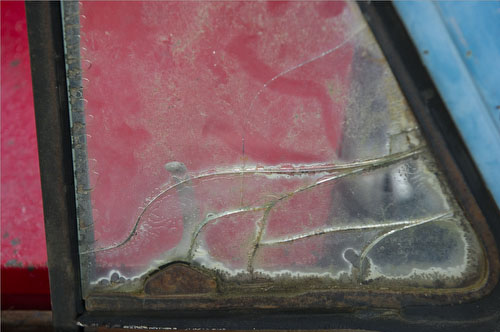
Final Result
The final result does not look much distorted at all. Warping is especially effective if you work with organic structures.
Other Features
- CS 5 now comes with Configurator V2
- Can now save directly to JPEG from 16 bit images
- Mixer Brush for painting (not for us)
Conclusion
We find that Photoshop CS5 is an powerful new release and for many worth the upgrade. |