My sensor on my SD9 had been getting
dirtier and dirtier. I admit I am not the most careful when it comes
to changing
lenses. I
had some success with methanol-based products early on but as the
camera got more and more dust, I just couldn't get it clean and often
felt
like I was just moving dust around. With my SD9, I had pretty much
given up
and just spent time with Photoshop using the clone tool and healing
brush; this process was getting longer and longer and naturally more
painful!
My SD10 was starting to get more dust in addition. Desperate to find
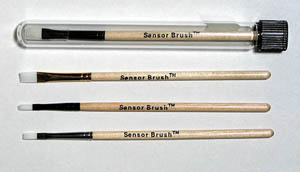
a solution, I tried the Sensor Brush from Visible Dust which someone
had mentioned at one time on the forum. I emailed the company for
advice and some specifics on cleaning that weren’t clear on their website
(since updated, I believe). Upon their advice, I first cleaned the chamber
walls with the electrostatically charged brush of which there are two
sizes. I could see that there was no lack of dust particles in the chamber
and realized that this probably had a lot to do with not being able to
get the sensor clean. I would do one pass with a side of the brush and
then blow off the particles with an air can as recommended. After cleaning
the walls, I cleaned the sensor in the same manner. I can’t tell
you how happy I was to see such a dramatic difference in the amount of
dust on the sensor. I suspect I could clean the chamber walls a little
more and the company makes a product designed for cleaning walls. In
addition to the product working very well, I like the fact that there
is no liquid to put on the sensor. With methanol-based solutions, I got
smears on the sensor a few times and although they were probably my fault,
it didn’t make it any easier to bear. It appears that a number
of Sigma DSLR shooters are using this product now and commenting
favorably upon it.
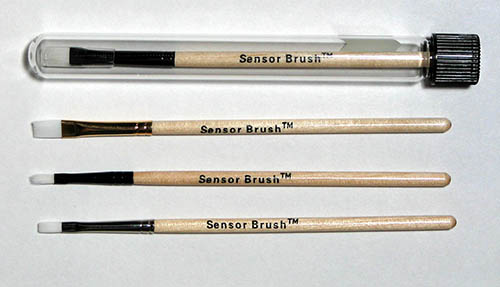
Even if you don’t have the chamber-cleaning product, clean the
chamber walls first with the larger of the two brushes. The smaller
brush is for touch up and spot work. There are a couple of things to
remember. You need canned air to use the brush. The canned air charges
the brush. This take 5 – 10 seconds to do and the charge only
lasts about 20 seconds. The canned air tube has to be close enough
to really move the fibers against each other or you will not recharge
the brush. Also, the canned air cools the brush. The brush heats up
very quickly and can over-heat very easily and be ruined by the fusing
of the fibers. The company recommends blowing the brush for 5 to 10
seconds and then making ONLY one pass over the camera area. Then re-blow
for 5 to 10 seconds. In addition to recharging the brush, as I just
mentioned, this cools the fibers off and dislodges all the attached
particles from the brush. Don’t expect to get all the dust off
with just a few passes. In addition, there may be some spots hard-to-get
or as someone mentioned, some kind of residue on the sensor cover.
These may not come off and the company offers a liquid-based solution
for “sticky” spots.
Don’t touch the brush. You can clean it with alcohol but it
will take a long time to dry; mine took more than an hour and I finally
left it for the night. Blowing with the canned air might help. When
not using it make sure you store it immediately in its tube with the
cover on. Some final words of advice are to make sure you have a clean,
dry, wind-free area where you work to clean the brush and use rubber
gloves for added insurance.
I have the chamber cleaning product but have not tried it yet as I
have been happy with the results of just the brushes. When I do use
it, I will add to this review.
Note: If you use a white paper to do your test shots, you run the
risk of dust and imperfections on the paper that can be confused with
dust on the sensor. I try always shoot blue sky or clouds if there
is no blue sky.
Here you can download sensor check photos:
FYI: We enhanced the contrast strong to show the
dust stronger than you would see in your normal pictures.
Note by Uwe Steinmueller: We actually
shoot a white wall in the room at very low aperture (F/18 or smaller)
and be really out of focus. This way the dust or spots on the surface
you shoot cannot be taken as dust.
You can get the products from Visible Dust
One addition
It has been recommended NOT to shake the compressed air can as you
can get a residue on the sensor cover. I did have this happen with
a friends camera - maybe it was just moisture -
and it eventually disappeared (a matter of minutes). I am using a
scuba tank now as I have gone through a few air cans as a result
of having two cameras and helping another person clean theirs.
Additional information provided by Visible Dust
We received some more information from the company and would like
to share it with our readers:
"Sensor brush surface is modified to attract dust and particles
that are usually have opposite charges. CCD surface is positively charged
so they attract dust and particles that are either negatively charged
such as pollen or particles of animal or human origin or less positively
charged such as hair or synthetic material from clothing. So the strong
positive charges of CCD attract negatively charged and less positively
charged particles to strong positively charged surface. Alcohol cleaning
is the culprit not the helper in this situation, since alcohol removes
water due to the hygroscopic nature makes the situation worst. This
is the reason spraying water will reduce the static charges in laundry
machine. Consequently in dry climate static charges are more than wet
climate.
CCD has hot and dry cavity and with constant charging it produces
high electrostatic environment to become a dust magnet. Our science
is based on these concepts rather than mechanical cleaning. The air
can is used to clean and to dislodge particles. Fluorine can rub the
electron from the surface making it more positive (1,1,1,2 tetrafluoroethane
which has low pressure with no residue that last 20% longer and the
other more popular brand 1,1 difluoroethane which has more pressure,
if not held properly will spit out residue). In our case the brush
filament having positive charge of its own once blasted with air become
even more positive than CCD surface. If air can is used directly on
CCD surface it will produce the opposite effect. This is the reason
many people experience when they blast the surface with air.
Using microfibre cloth to clean the surface runs the risk of fiber
burn resembling scratches if the cloth used in dry state. That means
the filament of polystyrene will melt on CCD by heat resulting from
friction. Nevertheless, they leave a lot of lint behind.
Scotch tape or magic tape 810 will produce scattering effect not visible
by naked eye and has been seen using FTIR scanner. This will produce
color shift in 6.5 microns range in red spectrum. This is like coating
the sensor with polymers of low quality aside from adverse effect of
stress on cover glass covering CCD. Our results show that cleaning
the chamber wall with chamber clean solution containing anti dust repellant
and antistatic charge build
up (It is important to be filtered to less than 0.2 micron otherwise
will produce adverse effect) reduces the cleaning of the sensor by
more than 95%.
Our unpublished results for sigma SD10 has shown that not cleaning
the chamber for three months we only had two small specs showing up
on our CCD surface. Of course sigma has a dust protector as well. One
could also use sensor brush to clean the chamber wall grooves and hinges
that are hard to reach. Using other cloth or other methods makes this
situation worse since they leave more lint behind. Also once you used
the chamber clean avoid using the same brush since the antistatic material
from chamber clean will diminish the good electrostatic ability of
brush to attract dust. A separate brush can be used for the chamber.
Brushes maintenances may not be that difficult at all. One can use
pure alcohol or rubbing alcohol to wash the tips or Electrasol dishwasher
liquid devoid of waxy stuff or peroxide. Put one drop of Electrasol
liquid in one quarter of water using clean cup. Followed by rinsing
with plenty of distilled grade water from pharmacy to rid of any slight
left over detergent. One should avoid using oxybleach, or fancy detergent
since most are surfactants having charged molecules that can attach
themselves to the filament rendering it neutral or ineffective.
Finally sensor brush is made specifically from very thin filaments
and specially designed for sensor and delicate surface cleaning. They
are meticulously cleaned to rid of any trapped particles such as metals,
sands, glue or chemical. Every one is microscopically examined. We
don't trust to put a few thousands dollar camera tools in hands of
home made brushes. The ease and effectiveness of our products will
amaze any DSLR user. We rely on scientific testing and the state of
art equipments. Our
sensor brush can outlast the life of many digital cameras. It is portable
and can be carried on flight. These properties make the sensor brush
a valuable tool for an avid photographer or landscaper owning a DSLR
camera."
|