| Digital Outback Photo - Photography using Digital SLRs |
|
 |
|  |

|
 |
Photo Techniques #002"Get the flash off camera"by Neil Turner
|
| There are hundreds of reasons to get your flash off camera and only two for leaving it there. There's laziness and there are fast moving news situations, otherwise you really shouldn't have that flash in it's hot shoe. Because this is a predominantly wildlife and nature site, and I'm a portrait and feature photographer you are going to have to employ a little imagination. You are all creative people so here we go. |
 |
|
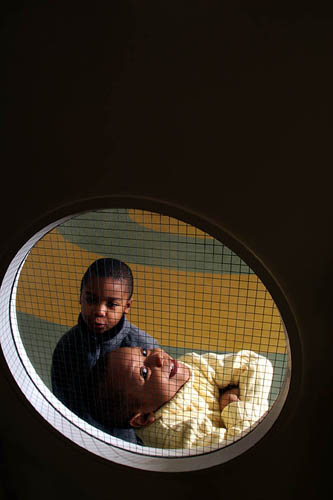
This photograph just wouldn't work with the flash on the camera and bouncing off of a ceiling or wall isn't an option. I know that there isn't too much toughened glass in the natural world but I am giving you a tough working scenario here. The story behind the picture is the opening of a new school, but the pictures had to be taken before it was finished so I only had a small area to work in. Looking through gaps and windows is a common technique - used to give real emphasis to the subject and to suggest an element of intrigue. These young guys were the other side of the door in a room with very little light. There wasn't much my side of the door either so I had the choice of lighting my side of the door or letting it go dark. I chose the latter because the paintwork on the door wasn't finished! By getting the flash unit into the other room on a lightweight lighting stand I avoided the need to worry about the flash to subject distance changing too much - something that I'm keen on. Those of you who have read my intro would have seen the brief reasoning about the angle at which the light strikes the subject and in the case of this picture that was limited a little by the existence of the brick wall, but I managed to get the flash off to an angle of about 70 degrees from the axis of the lens. The stand held the flash at about the same height as the lens and the light was bounced off of an 80cm (32 inch) white umbrella some four feet back from the boys so that what little of the background gets into the frame is reasonably well exposed. Only one flash lightsource, and very little available light. You will (hopefully) have noticed that I haven't mentioned what type of flash was used or how it was triggered. I haven't mentioned what aperture I was working at or what shutter speed. That was deliberate, because I wanted first to establish the principle by which the light was positioned, the circumstances surrounding the decision to place it there and to point out that what you use is secondary to how you use it. Obviously the flash needs to be metered somehow but there are three options here: You Could....
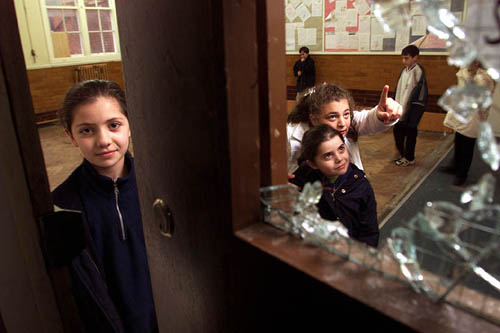
Each option is a valid one, and depending on the kit you own and how you prefer to work you should choose your own way of doing things. I went for the third option, I fired a test frame at an average aperture (f5.6 at 200 ISO is a good place to start with my set up), looked at the LCD display and decided to open up half a stop and shoot at f4.5. The flash to subject distance is the important one and wasn't going to change so this is always the best technique for me - it means that I can move the composition around, but the amount of flash is fixed come what may. As far as triggering the flash, well it again depends on your technique and your kit but I used a high sensitivity slave cell on the flash and and infra red flash trigger. Equally a cable could have been fed around or under the door or any of the many flash triggering systems on the market could have done the job. With the Canon system there is the wonderful ST-E2 flash trigger and I'm sure that other manufacturers have similar units. The lighting stand was a very basic, lightweight Manfrotto but I have used all sorts of clamps (humans can be used too) as well as a tripod to achieve the required effect. For the record, the flash was a Lumedyne 200 joule (200 watts per second) set at 50 joules. The simple act of getting the flash onto the other side of the door makes the image and just to prove that it is a technique that works over and over again here is another picture shot in a similar way. |
 |
|
The only difference between the two images is that in the second the flash is bounced off of a white wall inside the room with no umbrella and that there is some available light in the background. Getting the flash off of the camera makes light instantly more interesting. Interesting often equals creative, and creative normally means better. These steps are not rocket science, but the effect that they can have on your work makes them well worth the occasional experiment. The LCD screen on digital cameras means that you can tweak as you go and get flash right. I'm thinking about what my next piece will be about, but if there is anything that you think I can help with, let me know: www.dg28.com |
| Here is a news group for discussing the Outback Photo Essays. |
|
|
| For Comments post in our News Group |