Digital Outback Photo Contest #022
Contest September 2006: LightZone
RAW contest #2
sponsored by LightCrafts (producer
of LightZone)
See
also our previous contests.
Max entries extended to 30!
25 posted (contest closed)
1. Contest is open for submission till a maximum
of 30 entries
2. Published
LZN entries (so that you can
start learning and improving)
3. Gallery with current entries open
A Note on Copyright:
This image can only(!) be used in the context of this contest and the
only site that has the right to publish images is Digital Outback Photo
(or other sites that were granted permission, in this case also LightCrafts).
If you want to use this image for any other purposes (e.g. marketing)
you
can acquire
a license
from
us.
This is the first time that all of our readers can
share all(!) imaging steps (including selective corrections) with other
readers. How that?
You will just send in a LightZone LZN file and this file contains all
steps
and operations
you performed
on this image. If you don't own LightZone please install a demo version.
Contact
LightCrafts if your demo already expired. Also remember
that you can buy LightZone through our banner links and receive a discount.
(you help to sponsor our work at DOP).
The main goal is to share imaging techniques and visual
interpretations among all our readers.
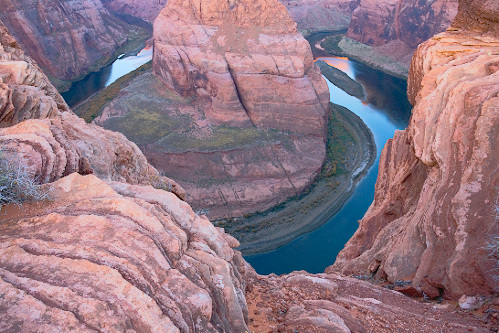
We provide the original RAW file of the title image:
- Scene: Page, Horse Shoe Bend (from our Summit 2005)
- Camera: Canon 5D
- Lens: Canon 17-40mm
You produce your interpretation
(color, B&W, colorized) of this image
using
only LightZone 1.6x or newer. Finally you send in only(!) your
final saved LZN file to us (the LZN file should be no larger than just
150-300KB).
Your contest assignment
Your task is to create your interpretation
of the following properties:
- Download the original 5D CR2 RAW file from
here (read the above copyright
notice)
- Only LightZone 1.6 or newer maybe used
- The
photo should be ready for print (including noise removal, dust removal,
crop, straighten, sharpening, cloning)
- You grant the free public use of your instructions used in the
LZN file
- Name the LZN file like: first_lastname_5d_0197.lzn
- You may also add a short descriptive outline of your workflow in
your email. We plan to publish some selective samples.
- Do not send images (we will create them via your LZN files)
- Send only the LZN file and your full name to: contest@outbackphoto.com
Rules and procedures
- Contest is open for all people that do not work for or a in affiliation
with LightCrafts Inc.
- We will publish no more than about 30 different LZN files for all
readers to download
- We
publish these entries even during the submission timeframe.
Don't just copy other entries
- We may also publish the LZN file used the create the title
image
- We will open a gallery with images that we created using the selected
LZN files (max 20)
Reader's Workflow annotations
Alan Huntley
"Attached is my entry for the second contest. I'm
really enjoying these exercises and seeing what others are doing with
LightZone.
I'm still on my trial of 1.6, but the more I use it the more I like
it! I think my layer titles in the lzn file are fairly self-explanatory
so I won't go into detail here; other than to say that, to my eye and
looking at this image, it tends to start with the lighter foreground
rock area on the left sweeping counter-clockwise around to the same
area on the right and, then, to the massive rock formation in the center.
Therefore, for me the primary focus of this image is the central formation
so I used the Color Balance tool (restricting it to his one area) to
better match the color, etc, of the rock in this area to the rock area
in foreground right. This change really seemed to keep my eye running
circles throughout these areas. That's the way I see it, anyway.
I also
wanted to accentuate the vegetation area down near the Colorado.
Color Balance tool to the rescue! I set a few different regions around
these areas and shifted the color slightly toward green and, also,
added a bit of yellow. IMO, this change brought a little more interest
into my primary focus of this image--the central rock formation. After
applying global saturation, I went back and adjusted the prior Color
Balance tool for the vegetation because it
was now a little too much. A dash of sharpening, and the image was
done. I tried playing around with a few B&W conversions, but
liked the color one better.
Thanks, again, for the opportunity to
learn about LightZone and to see what others are doing with it.
Btw, I've been to this location a number of times myself and I really
like the way this image captures the dizzying heights. I also really
like that slight touch of what looks like sunset color in the river
in the upper right corner. I've only ever been at this location at
dawn. Looks like I'll have to visit at sunset on my next visit!"
Note by Uwe Steinmueller: This photo was taken at
dawn :-).
Henk Verhaar
"It may look a bit gaudy, but this is what I
would hang on my wall... I love working with contrast masks in photoshop,
so that was why I took to LightZone in the first place. I actually
prefer the implementation of the contrast mask in LightZone-RT. My
interpretation of the file includes some general saturation tweaks,
a change of the white balance in color dodge mode, two regional color
balance tweaks to bring out the greens on the shore and the plateau,
and a regional color balance tweak to enhance the reds in the small
island (50% opacity). Next a contrast mask in soft light mode, 20%
opacity, and some sharpening"
|


