|
 |
|  |

|
 |
Essay #015The Glory of FallTips and Techniques for Shooting Fall
Colors
|
| I have two definite seasons that take up the majority
of my outdoor shooting time. These are spring and fall. Living in Arkansas,
we have a great fall display along with an excellent spring display. The
State has a tremendous number and variety of deciduous trees. These include
the Oak and Maple family but also some very unique species. Some of these
less common species include Dogwoods, Sweet Gum, Elms, and Hickory. Each
of these tree species will have a range of color that can vary dramatically
from year to year. The color change depends on many factors, but the most
important are the amount of rainfall during the whole year and the ambient
temperature.
Arkansas has two main forested mountain ranges, the Ozarks in the Northwest and North Central parts of the state, and the Ouachitas in the Southwest part of the state. I spend about 90% of my time in the Ozarks, as I find much better subject matter here. In my daily shooting, I tend to frequent a variety of areas in the Ozarks, but I always come back to these same spots every year and many different times during the year so as to catch the same subject during the change of the seasons. I also like to shoot with water included in my subject as much as I can. I use the smaller creeks that run throughout the state as often as I can. However in Arkansas, having a good flow of water in the fall is rather rare as this time of year often quite dry. While shooting fall colors, there are many factors that I consider. I also try to schedule my shoots around the forecast because I prefer to have weather conditions that give me optimum conditions for shooting. These conditions will affect my lighting, shutter speed selection, optimum ISO setting and best time of day to be shooting. I will discuss these below.
The first of these is good light. Fall color to me is best photographed when your subject is directly or indirectly lit by the sun. The maximum amount of color will come out with this type of lighting. I prefer to shoot my subjects when they are backlit by the sun as often as I can. The effect of the sun backlighting a group of fall leaves is a scene of tremendous beauty. Also a vista of fall trees, shot against a bright blue sky is a most tempting subject. With this type of light you get the maximum amount of contrast in the subject as well. However, you can’t always get a blue sky and great light. What do you do? One of the best solutions is to use Fill Flash. On a dark gray day, the use of Fill Flash will still allow you to get a good range of color. You won’t be able to pull in the trees in the distance, but you can still concentrate on getting some of the color up close nice and bright, and let the remaining subject matter fill in the image. The use of flash also allows you to shoot at night. The full illumination of a grouping of fall leaves at night by a flash can create a beautiful shot. Your leaves will still have the great color and will be framed in black. COMPOSITION OF YOUR SHOT What should you shoot a vista, or close up? I find that many times the vista shot may not be what I am looking for. Vistas first of all are going to task my 6mp imager to its maximum for the resolution. Any 6mp camera can take an amazing macro or close up. When you are working with fall color don’t rule out the macro or close up shot as you will get an amazing amount of detail out of the subject. I sometimes will just pick a single leaf or a couple, and work with the light so that the color and texture of the leaves is brought out to its greatest intensity. These types of shots make for some beautiful prints. FOLLOW THE SUN Time of day, is another one of the great decision makers for me. Since I tend to frequent the same parts of the state, I will create a mental log of what time of day the sun will frame my subject the best. Sometimes spots I shoot need early morning light others midday and still others only are well lit in the late afternoon. This will vary both my time of day and season. An example of this situation is a spot I love to shoot along Richland Creek. In this spot I have two excellent views, one upstream on a grouping of three large rocks and one looking downstream with more large rocks. If I want to shoot this spot looking upstream, in the fall, I have to be setup no later than 9:00 a.m. and then I will have about an hour to work. After that the sun will move over my shoulder and only strike the far bank and not the rocks or the creek. For this shot, the most dramatic effect will be to have the rocks illuminated by the direct sunlight. Now as the sun moves over my shoulder, it will start to light up the view downstream. Before this, I would have been shooting into the sun this does not make for a good shooting situation. As the sun moves, it hits the downstream left bank first, then the creek, then both banks. So again you get an excellent time and light study. As the fall progresses my starting time gets earlier as the sun is moving across the sky. In the winter, there is a brief period of time, when the rocks just get the light for about twenty minutes then it’s gone. My point here is to say that yes, many people will say that most of the great photographs are driven by luck and to some degree I agree with that. But by understanding your shooting environment, you can plan on getting much more consistent results. WEATHER The last consideration I want to mention is wind. Since I like to shoot with water in my work, often times I am shooting a slight time exposure to blur the water. When you are shooting a lot of smaller leaves, you really don’t want any wind blowing if possible. The result of this will be a tremendous amount of blur in your leaves which creates an effect I don’t like. If I know I am going to be working with water and wanting to shoot slower exposure times, I try to plan on getting out as early in the morning as I can since you tend to have much less wind early in the morning than late in the afternoon. However some days, especially fall days in Arkansas, you are just going to have wind. You can still get great shots, but you need to consider your faster ISO’s. When I am shooting on a windy day, most often I start at ISO 400 since I can now get shutter speeds of 1/1000 and 1/1500 during the day and that will stop most wind action. In the images that I have included, I wanted to share a quick description of the situation and how I shot it. I will also include the shooting information and why it was selected.
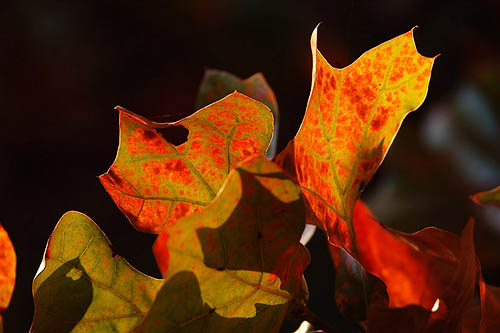
This shot is an example of the close up effect. This tree was a Post Oak that was at its maximum color. I was on a walk in my neighborhood and found this tree in a small grove. I had to climb up a tree close by to get the shot but it was worth it. In a fall season where the Oaks have received a good amount of rainfall they will most often get a deep golden bronze color. In this situation, I had the sun backlighting the leaves and I found an angle that just featured the two leaves. I like the effect of the dark background as it just made the individual leaves stand out better. This shot was taken with my D1x and the 80-400 VR at 400mm. I was using the VR mode as getting a tripod up in this tree would have been tough work. The combination of this camera and lens created a great shot. In this particular situation, you could easily take this image to 20 x 40 since most of the pixels are working on only a few leaves. If you look closely, you can see a single strand of spider web running between the edges of the large leaf on the left. It’s also very important to use spot metering in this situation. Spot meter the main portion of the leaf where the sun is hitting and then adjust accordingly. If you don’t, then you run the risk of having the most beautiful portion of the image overexposed. To help bring out the colors in the leaves, I used a Polarizer. I used a rather shallow F stop which makes the main two leaves stand out from the rest of the group.
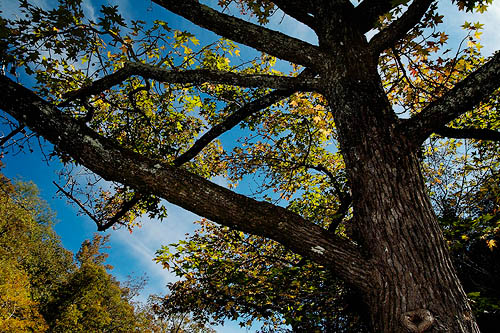
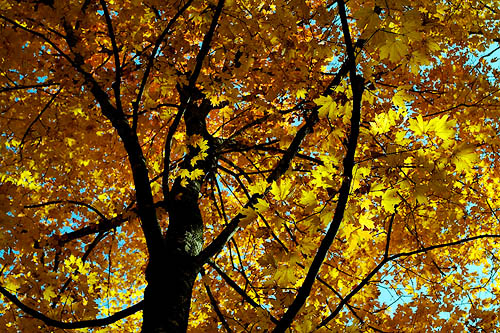
I don’t own a tilt-shift lens, thus whenever I shoot up, my perspective will be changed. I happen to like the effect as I feel it makes for a more striking “look” to the subject matter. This shot was taken around the 23rd of October, 2002. The tree in question was a Sweet Gum. Sweet Gums’ can put on a tremendous display of color with the leaves often times starting in a green/yellow look then ending in a blood red color. This year, however the leaves only got to the yellow phase. For this shot, I used my S2 and the Nikkor 17-35 at 17mm. I wanted to get some details out of the trunk of the tree so I used Fill Flash to lighten up the trunk. By doing this you can get a little variety to the image and not have the trunk take on a totally black look. This tree had just started to turn and as you look at it you can see all kinds of various colors on the leaves. I had been shooting portions of this tree and all of a sudden just happened to look up and caught this view. What stuck me regarding this subject were the deep blue sky and the various yellows and reds in the trees.
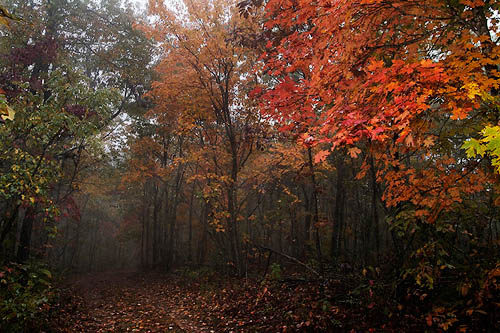
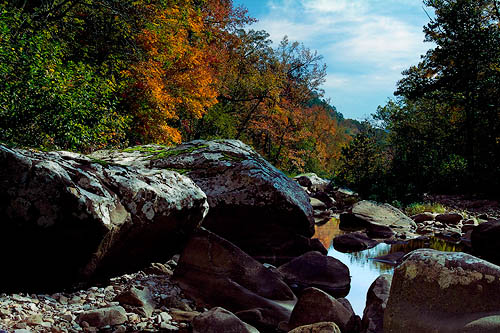
This spot is another favorite of mine. Normally this creek has much more water flowing through it, but this year it was very dry. However the color along this creek was outstanding the whole season. Here is an example of knowing your shooting environment. I had arrived at this spot about an hour later than I had hoped. The sun was strong on the left bank of the creek, but had totally dropped off the right bank and foreground leaving them dark. For this shot, I chose to keep the dark on the right bank, but wanted the rocks in the foreground to stand out. I used Fill Flash to light them up and make them stand out. However the extreme amount of variance in lighting caused me to shoot a bracketed series of shots. I metered the sky and the rocks on the left side as I didn’t’ want to blow out highlights in either of these parts of the image. I set my first exposure based on my metered sky feedback and then shot an entire series. I then shot the foreground with Fill Flash. Afterwards, I found the two best shots that gave me the best sky and left hand side of the shot, layered them, and then added a last layer to get the rocks in the foreground. When shooting a series like this, it’s most important to have a good tripod and the automatic bracketing feature of your DSLR. This way you can get the whole series without having to touch the camera and risk any movement. This shot was taken in mid October of 2002.
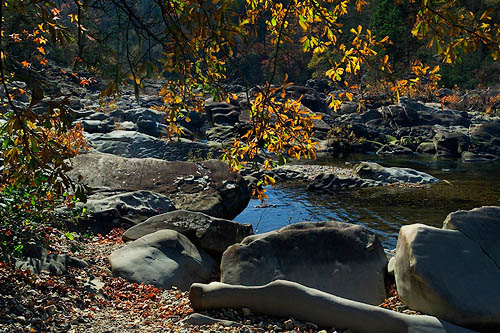
Southwest Arkansas has many beautiful rivers, and one of the most famous is the Cossatot which is the Native American name for Skull Crusher. While I was working on a series of shots on the Cossatot, I moved over to a shady location to view the LCD on my camera. As I walked over, I looked up and saw this shot. This is one of my overall favorite shots. I had the sun at my back which gave me some excellent lighting on both the rocks and the leaves over my head. I picked the shot where the leaves gave a nice frame on the left side of the image and then dropped down from overhead. If you had moved downstream just a few paces and looked back upstream at this same spot, it would have looked totally different. The sun was hitting the rocks and bringing out a wonderful light gray/white color. For this shot, I used my Kodak 660 and 17-35mm lens with a focal length of 24mm. I added a polarizer both to bring out more saturation in the color and to cut the glare off of the water in the foreground.
After a long day of hiking, late in October of 2002, I was headed back to my truck and found this grove of Maples that were as prime as any set of trees I have ever found. Unfortunately, the sun had gone behind the clouds so there was only neutral light. I stopped and took in the sight of this tree and almost didn’t take off my pack since I didn’t think I could capture it in a way that would do the subject justice. I wanted to get the entire tree as it looked just like a huge umbrella. I decided to use Fill Flash to bring out the wonderful yellow color of the tree and also bring out the rock on the lower left of the image. I moved to within about 10 feet of the tree and then lay down on my back and looked almost straight up. The effect was striking. I was able to capture the wonderful yellow canopy of the tree but in the process illuminated the two trunks and the under- branches just enough to allow them to add to the image but not dominate it. The vibrant yellows of this shot made for an excellent print.
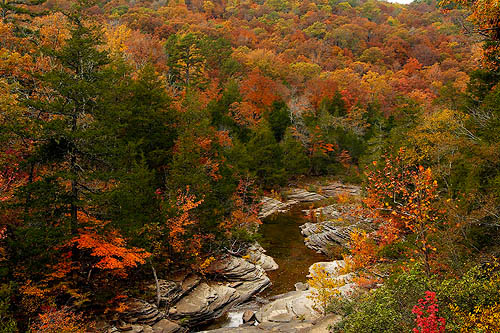
As the later part of October 2002 set in, I was unable to get good bright days for the rest of the month. This view is one of my most often photographed spots. I use it for both scenic beauty and camera resolution testing. The beauty speaks for itself. This type of shot I feel is a great test of a camera’s overall ability to handle smaller details. You are shooting across a long distance and trying to get the finer details in the distance. The more resolution you have, the better these distant details will be defined. The day I hiked into this spot, I had great color, but a gray day yet this scene had a wonderful “soft color look” to it. Usually I try to get the maximum contrast and brightness out of a shot, but in this case I chose to work with the slightly muted colors and the gray sky. I wanted to keep just a slight bit of the sky as it didn’t really lend much to the shot. However it did help add some scale to the image. If you look closely you can see individual leaves floating on the creek. There were no highlights to worry about blowing out but I did have to be careful to not wash out the creek in the center of the image. I want to point out here that if I had been lucky enough to catch this same scene with a blue sky and bright sunlight the effect would have been totally different, so the ability to understand your pending weather is very important.
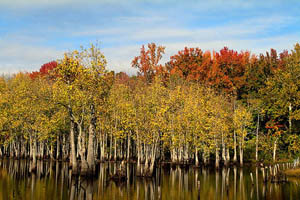
This image was taken alongside the Interstate. This grove of Cypress is in an Oxbow Lake which has a water color that is almost black. The black color of the water adds greatly to the overall effect by really pulling out the color of the trees. I have driven by this spot hundreds of times and always marveled at the beauty of it. However since it is right along the Interstate and I am most often either traveling to or from a shoot, I never stop. This day, I did and spent over an hour working the grove. As I got down to the level of the pond, I saw that I was going to quickly lose what was left of the blue sky so I set up quickly. My goal was to capture the tree trunks and their reflection on the surface of the water. As I worked the image later, I also decided to bring out the fence posts that gradually disappear into the water. When I took the shot, the sun was at my left shoulder so the trees were getting a great highlight. I choose not to use a polarizer here as my main goal was to capture the reflection of the trunks on the surface of the pond.
One of my favorite shooting techniques is to get directly under a particular tree then focus on a single portion of the tree. I prefer to keep only a small portion of the image in focus and let the balance drift softly out. I wanted to get this tree backlit by the sun that was rising that morning. In this case, I choose not to use Fill Flash and allow the tree limbs to go almost black to add a framing effect. I had to remember to spot meter the leaves in the lower right portion of the shot as these were the ones that would be most susceptible to being blown out. By doing this, I was able to get an almost transparent color to the leaves in the foreground of the image and keep a nice light blue sky to help add contrast to the overall image. Here also you can see the effect of not having a tilt shift lens as the branches seem to lift upwards towards the sky.
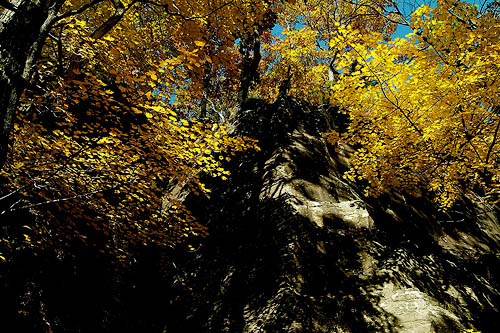
Stack Rock is a unique mountain in the Ozarks. In an unusual form of erosion the top of the rock has a normal dome top that is tree covered. But about one third of the way down the mountain, a sheer bluff line has been formed all the way around the mountain that varies in height from 20 feet to over 100 feet. You can walk all the way around the bluff line and catch amazingly beautiful views of the rocks and trees. I frequent this spot in the fall since I can find both groups of trees and individual trees framing the rocks. The rock also adds to the image as it has hundreds of beautiful colors and formations in it. For this shot, I used the 17-35 and looked directly upwards. I wanted the maximum amount of deflection so that I could get as many of the wonderful leaves involved in the shot. In working with this subject I took the shot with some Fill Flash to bring out the darker portions of the rock and then shot the same series without any flash. I ended up liking the shots that had no flash since the almost totally black shadows on the rock made the bright yellow leaves stand out even more. In this situation I had to spot meter the sky and the grouping of leaves on the upper right as they had the greatest amount of light striking them. I also had to work at ISO 400 so that I could keep as much motion out of the image as there was a slight breeze blowing that day.
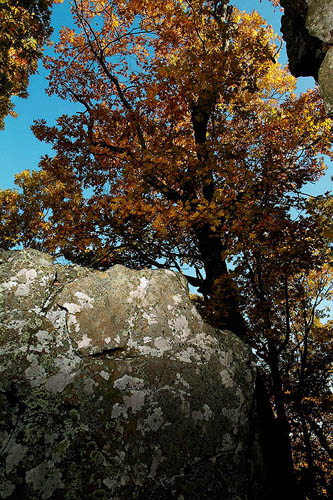
For this shot also taken on Stack Rock, I had several conditions to work around. I wanted to capture the large rock in the foreground, the bluff line on the right and the Oak tree in the immediate center of the image. However I had a strong wind blowing around this side of the mountain. I realized that I would have to shoot this image in parts since my camera’s maximum flash sync speed was 1/125 and I need more like 1/500 to 1/750 to stop the motion of the leaves on the trees. Keeping the camera on a tripod so I wouldn’t have any movement in my framing, I first shot the rock in the foreground with full flash. I then switched my ISO to 400 and set my shutter speed to 1/500 to shoot the trees both in the center of the image and the left side. Later in Photoshop, I simply combined the two, the rock from the first image, and the tree from the second, and I had my shot. The bright blue sky added some nice light contrast to the dark somber rock.
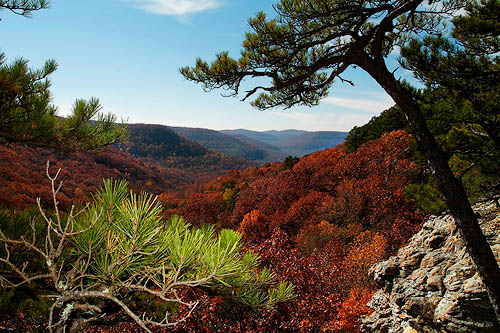
I wanted to end this article with a vista. In my work, I most often don’t come across a classic vista; instead I tend to work down in the hollows. Arkansas has many long bluff lines that run for hundreds of yards and offer wonderful vistas. In this scene, I wanted to get some of the Pine tree in the foreground on both the left and right side of the image but keep the deep blue sky I had. The problem is that if I exposed the scene for the sky, I would greatly underexpose the foreground and vise versa. So I used Fill Flash to bring up the Pine needles on the lower left corner and upper right corner. This allowed me to keep my sky and wonderful color out in the distance. The rock on the lower right side of the image had to be spot metered just to be sure I didn’t blow out the highlights on it. Later when I looked at the image in Photoshop, I felt that I had brought out the Pine tree in the lower left corner just a tad too much, so I applied Curves to the image and saved it. By using layers in Photoshop I then combined the original image and the portion of the 2nd image with the corrected Pine tree.
I used three cameras for these images, a Nikon D1x, Kodak 660 and Fuji S2. With all cameras I shot in the raw format. For the D1x, I used Capture 3.0 to convert my image, Fuji’s EX converter for the S2, and Kodak Photodesk 2.0 for the 660. All the images were converted to the Adobe RGB (1998) color space in Photoshop 6.0.1. For some of the images I also used Fred Miranda’s Digital Velvia Pro (an action that runs in Photoshop) to add an increase to the overall color saturation of the image. None of the images were sharpened during the conversion from raw to tif. I used a combination of Nik Sharpener Pro, Fred Miranda’s CSPRO, Ultrasharpen Pro, and Smarter Sharpen X. Each of these tools are either or actions that work within Photoshop. Each of these tools can be found at the following sites. www.fredmiranda.com Paul Caldwell I welcome any questions or comments at this address: pcaldwe@aristotle.net |
|
|


| For Comments post in our News Group |