| Digital Outback Photo - Photography using Digital SLRs |
|
"Capturing the Coastal Birds of Texas with a Camera"
|
| When you think about the beach and coastal shores, what do you think of? Many people think that the beach and it's surrounding environment is only good for swimming, sunning, fishing, and having summer picnics in the sand. They see the seagulls and take it for granted that all of them are the same and a part of the beach itself. They do not notice the brilliant plumage of a tri-colored heron or the serene majesty of a great blue heron at rest. The reddish egret performing an intricate ballet in the breakers along the shore is not worth more than a quick glance. To a photographer, however, the seagulls are more than just part of the scenery and they are definitely NOT all the same, herons are more than feathered statues of stillness, and the reddish egret is giving a solo performance just for them. To a photographer, the sea and sky is an endless backdrop of sparkling drops and frothing waves while the grass, sand dunes, and seaweed provide a lush and textured playground that illustrates how the birds are a natural and integral part of the environment. Coastal plains and beaches are a hotbed of avian activity throughout the year and can provide photographers with a never ending supply of feathered models. This is especially true along the Texas Gulf Coast. Texas has a number of bird and wildlife refuges along its gulf coast as well as beach areas accessible to the public. Some of the refuges can only be explored on foot while others use have rocky roads and platforms designed for viewing the existing wildlife. And although most of the beaches are accessible to the public, there are places where the wildlife shares their habitat with nothing more than the local fishermen. |
| As with any type of wildlife photography, it is important to know the area you will be visiting and how the seasons are reflected in that area. This type of information will help you determine the best time to visit and allow you to research the types of wildlife that will be stirring when you get there. Knowing the habits and characteristics of potential photographic models can make the difference between getting lucky once in a while or being able to consistently photograph the different phases of growth and behavior of a specific species. You also need to know what areas are routinely used for nesting and what type of birds will be there. This will help you choose the best time to take photographs in that area with the least amount of disturbance and discomfort for your subject. Any type of negative impact on the environment may restrict future use of that site, either legally or a lack of photographic subjects may ensue. |
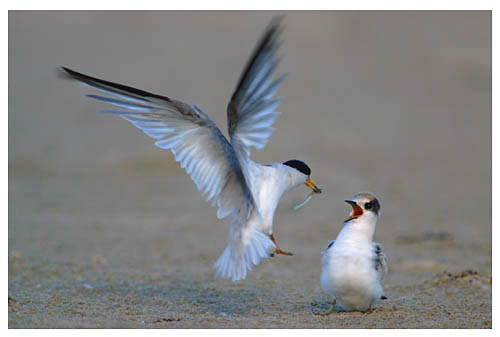 Least Terns |
|
Knowing the terrain and setup ahead of time will help you plan your visit and determine what lenses will be best as well as what the best time of day is for your visit. It is important to know where you will be in relation to the natural lighting and your subject. Since many of the coastal refuges have roads and/or viewing platforms, using natural lighting becomes a critical issue since you will want the sun to be at your back and this is not always possible in some of refuges. You may find that one area of a refuge is ideal for taking photographs early in the morning while another area is better for afternoon lighting. It may require one or more trips to a particular site to determine the best time of day for taking photographs there. Since lighting plays a critical role in photographing wildlife, it is important to understand the expected behavior of any wildlife that you may encounter. That perfect compositional setting may not work if the best lighting is behind it or to the side of it. For best results, the sun should be directly behind you (as if it was a person looking over your shoulder). Along the Texas Gulf Coast, the last two to three hours before sundown are prime photography time. This lighting will highlight your subjects coloring and ensure as much detail as possible in the photograph. As the sun begins its downward trek, the land will take on a golden glow, the water will appear even bluer, and your subject will display warmer coloring. The closer you get to sunset, the deeper and richer the colors of the landscape and the darker your subject. At this point, you may want to consider using fill flash to ensure that the subject is not lost in the shadows. |
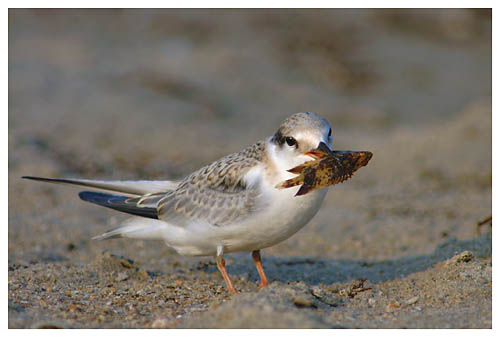 Least Tern juvenile |
| No matter what the level of light, it is important to meter and make appropriate adjustments before taking the photograph. Even using automatic settings can be misleading on occasion. Consider your ISO and aperture settings in conjunction with the current lighting and background then decide if compensation may be needed. This becomes especially critical when photographing pure white since you will not want to over expose and blow out the whites, thereby losing all detail in the whites and overshadowing the rest of the photograph. If you are unsure of your metering and compensation, you might want to try bracketing. |
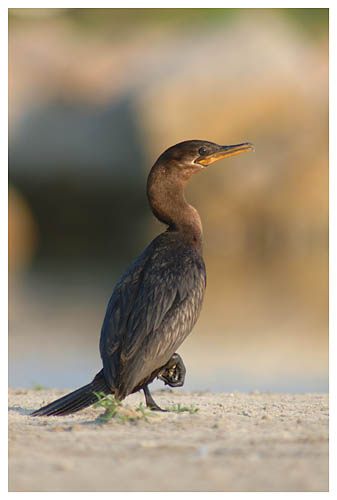 Neotropic Cormorant |
| Once you've tackled the problem of lighting and basic location, you're ready to begin photographing the wildlife. Now we get down to the nitty gritty, literally. The best place to take a photograph is on the same level as the bird that is your subject. Granted, this is not always a possibility (especially in refuges where you must stay in your vehicle), but on those occasions where it can be done, it should be done. This does not mean that you should forgo the use of a tripod, it just means that you should lower the tripod as much as possible and sit or kneel down (or even lay down if necessary) so that you are sharing the same focal plane as your subject. No matter how far away your subject is, when you remain standing and the subject is on the ground, you will be looking down to photograph it and it shows in the photograph. This angle is great if what you want are the tops of heads and backs. Not only that, but many of your subjects will view you as a threat and leave the area immediately. When you lower yourself to their level, birds are more at ease with your presence and your photographs will show that. Wildlife is naturally skittish when confronted by humans. Even seagulls, an integral part of any shore area, will squawk and fly away if you approach too close. For any type of wildlife photography, I strongly recommend using a 400mm lens at the minimum and would suggest a 600mm or 800mm lens where possible. This will allow you to take full-frame photographs from a safe distance that is less disturbing for your subjects. Using larger lenses will let you choose a spot where the birds will still fill the frame and yet you are not perceived as a threat to them. When photographing shore birds, you may find yourself hiking down the beach past your subject in search of the best lighting. If this is the case, walk slowly and quietly as far away from them as you can in order to cause the least amount of upset. There will be many birds that will fly away regardless of how careful you are, but don't give up hope. Many shore birds will return to the same area once they feel it is safe. Your best bet is to find your spot and get your equipment set up. Sit there quietly and wait for their return. This could take as little as five minutes or as long as thirty minutes. Whatever the amount of time, it is generally worth the wait. It might be to your benefit to sit farther away than you really want and slowly scoot forward across the ground in small increments that are less threatening until you are as close as you need to be. You may even find yourself sitting in the water while your feathered friends are playing on the sand. An important factor in photographing birds is how they perceive you. After a while, if you are relatively still and quiet, birds will start taking it for granted that you are part of the environment and ignore you. That is when the best photographic opportunities will occur. |
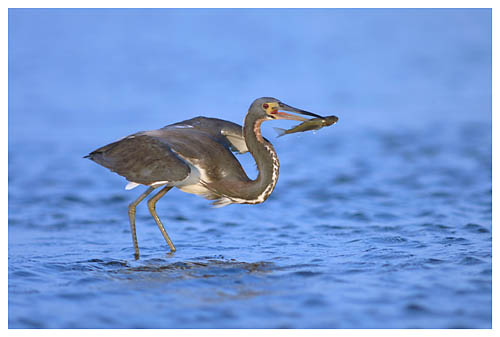
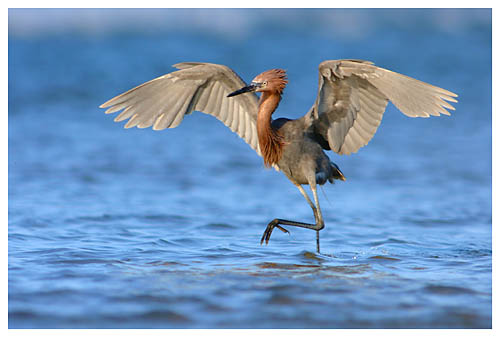 Reddish Egret |
| You've picked your spot and the waiting is over, the birds have accepted you as part of the landscape and ready to go about their regular business. Now it's up to you to capture them in a photograph. While you want them to exhibit their natural behavior, composition is still an important factor in the finished photograph. It is better to compose the image in your viewfinder before you take the photograph rather than waiting to crop and redo the final product. To achieve that, you will need to watch the bird or birds and note how they move, how fast they move, how large is their wingspan, and are there any particular body movements specific to a certain type of bird. For example, you can tell when an egret or heron is fishing by watching them tip their heads to the side to look at the water. Recognizing this type of behavior for what it is will allow you to compose your photograph and wait for exactly the right moment to release the shutter. There will be times when you miss the image you want because the bird chose not to follow through or moved in an unexpected direction, that is to be expected due to the nature of the beast. If you are attempting to photograph bird with it's wings spread, make sure that you are far enough away that the entire wingspan, wingtip to wingtip, will fill the frame with a little room to spare. You may find that for some types of photographs you are simply too close. Watch for reflections in the water. If the water is very still and their reflection is clear and relatively complete, you will most likely prefer to get the reflection as well as the bird. Where a bird is wading in the water, you will want to include some of the water so that viewers will not assume you cut off his legs. This same theory would apply to birds fishing for dinner in the rocks. You want every image to look like you planned for exactly that image. Take into consideration the background since garbage does not add anything to a photograph unless it is going to be used for a call to clean up the environment. Blurred backgrounds will emphasize the sharp clarity of the bird in the foreground while blurred backgrounds and foregrounds will add depth to the image. But most importantly, make your subject the primary focus of the photograph. |
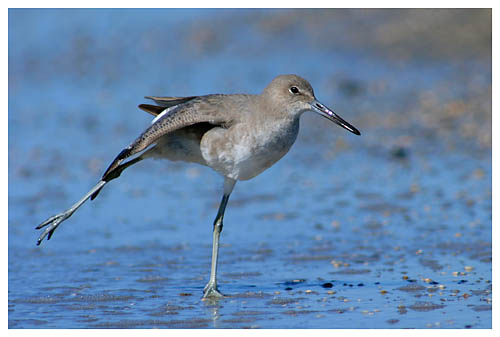 Willet |
| Remember to plan your trip and select a site that will suit your photographic needs. Take into consideration weather conditions and your lighting source when getting into position to take photographs. Select a lens that will allow for full frame images while letting you stay back a short distance from the subject. Be prepared to rough it where necessary in order to get the best image possible. Make yourself as much a part of the environment as you can and wait patiently. You will be rewarded with photographs that show birds in their natural environment acting naturally. |
|
Technical Information |
|
All the images were taken with a Fuji S1 with the settings
A Nikon 600mm is the lens used for these photos along with a Gitzo tripod and a Sidekick. There was no flash used to capture these photos. |
|
|
| For Comments post in our News Group |