|
 |
|  |

|
 |
|
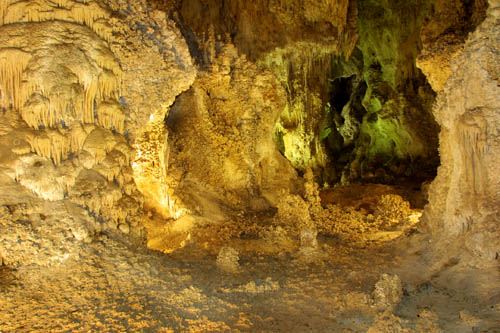
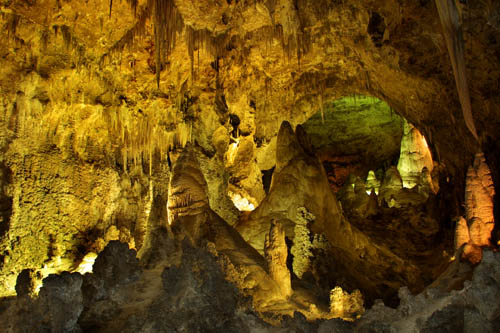
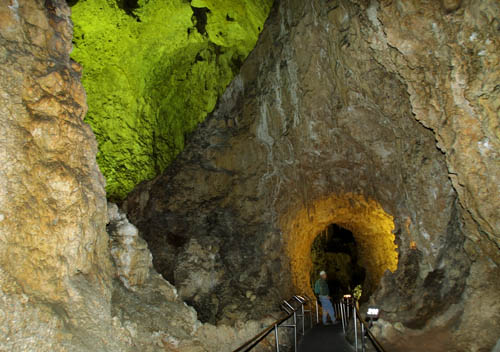
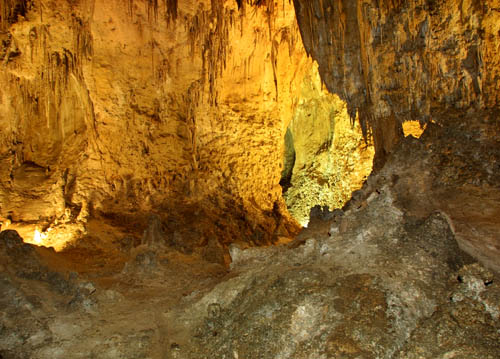
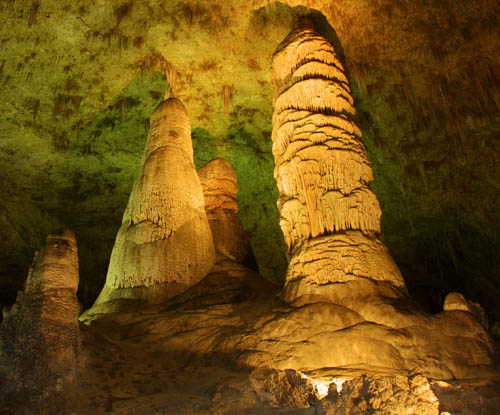
One of the more famous Caverns in the United States is Carlsbad Caverns in New Mexico. This cavern hosts one of the worlds largest chambers, and is filled with spectacular formations and views at every turn. Its located just outside of Whites City in southeastern New Mexico, and is one of 94 known caves within the Guadalupe Mountains. The Park itself is huge, covering over 46,766 acres, of which 33,125 acres of it is a designated wilderness area. On your way from Whites City to the park entrance, youll be on a scenic and winding road that has many interesting spots you can stop at. Youll even find a one-way wilderness drive upon reaching the top near the facilities, which takes you through part of the northern Chihuahuan desert ecosystem. Its a well-kept gravel road with many interesting things to see, and well worth the time to travel it. After our arrival at the entrance facility, we were presented with two pathways into the Caverns. We could take the easy way, which is an elevator ride straight down to the bottom, or we could take the natural entrance which involves significant exercise. We decided to take the natural entrance into the cave as part of the self-paced and self-guided tour. With gear in hand, we descended the mile long downhill route, until we reached the bottom, 750 feet below the surface. This is where some of the largest and most spectacular formations are at, and where our photo journey begins. |
 |
|
Before we had started our journey into the caverns, I had chosen to take along my Canon EOS D30, 17-35 2.8L lens, several CF cards, a good sturdy tripod, and a fully charged 550EX flash. Now thats quite a bit of gear to carry, and you can expect a Ranger to give you the speech about staying on the walkway, and not interfering with other peoples enjoyment of the Caverns. I assured them I would be most courteous, and did in fact, do exactly that. Photography inside caves and caverns isnt the easiest thing to do. Especially when youre among the tourist crowd, and have no ability to setup any special lighting, or exceed the walkway at any point along your journey. And with so much beauty to see, you dont want to spend all your time on one shot, or in one place. These caverns are huge, and theres a lot of ground to cover before the park closes. So, you need to be able to setup, shoot, breakdown and move to the next location fairly rapidly. Not to mention timing your shot between the groups of people passing by. The walkways are narrow enough that you, your tripod, and someone passing by generally cant happen simultaneously. We found that by letting groups of people pass by before we setup, we would have enough time before the next group came by to make the shot. This worked quite well for us. My goal in shooting the caverns was to get nice sharp pictures with plenty of depth of field. I also wanted to get fairly evenly lit pictures in spite of the extreme contrast caused by the bright lights they use to illuminate formations, and the pitch black that otherwise surrounds you. Not an easy task to say the least. Careful compositions had to be made when possible to keep unseen foreground objects from sticking out like sore thumbs in your photographs when illuminated by your flash. |
 |
| I decided the best exposure would come from a technique known as dragging the shutter. This involves calculating a flash exposure for foreground objects, then leaving the shutter open to bring up the ambient lighting in the cave, to an equal level to the flash illumination. (Remember that time multiplies light in your exposure.) If youre using a D30 camera with a 550EX like I am, you can also use a little trick of setting the lens to manual focus. This causes your ETTL flash to use an overall reflected light reading, instead of spot metering. With the cameras auto focus on, the flash will try to meter on your focusing spot inside the viewfinder. Most D30 users find this annoying when using an intelligent ETTL flash unit in a fast-paced environment. With manual focus however, it has no known focusing point, so it cant tell what you are wanting to meter from, so the camera just averages the whole scene. Neat huh? I relied on this trick to help make the exposures since I didnt happen to have my Luna-Pro light meter with me. I had to rely on the cameras metering system for these shots. The software in the D30 is actually very good at balancing flash output and ambient lighting; a technique youll find labeled fill flash in your cameras manual. I just didnt know how well it would handle the long exposures and DOF I needed for shooting in this environment. Thankfully it did very well. Each shot usually resulted in a full-power pop from the flash unit, followed by a shutter drag from 5 to 20 seconds. |
 |
| In some cases it was so dark that I couldnt see anything clearly enough to focus on it, so I had to estimate the distance, and use the distance scale on top of the lens, keeping in mind the DOF. I also found that the camera set in the P mode offered me quick flexibility by allowing me to lengthen or shorten the exposure to get the depth of field that I wanted at ISO100. After the camera evaluated the ambient light in partial metering mode, a quick spin of the dial allowed me to dial in the desired depth of field while viewing the calculated exposure time for the shot. Each exposure generally ranged from 4 seconds to 15 seconds each, depending on how close I was to the objects, and how much existing lighting I had to work with. I did have several shots that were 20 seconds long, but I tried to keep the time on each shot around 10-15 seconds so as not to introduce noise into the final shot. A CCD based camera will probably pick up noise with this long of exposure, but the CMOS sensor in the D30 handled it beautifully with no visible noise. I also used the timer function, which allowed the camera and tripod to stabilize from shaking before the exposure began. The result was some very sharp and spectacular photos. The different types of lights they use for illumination here range from florescent to incandescent, and these will show up fairly dramatically as different colored influences in your photographs. |
 |
|
Overall our journey took us over 3 hours to go through just the bottom section, and that doesnt count the climb down which added another hour. If you dont think that youll have enough time to travel the natural entrance and take pictures, you may just want to take the elevator down and get straight to shooting. For my wife and I, Carlsbad Caverns has been among the most interesting caves that we have ever been in. We definitely enjoyed them a great deal. The photos dont do justice to the shear magnitude of these caverns. Theyre simply gigantic! Be prepared to be awestruck; it is among natures most fascinating environments. The entire Carlsbad Caverns Gallery can be found here: http://www.kellydrown.com/NewMexico/Carlsbad2/index.htm |
|
|
| For Comments post in our News Group |