| Digital Outback Photo - Photography using Digital SLRs |
|
Decoding NEFby Daniel Stephens (last updated 12/09/2000) |
|
Introduction |
| What is NEF? |
| NEF is a file format produced by the Nikon D1 digital camera, it is the closest thing to 'raw' data which can be saved by the camera, and can be thought of as a "digital negative". Instead of containing a fully processed image like a TIFF or JPG file, NEF files store data far closer to the way it is sampled by the camera's image sensing CCD, and require post-processing to be made viewable. |
| At first glance it would seem that NEF files are added hassle, especially when turning them into viewable images requires additional software, most of which is commercial. The advantage of NEF files however is that they contain all 12 bits of brightness data from the CCD, and thus offer much more flexibility to compensate for lighting conditions, exposure, or other less common needs. Also, because they contain the raw data, if post-processing techniques improve, or new ones are developed, one can simply re-process the NEF files and obtain better images, rather than being forced to re-shoot everything. |
| Unfortunately, NEF files are a proprietary format, there is currently no published specification of how the data is stored, and how the image is processed into a final viewable form inside the camera or in Nikon's commercial software. |
| Why decode NEF? |
| I decided to take on the task of decoding NEF images myself for a few reasons. Primarily because I'm a Linux user, and all of the available NEF decoding software I could find required either a Mac or a Windows platform. Secondly, I wanted to better understand the workings of my camera and its capabilities, as well as the processes which go into modern imaging systems. Finally, I'm a great believer in free software, and I felt that I could give something to the community which might be useful to others. |
| Getting Started |
| What kind of file is that? |
| The first step in figuring out how to decode a NEF file was to work out how the file was arranged internally. All of my file processing tools were identifying NEF files as TIFF files, and a little bit of code and experimentation later I confirmed that a NEF file is infact essentially a TIFF file with a number of undocumented extensions pointing at the image data as well as the bundle of information about the picture (it's metadata) such as exposure, lens, etc.. |
| A little more poking around revealed enough to find a block of data that was large enough to be the image data itself, and there were exactly enough bytes of it to represent an area a little larger than the camera's full processed resolution with 12 bits of data for each pixel. In order to work out exactly how to rearrange the data I used a NEF file of something which had many distinctive shapes and colors in it: |
|
My test image: Crayons |
| Armed with this image, I tried a couple of basic data-shuffling methods until one of them resulted in something which I could recognize. The data only has one 12 bit sample per pixel, since a CCD is a brightness-only device, but the nature of the image is clear: |
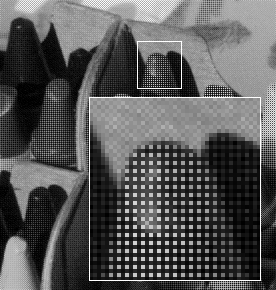
|
Basic image data |
| Notice how the image appears very 'gridded' - The inset shows a magnified section of this image, the magnified crayon appears to only appear brightly in every other row and column! This effect is evidence of the manner in which most color digital cameras use a single CCD to take a color picture. On top of the CCD's array of pixels is fixed a colored filter, which has millions of little colored cells each aligned with a single CCD pixel. In the D1 (and most similar devices) these filters are arranged in alternating rows, every other row with the filter colors (Red, Green, Red, Green, Red, ...), and the remaining rows as (Green, Blue, Green, Blue, Green, ...). Green appears twice as often because our eyes are most sensitive to differences in green for the detail in images [And because it's much easier to make an even grid with 4 patches than 3]. Applying a simple filter over the basic image shows the effect quite clearly: |
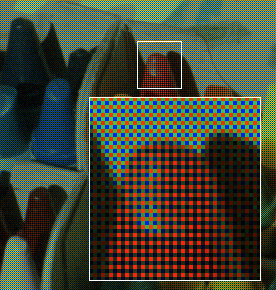 |
| Once the color filtering is applied it becomes immediately obvious why that pattern was visible, the crayon is red, and so only lights up those pixels which have red filters. The green and blue filters don't pass the red light through (But do pass the light of the slight reflection at the edge of the crayon's tip). Finally the actual color data received by the CCD is visible and the resulting image is recognizable for what it is! But, it still has a long way to go! |
| More to come... |