| Digital Outback Photo - Photography using Digital SLRs |
|
 |
|  |

|
 |
Photoshop Corner #005"The ultimate sharpening method"by Fred Miranda
|
|
What makes an image appear to be sharp? According to David Blatner, writer of Real World Adobe Photoshop 6, "The human visual system depends to a great degree on edges. Simply put, our eyes pass information into our brain, where every detail is quickly broken down into "edge" or "not edge." An image may have great contrast and color balance, but without good edge definition, we simply see it as less lifelike." As a photographer, I strive to produce images that replicate the moment that occurred during the time it was taken. My goal is to make my pictures as lifelike as possible, and therefore sharpness is always an essential element. A majority of photographers still use some sort of unsharp mask filter to increase the appearance of sharpness in their digital or scanned film images. Many of us know how Photoshop's unsharp mask (USM) works and how to get the best results from it. Although USM is a valuable tool in our digital darkroom, there are alternative tools available to us that not only provide better results, but are easier to use. You may already know how to use USM settings for portrait, landscape or high ISO pictures. But, have you ever wondered if there were a few steps you could follow or even a Photoshop action you could apply in order to sharpen your subject and keep irrelevant parts of the composition unsharpened? Well, there is. The answer is called EdgeSharpen. EdgeSharpen is a technique that I use as a part of my daily workflow. It sharpens your images without sharpening noise and/or artifacts. This action is very effective with high ISO shots, or with cameras that produce noticeably noisy images. There is even a version that works in 16-bit mode, for those who have high end digital SLR cameras. Here is how it works. Instead of globally sharpening your image, this technique sharpens the edges of the main subject without increasing image noise and therefore avoids getting that terrible "digital look". Some people who have used this technique report that their images look more natural as if the sharpness is a consequence of the use of a high quality lens. I offer two methods of EdgeSharpen on my Actions and Profiles page. You can download them from here. One is called EdgeSharpen 16-bit, and as the name describes it works with 16-bit mode files. The other one is EdgeSharpen 8-bit with anti-halo. A few weeks ago I received a tip from a friend called, Jes. He brought to my attention that it is possible to remove some of the unpleasant halo effect that occurs when sharpening. The halo is what appears as a light/dark ring around the areas with the most contrast. To a certain extent, this halo is somewhat necessary in order to visualize the image as being sharp. However, a problem occurs when there is too much of the halo apparent at 100% magnification. To solve this, you need to make the halo a fixed size around the edges of your subject. It is difficult, but not impossible to do. My technique sharpens only what needs to be sharpened and also removes any exaggerated halo created during the process. This action will convert your 16-bit file to 8-bit if necessary and provides a more natural result because of the anti-halo steps. |
| Here are the basic steps of EdgeSharpen 8-bit: |
|
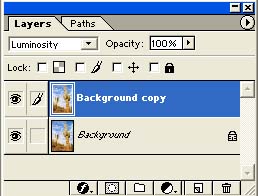
1) Convert your image from 16-bit to 8-bit (if necessary) 2) Duplicate the image 3) Set the duplicated image mode to "Luminosity" |
 |
|
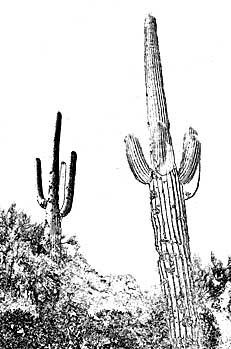
4) While in the duplicate layer, Select all (control-A) and copy (control-C) 5) Locate the Channel's palette and create a new channel. Then Paste the selection there (control-V) 6) From filters/stylize, click on find edges. |
 |
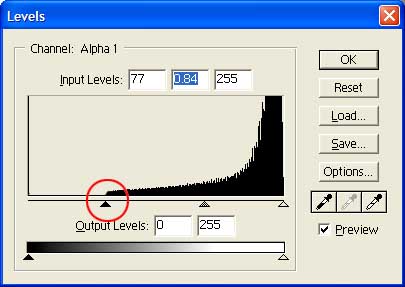
| 7) Now we can do some "Levels" tweaking. Use the outer and middle sliders for fine-tuning what you want sharpened in your image. Black areas represent parts of the image we want sharpened and white areas what we want left alone. |
|
Black areas = 100% Full sharpness applied |
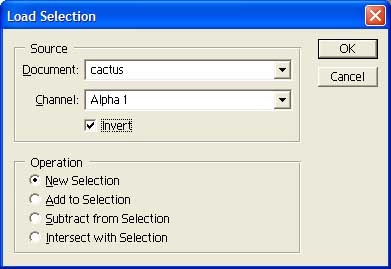
| 8) Now click on Selection/ Load Selection and choose Channel: Alpha 1 and check on Invert |
 |
|
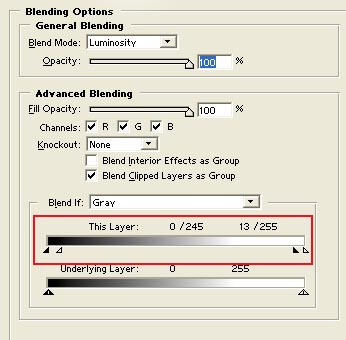
9) Now we can apply the unsharp mask, which will only affect the selection you just created. First apply: Radius: 0.2, Amount 500, threshold: 0 10) Then apply a second Unsharp mask with the following settings: Amount: 280, radius: 0,8 and threshold: 0 11) Now right-click on the duplicated layer and choose "blending options". At the bottom, on "Blend if:" Choose the default gray and move the sliders on "This layer" until it looks like the image below: |
 |
| 12) You are finished. Now just go to Select/Deselect or press control-D |
|
After applying this action, only the desired sharpened edges in your image are benefited by the series of Photoshop's USM. However, if you want additional intensity you can repeatedly apply the action depending on how much of the effect you require for your image. To apply the same method in your 16-bit mode images, create the selection following steps from 1 to 8 above on an 8-bit duplicate of your 16 bit image. Once you get the selection, you need to transfer it to the 16-bit mode image and then apply the sharpening steps there. If you prefer, you may download the 16 bit version of this action here. Photographers put tremendous effort into getting sharper pictures. We are always in search of that perfect piece of glass that will produce keener images with high contrast and resolution. This technique complements that goal. Hand in hand, only the right photographer, the right lens, and the right settings can produce a work of art. And, just in case your photo is a little ruff around the edges, now there's the EdgeSharpen to help you get closer to your goal. |
| We all know that all "ultimate" things get improved and we run out of words so also this time. Fred continued to work on the ES sharpening and the results are just amazing. You can download the "ultimate" :-) free action here. |
| Here is a news group for discussing the Outback Photo Essays. |
|
|
| For Comments post in our News Group |