| Digital Outback Photo - Photography using Digital SLRs |
|
 |
|  |

|
 |
|
Lightjet Printing at Calypso Color Experience report by Uwe Steinmueller (02/24/2001)
|
| To really experience the beauty of a digital photo it has to be printed. Inkjet printers reach today a level of quality which was not even thought to be possible about ten years ago. But still classic prints on photographic paper can make a digital photo just look like a "real" photo. While Inkjets create colors through dithering photographic paper show continuos tone. |
| Through an article by Galen Rowell "The worlds best Prints" I got the first time aware of the Lightjet printing and a lab Calypso in Santa Clara which was referenced in Galen's writing. It was interesting that this was a printing process which starts from digital files (mostly from scanned slides). |
| First I used Calypso as a fist class lab to process our E-6 slides. At my visits I could see all these wonderful prints in Calypso's lobby. Among them prints from Frans Lanting and Charles Cramer. Also later I enjoyed the gallery of Galen Rowell where most prints on display were Lightjets. So I was very certain that not the Lightjet printing process would be the limitation but it might be our own D1 photos. |
| Calypso has different pricing whether you they have to scan, color manage and resize the photo or the customer delivers a "ready for print" file (Calypso has the guidelines and profile necessary online here). I always prefer to have as much control myself especially if it also saves money. So only the second option could be our choice and is highly recommended. |
| We made 3 test prints in 16x20" (matte, glossy is more critical to cracks or finger prints). The results were very impressive. If you have your monitor correctly calibrated the colors are just what you expected. |
|
Here is what we did to deliver the ready files to Calypso (can be also found in their clear guidelines):
|
|
Nikon D1, 20mm MF, NEF raw format We had printed this photo also before in 20x30" and the result was pretty good for a digital camera like the D1. To get better results from film you would need the very best drum scanners. Photos from Frans Lanting and Galen Rowell I mentioned had probably a better quality. They were created on the best scanners available by excellent operators. |
|
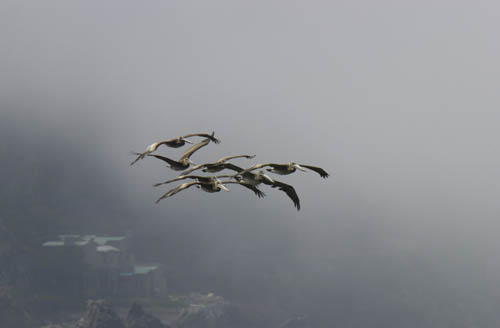
D1, Nikon AF-S 80-200 + TC-20E @ ISO 400 handheld, NEF raw format To reproduce this smooth grey transition of the fog is very difficult for any printer. The Lightjet with it's continuos tone did a wonderful job. |
|
D1, 50mm f/1.4, tripod, , NEF raw format This photo came out very natural and gave the impression of much more details than it really holds. The Nikon 50mm f/1.4 is also a very good lens and get the most out of the D1. |
| The following photo was printed in 20x30". We were more that surprised that this could be done from a D1 photo. I showed this print to quite some people and it seems a lot were impressed. We are! |
|
D1, 28-105mm f/3.5-4.5, handheld, NEF raw format This photo was more limited by the consumer grade lens than by the D1 capabilities. Today we would use the AF-S 28-70mm f/2.8 and the result would be even better in contrast, saturation and sharpness. But that aside we love this print as it is. |
| Final observations |
|
| Needless to say that printing at Calypso on the Lightjet is highly recommended. |
| For Comments post in our News Group |