| Digital Outback Photo - Photography using Digital SLRs |
|
 |
|  |

|
 |
"The local Safari" |
|
I shoot portraiture by trade, but when I'm not working, I enjoy photographing local wildlife in my backyard. It was Saturday and my two kids suggested we do something on such a nice sunny day. I hadn't been to the zoo in over a decade, so I thought this would be fun. The problem was, so did several thousand other people... so shooting pictures would be a bit of a trick while being herded with the masses. I slung my D30 with 80-200 2.8L lens over my shoulder and started to proceed through the gauntlet, much like mice exploring a maze. I did manage to get a few frames of the zoo animals during our trek. The following are a few of my favorites, along with some tips and tricks to shooting during your own local safari. The first suggestion for shooting at the zoo is to go during a time when it's not so busy. This will allow you to bring a tripod and take your time. During our visit, I shot hand held only. It's also a good idea to go in the spring or fall when it is cooler outside. You will find the animals to be much more active during the cooler weather. If you can find out, it's also more exciting to go during feeding time. Call your local zoo to find out these times. |
 |
| Many of the animals are large, slow and are easy to photograph because there are no obstructions between you and your subjects. Simply position yourself in a good place and wait for the shot. As a portrait photographer I'm trained to look for good portrait light. These same techniques are used when photographing portraits of animals. "Good light" will make a much more interesting image. Also - GET CLOSE, the difference between a good zoo portrait and a home snapshot is often the amount of empty space around your subjects. At the zoo we see the animals from a distance. So photograph them with a good telephoto lens to get your subjects closer than you would like them in real life! |
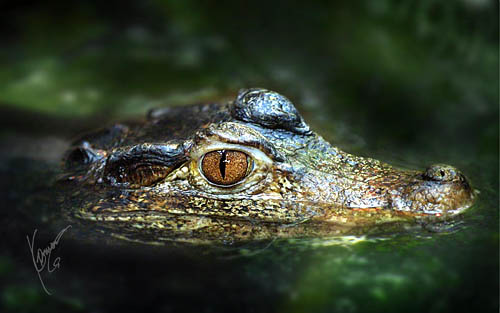 |
| In some instances, the light will NOT be very desirable. This crock was photographed in one of the zoo's tropic houses. These areas are always dark, and in this case the subject was lit with a couple of florescent light bulbs. Using your digital cameras white balance settings will help neutralize the color casts from florescent lighting. In addition, I used Photoshop to change the specular highlights in the subjects eye from a 'tube shaped bulb' reflection, to one that looks more natural in nature. I make the highlights in the eyes look more as if the light was coming trough tree branches. This was much more desirable than having the long straight lines that were originally captured in the photograph. |
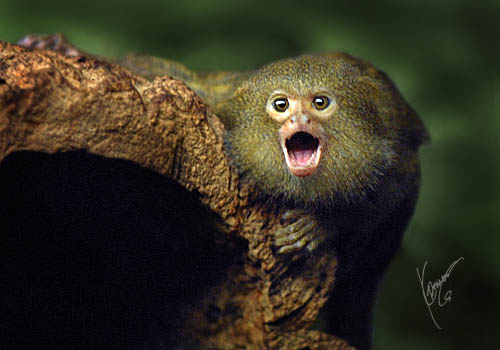 |
| Other problems in these animal houses is low light levels. A tripod can be of value here, but in this case I traveled light. To help avoid camera shake, I braced myself against walls or in some cases... I put my lens tight up against the Plexiglas that was separating me from my subjects. Being against the plastic will help eliminate camera movement. However at 1/15th or slower, some camera or subject movement is inevitable. This particular subject didn't like seeing himself in the reflection in my lens. To him is was another monkey in his territory. Knowing this can attract the subject closer to you and can make for some exciting reactions and expressions from your subjects. |
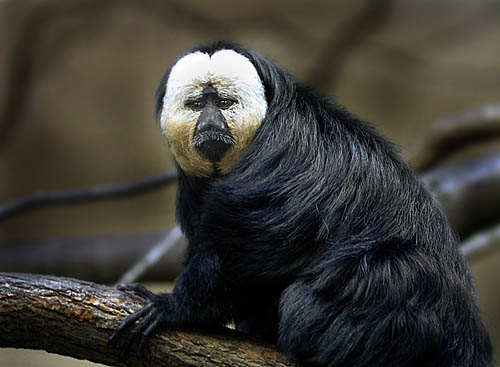 |
| This subject was very upset at seeing himself in my lens and only appeared briefly as he ran by.... then hid. What is a plus to attract one animal, can send others into the shadows. I only had a couple seconds to record this subject which was moving very rapidly. Again the subject is behind plastic. One of the biggest problems with shooting subjects behind a transparent wall of some type is that you will get reflections from lights behind you in the plastic or glass. Look before you shoot and if you see light or glare in the glass, then move your position to the left, right, up or down to eliminate it. Another problem can be children's smears on the partition, look for areas on the glass or plastic that is fairly clean and free from hand and face prints. |
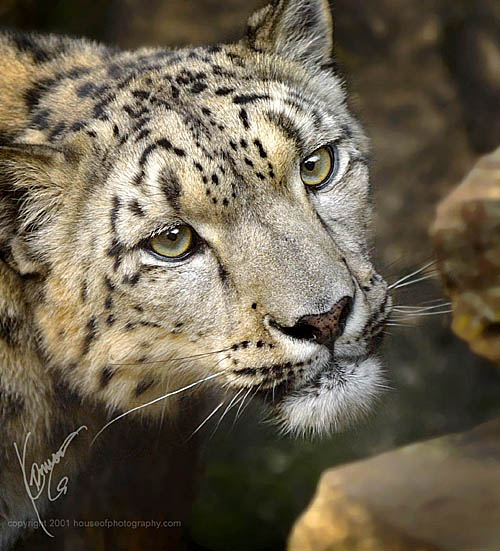 |
| The most difficult thing to over come at the zoo is often the bars or wires of the cage. To eliminate these lines, select the widest f-stop of your lens. In this case I selected f-2.8 and zoomed in fully to decrease the depth of field. (range of focus). This allowed me to force the wire cage 'out of focus' so far that the thin wires disappear! While framing the shot, I can see the cage out of focus slightly in the shot. So I move my position slightly left, right, up or down to get centered better through one of the cage openings. If you have a out of focus cage bar or wire over the subjects eye or finely detailed area... you can loose detail and get a fuzzy area. So get close to the cage (as close as allowed by the zoo) and throw that cage out of focus. I found this snow leopard having a friendly spat with his cage mate. I watched them for about 2-3 minutes until he snuck up on his mate, and was about ready to pounce! Just before he did, I got the image with his intense 'stare of pending attack'. These expressions are much more exciting than those from sleeping or resting subjects. |
 |
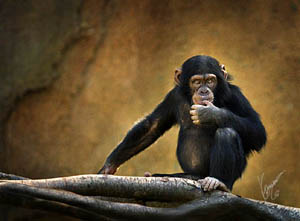
| We happened to stumble into the chimp area just before feeding time. There were so many people I couldn't get a shot where the chimps were hanging out. As we were about to leave the area, the whole troop started moving out into the yard and got really active. The zoo keep said, 4pm is feeding time. Which allowed me to get a shot of this little chip, awaiting his dinner. |
 |
|
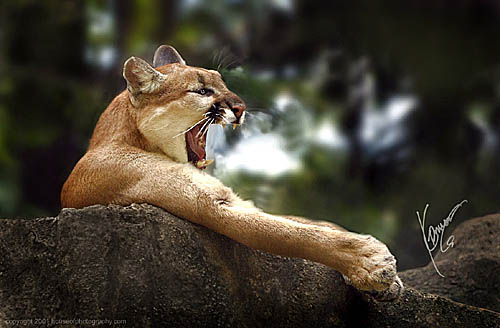
This particular subject was the hardest of all. Not only did I have cage wires in front of me, separating me from my subject. But the puma also had cage wires behind him that could not be forced out of focus in the camera. The subject was resting, but as I watched him he reached out and yawned. Allowing me to get a shot that looks almost like an attack. The subject looks like he's swatting something with his claw as he gives a warning growl! Really, he's as relaxed as can be. But you're image can tell your own story! The shot was good enough to warrant some extra work. So I removed the cage wires in the background by forcing them out of focus in Photoshop. I selected the background area and used the blur filter to knock it out of focus just enough to make the cage wires vanish. I hope you enjoyed our Local Safari! - I got many nice pictures during the course of about 90 minutes walking the zoo with wife and kids. With a little knowledge and patience you can get similar results at your own zoo. Please keep in mind that when reducing images for website viewing that their quality and detail is severely degraded. If you'd like to see some of these in a larger more detailed version. View one of my online storage sites here. Click on the photo to enlarge once, then click it again to enlarge it even more. Ron Kramer (www.houseofphotography.com) |
|
|
| For Comments post in our News Group |