| Digital Outback Photo - Photography using Digital SLRs |
|
 |
|  |

|
 |
Photoshop Corner #015"Sharpening, a necessary evil of digital work" |
||||||
|
I have been involved with photography now over 25 years, and have worked closely with digital photography the last 2 ½. In the past, my photography work was with slides and prints. I worked in my own darkroom for at least 10 years, moving from black and white to the Cibachrome process. After many years of working with Cibachrome, I lost interest in working with color due to the conditions of the medium. This was mainly due to issues such as working in total darkness and so little time to make corrections. When the digital revolution started, I paid little attention. I worked with early versions of Photoshop, but still didn't like the quality of what scanners from 5 years ago could do. With the advent of the 2.1 mp imager, I got back into photography full swing and have never looked back. My work is mainly outdoor scenic, which involves anything from landscapes to macro work. One of my favorite mediums to work with is water. As I read the various forums, I often see the same questions on sharpening posted over and over again as a new person to the digital world discovers that a digital camera and its output many times is not always truly sharp. Here are a few reasons for this:
In writing this article, I used only raw images from a Nikon D1x. The base output of the D1x is 5.74mp or 3002 x 1980 resolution at 300dpi. For all of my printing, I use an Epson 1280 inkjet. I print on letter, A3 or Super A3 paper. My final image sizes will be 8.5" x 10.5"(for letter) 11" x 16.5"(A3) and 12" x 18"(Super A3). I convert my raw files with Bibble, Qimage or Nikon Capture 2. In each of these tools I convert the raw file to a tif and then move to Photoshop to do my final image work and printing. During the conversion process from raw to tiff, I will incorporate some sharpening. My goal in sharpening during the raw conversion is to get the image to a state that fixes the softening created by the in-camera filter. D1x raw files are quite soft, whereas Kodak 760 files are considerably sharper as you have the option to only use the I/R filter. For the sharpening during the raw conversion process, I use what I call "base settings" dependent on the conversion software. I have listed these below by program.
Please use these as a starting point as your preferences may vary. I am a windows user so all my Photoshop experience comes from the aspect of this OS. All of these conversion software tools I have listed will work with windows. From these tools, I will now have either a 6mp (3002 x 1980 from Capture 2) or 10mp 4530 x 2460 from Bibble or Qimage). The 6mp image is 6.5" x 10.1" at 300 dpi and the 10mp image is 8.5" x 13.1" at 300 dpi. With either of these outputs, I will now have to interpolate up or down to get to the final print size. As I feel interpolation requires a separate article by itself, I am going to focus on two of the sharpening techniques I would now use on a print with a final output size of 10.5" x 16.5" for A3. Since my work often times has large amounts of sky, water or other solid masses that don't need sharpening, I prefer to use tools that allow for selective sharpening. If the tool doesn't offer a selective version, I will then incorporate a mask in Photoshop to protect the areas I don't want sharpened. I currently use only Photoshop 6.0 for this process. I prefer to resize and do all my color work first then sharpen the image as a last step. For this article, I will be using the following sharpening tools:
|
||||||
| EdgeSharpenPro16bit. | ||||||
|
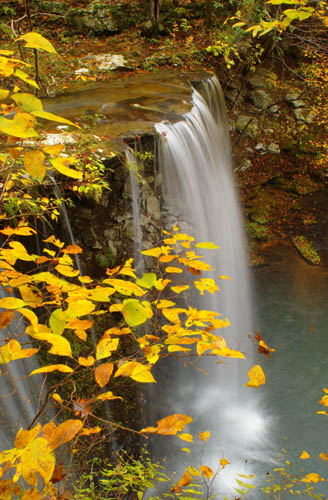
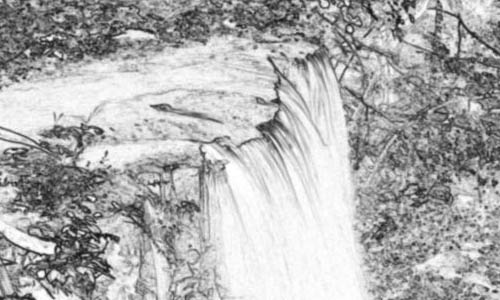
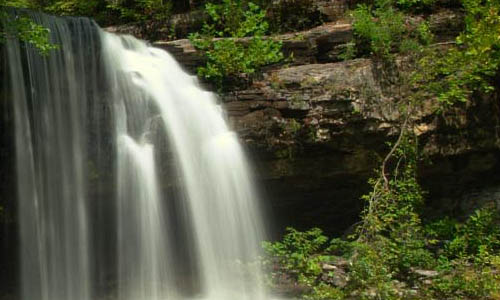
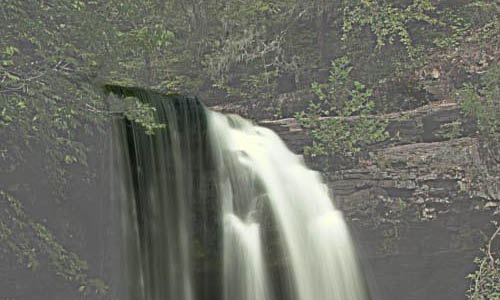
I believe that this is one of the best overall tools on the market and a great price performer. This action uses Photoshop's USM tool, but it is designed to pick out the edges of elements in the image. Because of this your sky or water etc. will not be picked up and sharpened. You generally don't want to sharpen those parts of an image since the resulting sharpening will always increase noise. Native Photoshop USM is a 100% tool that sharpens everything in an image the same amount, so Fred's tool is a great asset. The image shown below a good example of why I use selective sharpening. I have a large amount of water that I don't want to sharpen; however within the same space, I have small leaves and details that I would like to sharpen. I would also like to sharpen the background detail and not the large pool of water at the bottom. The use of standard Photoshop USM in this case would be a disaster since all the water would be sharpened and you would see a marked increase in noise in both the waterfall and pool below. I blurred the waterfall intentionally, so I don't' want to have it sharpened. Noise can ruin an otherwise beautiful image. From my printing experience I feel that noise tends to look worse when printed on an inkjet, than when viewed on screen. To start working with Edge Sharpen Pro, open the image you wish to sharpen from the main Photoshop screen then select your actions palette. When you are ready to run the action, you should see these actions. |
||||||
 |
||||||
|
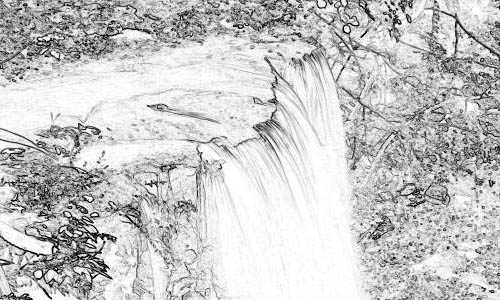
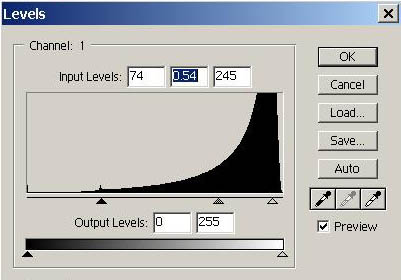
EdgeSharpenPro 16 bit (Esp16) has several options. On the actions palette, you will see that I have selected the 3rd option, high tweak (advanced). This allows me to change the pre-set conditions that Fred Miranda wrote into the action. Make sure you have the red box showing just to the left of the name of the action or the steps will run without allowing any user intervention. The other settings within the action will allow for even more strength in the USM under the auto stronger selection and a selection for sharpening web images. Once you have selected which option you want, go down to the play button and click on it. Once you hit play, the action will start and you will see several steps run automatically then you will have an image that is now in black and white showing on your screen. |
||||||
  |
||||||
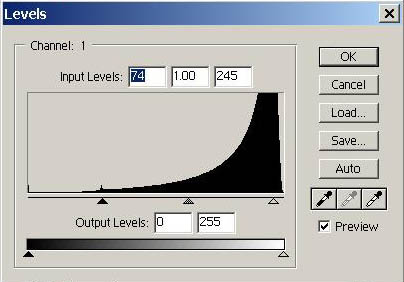
| From this screen Esp16 has gone out and found your edges, and they are shown in the darker areas, the lighter areas show parts of the image that will not be sharpened in this action. By moving the sliders, you can either darken (increase amount of edge selection) or lighten (decrease the amount of edge selection). For this image I chose to move the middle slider to .54. as shown below. You can see that the image has darkened considerably. | ||||||
  |
||||||
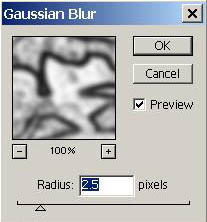
| By hitting OK on the image, the action will continue to run and now you will see the Gaussian Blur screen. This defaults to 2.5 but you can adjust it up or down. The Gaussian blur is being used to reduce haloing and artifacting. Haloing creates a slight white edge around the part of the image being sharpened. | ||||||
  |
||||||
|
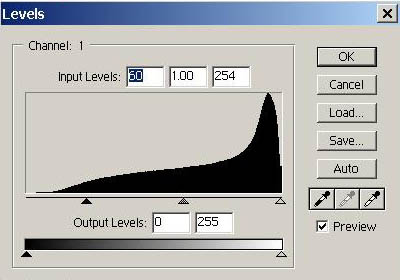
Again select OK, and you will get one more levels command
where you can tweak the lightness and darkness again. This step will allow
you to correct if something changed during the Gaussian blur, however
most often I will leave it alone.
|
||||||
 |
||||||
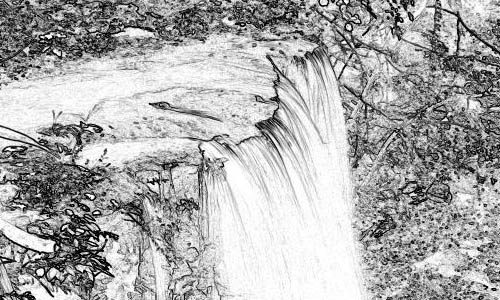
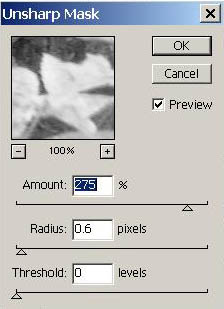
| The last step will be the actual USM screen. On this screen you can make the normal adjustments to the Photoshop USM tool i.e. percentage amount, radius and threshold. Esp 16 defaults to a percentage of 275 and I tend to back this off to around 175 to 205 for my work. You can now see the actual areas that will be sharpened outlined in broken white lines. For my use this is the real key of the entire action, as now only the areas of detail are being sharpened. You will also note that the image is now in Lab Color mode and the action is only sharpening on the lightness (luminance) channel in Lab mode. This helps to keep your saturation and color consistent. | ||||||
 |
||||||
| The process is now complete, and your image is sharpened. | ||||||
| High Pass Filter Process | ||||||
|
This technique is very unique, in that you utilize two Photoshop filters. These are the High Pass Filter and then the USM filter. I use this process in conjunction with Photoshop layers, as often times I don't want to have the entire image affected by this method. However depending on the image, I sometimes, will just use this method on the entire image. For this example I am going to show how to use this method with layers. To start with, I will take the image I want to work with and determine which areas I want to sharpen. |
||||||
  |
||||||
| In this image, you see definite areas that don't require sharpening. These would be the waterfalls, the darker areas between the falls and the pool below the falls. The areas of green I would like to sharpen. So my first step is to mask in Photoshop using the quick mask tool. Unfortunately since Photoshop 6.0 will not allow layering in 16-bit color, I had to convert this image to 8-bit. | ||||||
 |
||||||
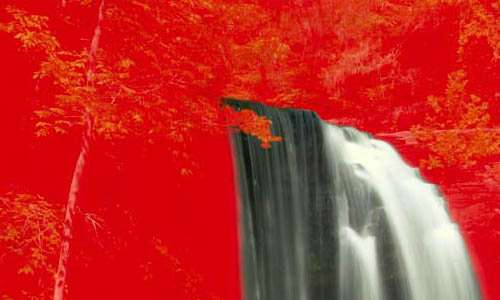
| Now you can see by the areas shown in red, where I want to apply the Highpass filter. When using the quick mask tool make sure you tell the tool the color represents areas you want to select. From this point you want to convert the image from quick mask mode to selection mode. The red will convert to an outline. For the next step, go back to the main selection bar of Photoshop, select layer, new, and layer via copy. You will now have two layers in the layers palette and the image will look like this. | ||||||
 |
||||||
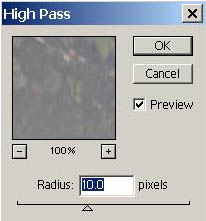
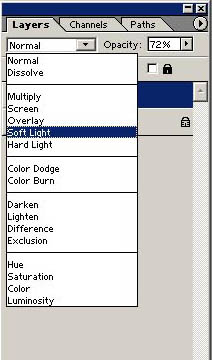
| Making sure the new layer is selected in the layers palette, now go to the main selection bar, select filter, other, and high pass. High pass will come up on the screen with a radius of 10 I leave this as the setting. You will also see that the areas that you masked and selected for the high pass filter now have a gray color to them. While still on the layers palette, make sure the new layer is selected and go to the light selection box. This will show a default of normal however for this process you will click on the down arrow and select soft light. You are now finished with the High Pass filter. | ||||||
  |
||||||
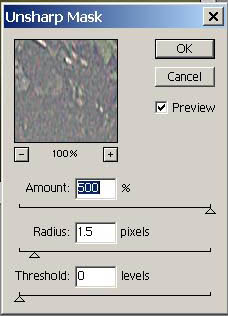
| While still selecting the layer where you used the high pass filter, now select the Photoshop USM filter. When it comes up, select the following, an amount of 500%, radius of 1.5 and threshold of 0 or 1. Your image will now most likely seem way over sharpened, but don't worry, now comes the neat part. | ||||||
 |
||||||
|
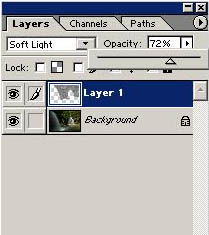
While still in the layer, now go to the opacity setting,
it will be set to a default of 100%. Click the arrow and now adjust down
your opacity to around 60 to 70%. This is a starting point, your needs
may vary; however as your move the opacity slider, down you decrease the
amount of sharpening. I would recommend saving the image as a psd extension
so you could modify these settings later. If you flatten it, you will
no longer be able to adjust anything. This is an involved method, however
you will get very even sharpening on the areas that you masked. Again
remember if you want to process the entire image follow the same steps,
without the mask.
|
||||||
  |
||||||
| Conclusions | ||||||
|
Fred's Esp 16 Pro is a great tool however I feel that it might sometimes have limitations. Examples of this are when you are attempting to sharpen an image that has large areas of smooth or slight details. An image where you have many large rocks, which are composed of smooth material like sandstone might have a tough time with this tool. The tool will only find the main edges of the rock and more than likely not see the small details on the rocks. I have also found that Esp 16 sometimes has trouble picking up small leaf details if the image is basically all of one tone or contrast. This problem is more pronounced on images where I have taken a scenic shot, with a wide-angle lens with my D1x. The trees in the distance will often times be seen as one mass by Esp 16 as the edges are harder to pick out. This is a minor point to me, and if you spend more time with the various settings within Esp 16 you might find a way to get around it. The real beauty of Esp 16 is that it will leave areas of sky, water, and shadow alone. These areas in an image really don't need sharpening, as you will invariably increase the noise level. Most other sharpening tools, without the aid of a mask, will sharpen everything on an image the same. What this brings about is what I consider a vicious circle, you sharpen, then reduce noise, then sharpen etc. Each time you reduce noise, you also will reduce image detail. The highpass filter also has its limits. More than anything, it will take a lot of time, if you include the mask preparation. It offers the ability to let the user have a lot of control within the sharpening process since you are using layers. With Photoshop 6.0 this does mean you will have to be in 8-bit mode, since PS 6.0 does not support layering in 16-bit color. I still like to sharpen everything I work on with Esp 16 as a first pass. I might not keep this sharpening in the long run, after I have compared the results with some other methods. |
||||||
| I welcome any questions at the following email address pcaldwe@aristotle.net | ||||||
| For Comments post in our News Group |