Photoshop Corner #018
"Stitching
in Photoshop"
by
Dr. William Wolberg
|
| |
| Why I developed this Action |
| |
| In the field, I usually carry only my 70-180 mm
f4.5-5.6 micro lens that allows me to take micros of flowers, bugs etc.
and moderate tele pictures. Wider-angle shots are not possible.
However, to solve this problem, I take two vertical pictures with about
a 10% overlap and then use the described technique to stitch the images.
Additionally, the resolution is greatly improved by doubling the pixel
content. Essentially my 70 mm is converted to a 35 mm lens and the
2:3 35 mm camera format is converted to a 4:5 format. |
| |
| What the Action does |
| |
| I don't use any of the available panorama editors because
they create a blur at the seam. Rather, I use Photoshop and proceed as
follows. Make a new, blank file at the same resolution as the two pictures
to be stitched, but make it wider e.g. 4000 x5000 pixels at 300
pixels/inch in the case of the Nikon D100. Then, make 50% opaque layers
of both pictures and move them to the new background file. Precisely
align the two and then use the rectangular marquee tool to draw down along
the middle of the overlap. From this point on, the provided Action
takes over, saves the selection and makes a new layer from the selected
area, loads and inverses the selection, makes another new layer from that
selection, and flattens the image. The operator then manually crops
the final image to remove excess background. |
| |
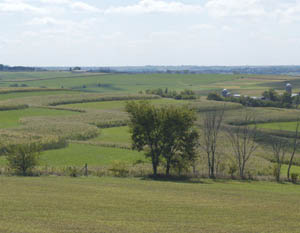
| Example |
| |
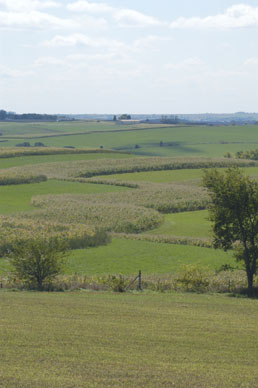  |
| |
|
| |
| Using the Action with other lenses |
| |
| With wider angle lenses, some
seam editing is necessary particularly with near-far shots. Never the
less, even landscapes at taken with a 24mm lens tune out very well.
One of the reasons that this method works so well for me is that I use
the method mainly with my 70-180mm lens. That lens has its own mount
and the optical axis does not change when the camera is panned while in
the vertical position. Optical axis considerations come into
play in situations where the lens' optical axis shifts when panning. |
| |
| Instructions for using the Stitching
Action |
| |
- Load the action into your folder Photoshop/Presets/Photoshop Actions.
- Before you start the action, make a new, blank file at the same
resolution as the 2 pictures to be stitched. Make it somewhat
larger e.g. 4000 x5000 pixels at 300DPI.
- Then, make Layers>Duplicate and label them RBackground copy for
the right and LBackground copy for the left image.
- Make each layer 50% opaque and move each of them to the newly created
background file. Move the layers into precise alignment.
- Then use the rectangular marquee tool to draw down along the middle
of the overlap.
- Change the opacity of each of the Background copy layers back to
100%.
- Make the right layer active and start the action.
|
| |
| Action for download
(ZIP) |
| |
| |


