Image 1 – Experiments with Mixed Visible
and UV Light
Digital Camera Experiments (Intro to the series)
I love digital photography – I
started shooting a digital camera back in the days when ½ megapixel
was standard; and the resulting images looked fuzzy even on a
computer screen. But
even these early digital cameras changed the way I was able to
shoot in the field and easily process the results in the digital
darkroom, giving me many new options for creating images; and
the current technology now allows me to create excellent images
while
retaining these options. The advantages of digital photography
go well beyond the current debates of resolution into the realms
of experimentation and creativity.
This article is the first in a new series of articles on many
of the ways that I have learned to work differently when using
a digital
camera and a digital darkroom. Many of the topics will focus
on experimentation with a digital camera and shooting digital
multiple
exposures, but I will leave myself the option to discuss some
other random topics that relate to the changing world of photography.
I’d like these articles to have two major objectives. First,
these articles should challenge the way you think about shooting
images in the field, I’d like to imagine new possibilities
and try to create new ideas for images. Frankly, I think that realism
in photography is a bit overrated and over emphasized, but some
of my experiments may improve the apparent realism of photography;
today’s article on shooting moving water is one example.
And secondly, I’d like these articles to provide some ideas
for getting out and shooting images; the most important step
to creating good photography is shooting, shooting, and more
shooting.
I strongly suggest that the best photographers in the world have
all shot the most bad images; thousands upon thousands of bad
images intersperse with some wonderful gems. So hopefully these
articles
will be an incentive to shoot.
So one of the first major advantages of digital cameras is “Experimentation”.
I’ve
heard a number of photographers claim disdain for the preview
screen on the back of most digital cameras. This
screen provides a low resolution view of the image captured by
the digital camera and often it also provides a histogram of
the image as well. I think the disdain comes partly from the
view that ‘good’ photographers can get the exact
exposure correctly without using such a tool, or that the preview
is so small and imprecise. In my articles, I’d like to
show some example of how I use the preview screen and histogram
to create some image that would otherwise have been much more
difficult using film.
I can think of lots of example of experimentation that I was
taught in my photography classes; shooting long exposures, panning,
shooting while focusing, or shooting while zooming. After one
class on experimentation, I ran out and shot a couple rolls trying
every possible combination of experiments. The results were interesting,
but all of the slides ended up in the circular file. These experiments
were good ideas, but no amount of bracketing could help me figure
out the perfect technique as I was shooting these frames. But
now, with a digital camera, I can get almost instant feedback
to fine tune my image on-site. I can now create some interesting
image while experimenting in the field, and its fun.
And another major advantage of digital cameras is the ability
to quickly and easily shoot multiple exposures, bring these into
the digital darkroom, and combine these into a final compelling
image which better fits the vision of the photographer. A simple
example for this is shooting panoramas – making a series
of slightly overlapping images that can be pasted together to
create one larger final image. There are a whole range of additional
possibilities for making multiple exposures by making minor adjustments
to the different images as you shoot each. I write articles that
list some examples of these combinations.
Making multiple exposures in the field allows you to capture
a wider range of information than might be possible with a single
exposure; plus these multiple exposures can be combined together
relatively easily since the basic components of light in the
scene are relatively unchanged. In general, you change just one
aspect of the image; time, focus, exposure, etc; and leave all
the other elements unaltered. This first article will cover combining
two images shot at different shutter speeds to create a realistic
image of moving water.

Image 2 – Blending Images of Moving Water
Digital Camera
Experiments:#001 Multiple Exposures for Moving Water
Moving water
is magical – the never ceasing flow of a water
fall, the never quite still surface of a lake, the never quite
identical pattern of waves – these motions mesmerize me
and continue to draw me back to photographing water. Yet, what
are the best options for representing moving water on a static
image.
The basic ‘rule’ for photographing water suggests
photographing moving water at fairly long to very long exposures
(¼ sec to 10 sec) to produce a silky smooth blanket of
moving water. I have also made many images of moving water with
very short exposures (1/250th sec or shorter) – these freeze
the action of water to look like acrylic sculptures, but maintain
the tension of motion. Ironically, the exposures of moving water
that I have liked the least are near the ‘presumptive’ speed
of the human eye; around 1/30th sec – these often just
look blurry.
Over the last few years, I have used digital techniques to create
multiple exposures of moving water that can be combined together
to create a new look for moving water.
In its simplest form, I merely make one exposure at around 1/250th
of a second (this requires a fast lens and good light), and make
a second exposure at around 1 second or longer (this requires
a small aperture, a neutral density filter, and a tripod). I
always take both these images on a tripod so that they are sharp
and very easy to register over the top of one another. I then
overlay these images in Photoshop and experiment with various
blending options for combining the sharp and blurry images together.
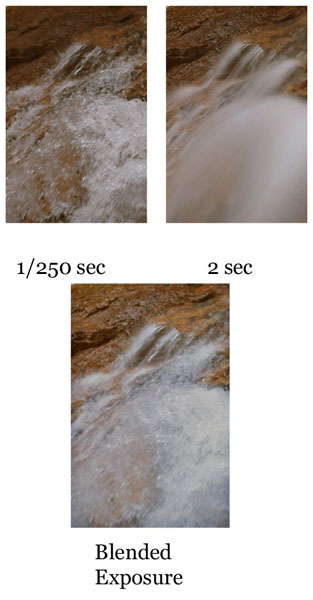
Image 3 – Example of Blending Two Shutter Speeds
Blending is easy, move the two image over the top of one another
(just copy one image over the other using the Duplicate Layer
command, but duplicate it to the second image – if the
two images were shot on a tripod, they will be in exact registration
over one another). Then change the opacity of the upper layer.
Or you can change its blending mode – I have had good luck
using the ‘Overlay’ blending mode, since it will
mask where the upper layer is grey, but show details where it
is bright or dark. It’s that simple – yet the results
create yet another interesting options for photographing moving
water – in fact, the combination of long and short exposures
produces one of the most realistic and still pleasing images
of water. I have also experimented with locally blending in sharp
water detail (from the 250/th sec exposure) by masking out part
of the sharp image – and have mixed sharp and long exposures
using flash.
Experiment and you might be surprise with the results.
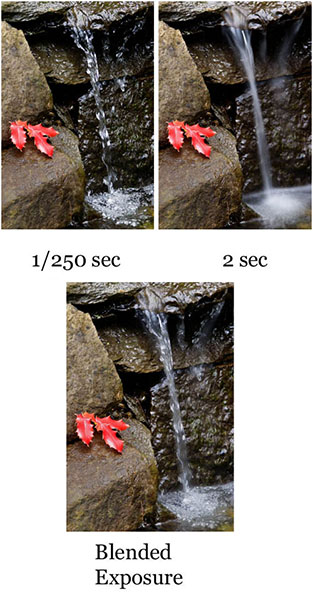
Image 4 – Example of Mixing Two Shutter Speeds
|


