| |
|
| |
Digital Outback Photo Contest #011
Contest January 2004: Sharpening Contest #2
|
| |
|
| |
Limited to 8 entries (8 entered,
terminated) |
| |
|
| |
See also our other
contests |
| |
|
| |
A Note on Copyright:
This image can only(!) used in the context of this contest and the only
site that has the right to publish images is Digital Outback Photo. If
you want to use this image for any other purposes (e.g. marketing) you
can acquire a license from us. |
| |
|
| |
|
| |
There are no prizes for this contest as the evaluation
of the results can be too subjective. |
| |
|
| |
To share experience it is not enough
just to show the results. We need precise step-by-step descriptions
of all image editing operations that had been performed. That is why
we need to limit the used tools to the ones that are available at Digital
Outback Photo (and they have to be available for PC or Mac):
- Photoshop (this is the standard image editor we use)
- Commercial and non commercial sharpening actions and plugins
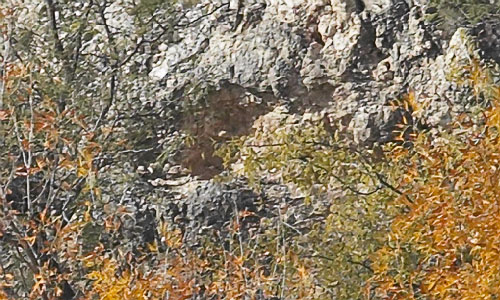
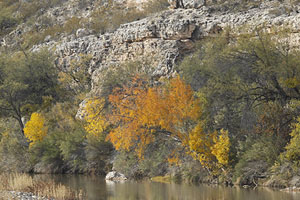
Photo was taken with the Canon 1Ds.

Fall at Montezuma Castle, AZ
(full image)

500 pixel wide crop (created with C1, not sharpened)
Rules:
- It is Your task to sharpen the crop shown above
- You load the cropped image (JPG, copyright Bettina & Uwe Steinmueller)
from here (about 180KB)
- Use any sharpening technique you like
- Describe the process step by step
- Send only the instructions and the final sharpened image crop (JPG
8 in Photoshop) and your full name to:
contest@outbackphoto.com
- Do not change any colors
- The final image has to be in Adobe RGB and RGB color mode (without
any layers)
|
| |
|
| |
|
| |
|
| |
|
| |
|
| |
|
| |
Note: As all photos should be in the Adobe RGB color
space it is recommended to download interesting samples and view them
in Photoshop on a profiled monitor and at larger magnification. |
| |
|
| |
|
| |
Sample Entry (by Uwe Steinmueller) |
| |
|
| |

Because we do not participate our experimental sharpening
method stays undisclosed.
|
| |
|
| |
|
| |
|
| |
|
| |
|
| |
Results |
| |
|
| |
#01 Gary Yelland |
| |
|
| |
|
| |
|
| |
- Convert to LAB
- Lightness channel Unsharp mask 136, 0.4, 4
- Convert to RGB
|
| |
|
| |
|
| |
|
| |
#2 Alan Cameron |
| |
|
| |
|
| |
|
| |
- Image opened in Photoshop 6
- Plug-in : focalblade ver 1.02 used with settings:
- Expert mode
- Auto modes off
- edges sharpen 161, radius 0.2, method Gaussian, compensate
enabled
- surface sharpen 120, soften 0 ,radius 0.2
- Fix: white halo 56, black
halo 0, highlights 0, shadows 0
- mask display precise, intensity 79,
smoothness 2.2, remove 35, expand
7, Glow 0
|
| |
|
| |
|
| |
|
| |
#3 Alan Steadman |
| |
|
| |
|
| |
|
| |
- open in PS CS
- resize to 1000% with genuine fractals
- apply photokit sharpener supersharpen
3
- resize back to original size
- high pass sharpening layer (radius 0.5%)
Editor note: 1000% resizing will not be very practical on large images. |
| |
|
| |
|
| |
|
| |
#4 Buck Gordon |
| |
|
| |
|
| |
|
| |
Using PhotoKit Sharpener V1.1.0 from Pixel Genius:
- Capture sharpener - digital high res, narrow edge sharpen, 50%
opacity
- Creative sharpener - sharpening effects, edge sharpen 1,
50% opacity
- Output sharpener - web and multimedia sharpener,
600 pixel narrow
edge, 50% opacity
- flatten
|
| |
|
| |
|
| |
|
| |
#05 John Connell |
| |
|
| |
|
| |
|
| |
- Duplicate layer
- Filter - High Pass - Radius 5
- Set blending mode to soft light
- Flatten Image
- Filter - Unsharp Mask - 127, 0.3, 0
|
| |
|
| |
|
| |
|
| |
#06 Larry Lueck |
| |
|
| |
|
| |
|
| |
- Duplicate current layer, set layer to mode Darken,
opacity 55%
- USM amount 12%, radius 2.4, threshold 0
- Fade to luminosity
- USM amount 75%, radius 1.4, threshold 0
- Fade to luminosity
- USM amount 75%, radius 0.9, threshold 0
- Fade to luminosity
- USM amount 75%, radius 0.6, threshold 0
- Fade to luminosity
- USM amount 80%, radius 0.4, threshold 0
- Fade to luminosity
- Duplicate current layer, set layer mode to Lighten,
opacity 25% (This
eliminates halos.)
- Flatten image.
If the image is noisy, set all thresholds to 3. |
| |
|
| |
|
| |
|
| |
#07 Mike Kurzawa |
| |
|
| |
|
| |
|
| |
- Open file in Photoshop 7.0
- Create one Duplicate Layer = “Background
Copy” of Original
- USM on “Background Copy” at Amount
= 300%, Radius = 0.3 pixels, Threshold = 0 levels
- Fade USM, Luminosity
Mode, 100%
- Change “Background Copy” Mode to “Lighten”
- Create
another Duplicate Layer = “Background Copy 2” from
previously already sharpened “Background Copy”
- Change
Background Copy 2 Mode to “Darken”
- Change Opacity
on “Background Copy” (Lighten) to
66%
- Flatten Layers
- Save
|
| |
|
| |
|
| |
|
| |
#08 Antonio Dias |
| |
|
| |
|
| |
|
| |
- Focus Magic PS plugin
- Parameters:
- Image Source: Digital Camera
- Blur Width: 1
- Amount: 100
|
| |
|
| |
|
| |
Thanks to all participants (including all submissions
that did not get published). |
| |
|
| |
|
| |
|
| |
|
| |
|
| |
|
| |
|
| |
|
| |
|
| |
|
| |
|