The first part of this series examined the
minimal changes that are required to use Lightroom as a panorama
photographer. This part looks at synchronizing Lightroom between
different machines.
Traveling (The World)
Whenever I travel for
work (in real life, I’m in high-tech
Marketing), at least one camera always goes with me. I often end
up with hundreds of images that I need to manage while on the road.
And while my mobile computing equipment consists of a 3 year old
corporate notebook, which is hopelessly underpowered, under-RAM’ed,
not color-calibrated and features only a 10 inch screen, I often
find the time to work on my images, be it stitching a panorama
during a meeting (panorama stitching takes a lot of time on an
old clunker, so yes, what better time to stitch than during a meeting
when you don’t need your notebook), working on layer masks
while on an airplane or doing some non-destructive editing in a
hotel room. Thus, one critical question concerning Lightroom is:
how can I export new images from my work notebook, including all
the individual settings per image, and then import them into Lightroom
on my main machine?
Traveler’s Workflow is similar, although I cannot finalize
an adjustments
Upon a cursory glance, my traveler’s workflow
looks pretty much like my regular workflow. But there are differences.
In general,
I cannot finalize any adjustment that requires me to make a visual
judgment, since I don’t work in a calibrated environment.
In reality, I can go through the entire ingestion process as
I would do on my main machine, including backups to portable
hard
drives. But while I can also select and rate almost all of my
keeper images, I can only make minor adjustments in Rawshooter
Premium,
basically relying on the histogram to not overdo any of my adjustments.
Typically, I “under-adjust” and then fix later on
my main machine in Photoshop. And while I stitch panoramas, I
can
only do non-destructive editing in Photoshop (through layers)
in addition to labor-intensive tasks such as masking. Thus I
end up
with backups of my originals, RAW files with minor adjustments
in my workspace folders and Photoshop files in various states
of editing that need to then be finalized on my main machine
at home.
When I return from a trip, I typically copy the following
from one of my two external backup drives:
- my originals
- my Rawshooter Premium settings, so I can retain
how I “developed” my
RAW files
- my Photoshop files which contain images (single and
panoramic) in various states of adjustments.
How does Lightroom handle this
challenge?
- Originals: Since I keep my backups of my originals
outside of Lightroom, I can simply use Windows or OSX to copy
them from
one
machine to another
- RAW files: The early beta versions contained
a nifty feature called the photo binder that allowed a user
to put a selection
of images, including all their adjustments, into one big file,
then transfer the file and import the Photo binder on another
machine. Unfortunately, that feature did not make it into version
1 of Lightroom.
So the best alternative is to select the images I want to copy
in Develop mode and then click Metadata -> XMP -> Export
XMP metadata to file. For every image in my selection, Lightroom
then writes an XMP sidecar files containing all the adjustments
I made (if I had changed my preferences to “Automatically
write changes into XMP”, Lightroom would have already
generated the XMP files and I would not have to do it manually).
So I just
grab the images and the corresponding XMP files, move them
to the other machine and Lightroom automatically adds back
all the
adjustments
when importing the images
- For my Photoshop adjustments, since
I use the Edit in Adobe Photoshop feature, I save these adjusted
images in Photoshop
format. Even
although I bring them back into Lightroom, I don’t make
any changes there, therefore, I don’t have to worry about
XMP sidecar files. Again, I just grab the Photoshop files,
transfer them to my main machine and import them into Lightroom.
While
this process is manageable, I’d wish Adobe brought
back the Photo Binder function from earlier beta releases or
another function that allows me to create a selection of images,
write
everything within my selection to one big file and then re-import
that file into Lightroom on my other machine. I give Adobe big
kudos for making Lightroom work reasonably well on an underpowered
notebook
like my old IBM X31 (Pentium M 1GHz, 512MB, 10’ LCD, 5400
rpm disk). Not only does it run OK, but screen real estate is
at a premium on a 10 inch LCD screen. How could I ever work in
Lightroom
without the ability to automatically hide the toolbars? I typically
set the left, right and top toolbar to auto hide, thus being
able to work within a much bigger and less cramped workspace.
I use
mainly keyboard commands to switch between modes and calling
up the most important functions, thus being able to work efficiently
even on my small travel notebook.
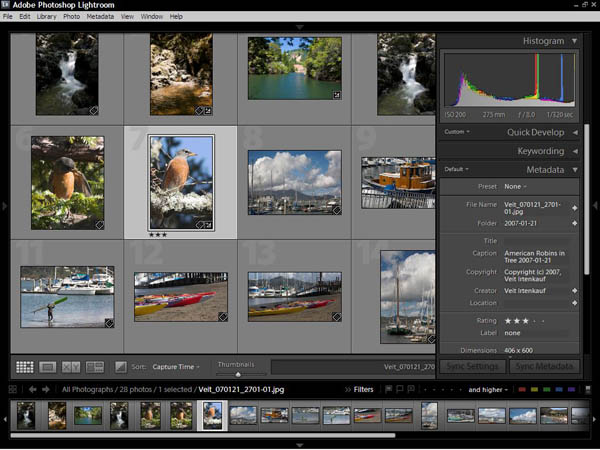
Lightroom on a 10 inch screen –the toolbar auto-hide feature
helps a lot!
It’s often the little things that make a difference.
And being able to use Lightroom on an old traveler’s notebook
made a big difference to me. Well done, Adobe!
Come to think of
it, I should probably install it on a Samsung Q1 seed unit that
I received recently. The Q1 is a UMPC (Ultra-Mobile
PC) running on an Intel Celeron processor, featuring a 7 inch
screen and works like a tablet PC with no keyboard. But that’s
outside of the scope of this series.
Part 3 of this series examines
how
Lightroom can help me as a photo-blogger. |


