Introduction:
Being a photographer involves a fair amount of printing,and although not all prints are deemed
as fine-art prints for sale matting your artwork adds to the printing process its own excitement
and has many advantages.
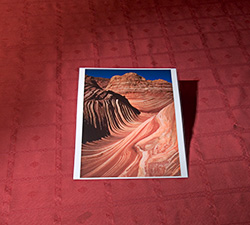
While you can certainly hand to your client one of your images as a "print-only" (and
sometimes this is exactly what the client wants), a mounted print has a much greater impact on
the viewer and will be more sellable, especially if you can do a quality and reasonably priced
job at mounting it.
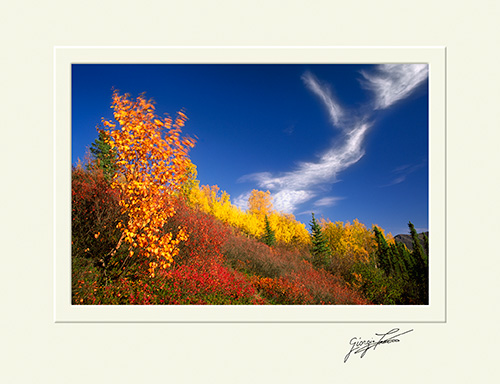
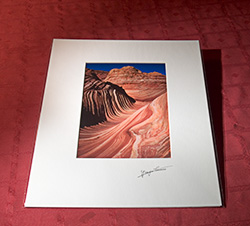
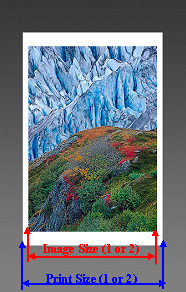
The "print-only"and the matted
version of the same image. Which one looks more attractive and professional?
Not only a matted print is more sellable, it's also more
protected and easier to handle.
If you plan to sell your work, matting your photographs is an essential skill that, sooner or
later, you'll have to develop.
The Problem:
Mounting and framing photographs is not an
easy task. At the beginning, it's not uncommon to waste a lot of time and
money before finding the right
tools and being able to mat your prints in an efficient and cost effective way.
This
essay is not about all the practical aspects of matting your photographs.
It's about a small program I've developed to help you plan and execute your
matting
projects.
Whether you cut your own mats using a hand-held
cutter, a more sophisticated mat cutter, or even if you buy cut-to-order mats
online (which I warmly recommend),
you'll spend a significant
amount of time calculating mat dimensions, mat openings, and drawing lines
on matting boards.
While the calculations are nothing difficult, per se, things can go really
wrong if you make even the smallest error. Errors in this department are
often unrecoverable, and discovering
that you cut one side of the mat opening off by 1/8 of an inch, will force
you to trash everything out: matting board, mat and often the print itself!
Things
are even more prone to errors if you mat your prints using double and/or
bottom weighted mats.
To keep things organized and error free, and
to preview your matting project before even starting it, I've developed a simple
software named: MatWorks! A virtual solution to all your
matting needs!

The software splash screen.
A Free Piece of the Solution:
MatWorks! is
a simple program that provides a virtual matting board for a variety of matting projects.
With MatWorks! you can easily calculate the dimensions
of the Mat opening and preview the final results using some of the most common
matting options.
Most important, MatWorks! is
a free software.
I initially wrote this small application for
my personal use. After using and refining it, I found it so useful that I decided
to donate
it to the
community of Fine-Art Photographers
who mat their own artwork.
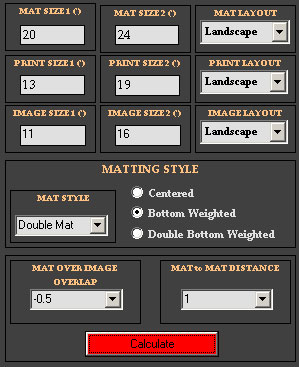
As shown in the screenshot below, the program
User Interface is designed as a single window.
All the input controls and program outputs are organized in logical and
easy to understand groups.
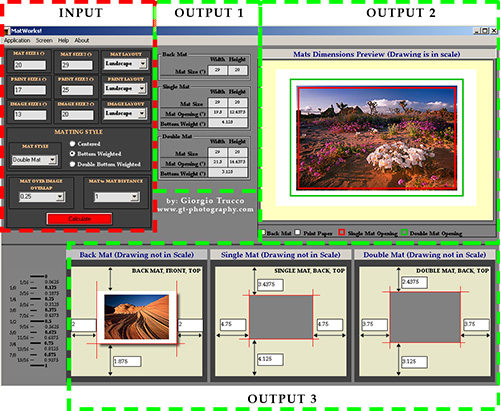
MatWorks! User Interface.
The Input Section is the control module of the entire software. Three
separate outputs provide all the information needed to: order pre-cut Mats online
(Output 1), cut blank Mats and mount the print
(Output 3), and review/preview the input options
(Output 2).
The User Interface contains 1 Input and 3 Output Sections.
The Input Section is used to select the parameters of the matting project:
- Mat Size, Print Size and Image
Size, plus Mat, Print and ImageLayout.
- Mat Style (Single or Double Matting) with Centered, Bottom
Weighted and Double Bottom Weighted Mat
openings.
- Mat over Image Overlap and Mat
to Mat Distance.
Output 1 is a numeric output
that reports the opening dimensions and bottom weights of all the Mats in
your project.
This output section is very useful when ordering
pre-cut Mats online because its format
matches the standard used by online companies selling such Mats.
Output 2 is an in-scale graphic output used to preview and
check the entire matting project.
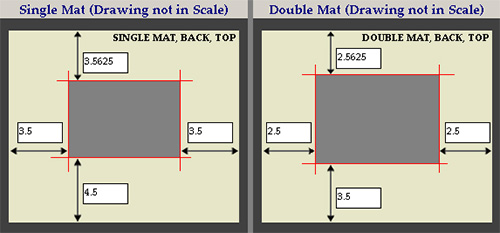
Output 3 is a mixed graphic (not in scale!) and numeric output
that offers detailed instructions for centering the print on the Back Mat and
cutting the opening in the
Top Mat(s).
Using MatWorks!:
Let's assume we want to Double Mat a 13"x19"print,
containing an 11"x16" image. We will use a 20"x24"blank Back Mat.
1 - the first step is to measure the print and the image size. Measure these dimensions
accurately, up to 1/16 th an inch. Make sure the image is centered on the print and surrounded
by borders of equal thickness on the opposite sides.
The Print Size can be very different from the Image Size.
It all depends on the border you left around the actual image. The only requirement is for the
image to be centered on the print and surrounded by borders of equal thickness on the opposite
sides.
2 - In the Input section, enter the Mat, Print and Image sizes and layouts.
In this example, all layouts are supposed to be Landscape.
3 - Choose your preferred Mat Style (Double Mat and Bottom Weighted in our example).
4 - Select a desired Mat over Image Overlap.
In this example we choose to leave a white border around the image. We want
the border to be 1/2 of an inch, therefore we select -0. 5 in the drop-down
menu.
5-Select your desired Mat to Mat Distance (1"in our example).
At this point the input section should look like this:
The Input Section after selecting all the desired matting
parameters.
6-Click on the "Calculate" button. The Output
sections will display all the relevant information.
If you are ordering pre-cut Mats online you"ll need the information shown
in the
Output1 section.
Here you will find the output dimensions of
the matting board, the opening dimensions (and bottom weights) of both the
Single Mat and the Double Mat (in case you have selected the
Double Mat style).
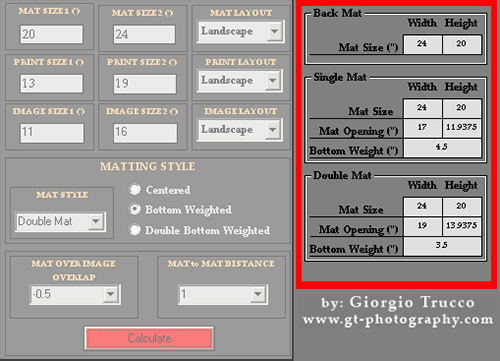
The Output Section containing the information
needed to order pre-cut Mats online.
If you are cutting your own Mats, you'll need
to refer
to the drawings of section Output3, titled Single
Mat and Double Mat.
Using a pencil and a ruler, draw
a rectangle ON THE BACK of
your Mats, as shown in the drawings. After drawing the openings on the ON
THE BACK of the blank Mats, cut the opening using a mat cutter.
It's now time to mount the print on the Back
Mat.
Refer to the leftmost drawing of the Output3 section,
titled Back
Mat.
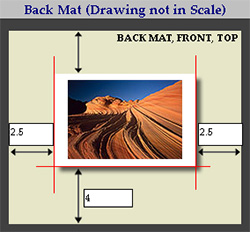
Draw three lines on the front of the mounting board, as shown in the drawing.
These lines will help you positioning the print in the correct place.
There
are a variety of different ways to mount photographic prints.
My preferred
method is dry mounting and my preferred adhesive for dry mounting is made
by CODA.
It can be bought in rolls for great convenience. I use their Single Release
White Adhesive, but other types are available.
More information is available
at their website:
http://www.codamount.com/mounting_adhesives.htm
I normally use a thin stripe of adhesive along the top border of the print.
Then I carefully position the print on the Matboard using the drawn lines
as a reference. While applying
a gentle pressure on the low part of the print (to keep it in place), I
peel off the plastic sheet to expose the adhesive and gently press the
print along
the top border to make it adhere
to the Matboard.
At this point you can add more adhesive or leave the print as is, obtaining
a sort of “hinged”assembly.
If the white border around the image
is large enough, you can even mount your print with absolutely no adhesive
on the back of the image.
After you've positioned the print on the Back Mat, it's time to stack
the previously cut Mats.
Add enough adhesive around the print to ensure a strong adhesion between
the Matboard and the Single Mat, peel off the protective plastic sheet
and stick
the Single Mat on top of the
Matboard. Keeping the Single Mat aligned with the Matboard along one
of the long borders is an easy way to obtain a precise alignment between
the
Matboard
and the Single Mat.
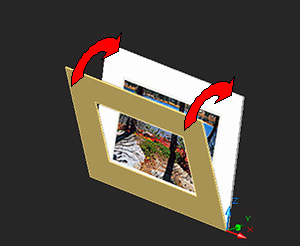
Matting the print using a Single Mat.
Repeat the same procedure with the Double Mat on top of the
Single Mat.
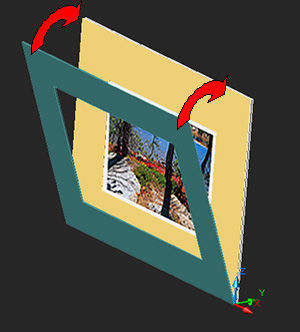
Adding the Double Mat.
As a final step, you can use a clean, soft-rubber brayer
to exercise pressure on the entire assembly.
Conclusions:
I offer MatWorks! for
free in the hope that it will be useful.
It is extremely useful to me and I
hope you will use it as much as I do.
I encourage you to report any bug or
inconsistency you might find. Also, if you think the program lacks some important
feature, feel free to suggest
it and I'll try to introduce it in
future releases.
At the time of writing the program is available only for Windows.
All you
have to do is download and unzip the file, and place the application in
any directory you want on your hard drive.
To add an icon on your desktop, locate
the "MatWorks 1.0.exe" file
on your hard drive. Right-click on it and choose: Send To > Desktop
(create shortcut).
The software comes with a complete PDF User
Guide (also accessible by pressing F1 when the software is running)
and is self-contained, meaning
that it
won't install anything on your
disk and it won't edit your registry.
MatWorks! can be downloaded
here (also check this location for regular updates).
Feel free to email me at giorgio@gt-photography.com with
all your comments!
Note by Uwe Steinmueller (Editor)
We find that Giorgio did a nice job to create
this tool. We find it easy and fun to use. Very helpful indeed!
Addendum
Run Time Error 713
If you get an error like
this one:
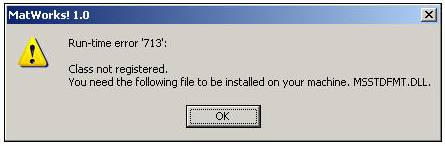
download from the Internet the following .dll: msstdfmt.dll
- Copy the downloaded file to the Windows/system32 directory.
- Now register
the dll by going to Start>run> and typing:
- regsvr32 msstdfmt.dll
- Click ok.
- Now the software will work properly on your system.
|