| |
Printing
Insights #013
Alain's Epson 9600 Diary
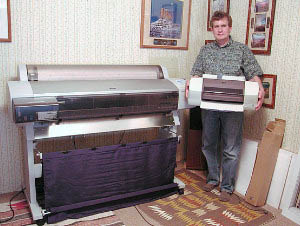
Size Matters (9600 vs. 1270)!
A diary review by Alain Briot |
| |
| |
| |
|
|
|
|
|
|
| |
| |
| We are very pleased that Alain Briot shares his
experience with his new Epson 9600 printer. Alain is a very well known
professional landscape photographer. Alain lives in Arizona.
Email
Alain
Visit
Alain's porfolios |
| |
| Note: Alain owns an Epson 9600. But as the 9600
and 7600 share the same print engine most of the findings also hold for
the 7600. |
| |

Improve your Digital Workflow
Testimonial
"If
you are just now venturing into the world of fine art digital photography
you can immerce yourself in new knowledge about almost every aspect
that I can think of. The photographs on the Outback Photo site
are stunning, to say the least! The books and handbooks offer a
true wealth of knowledge because they are so well thought out and
organized in a concise manner, with numerous examples. There are
vast quantities of other resources available as well, through linking
to other sites. There are interesting and provocative stories and
essays written by both Uwe and Bettina Steinmueller and many others.
I first found the site while checking reviews of the Canon Digital
Rebel and I haven't stopped exploring ... where do Uwe and Bettina
find the time to give so much? They are excellent teachers." Eleanor
T. Culling 2/25/2004
If you work with Photoshop
CS our e-books
DOP1009 or DOP2000 are the right choice for you. DOP2000
is the more complete handbook.
|
| |
| The diary always has the latest entry on top |
| |
|
| |
| 4/28/2005 Maintenance Tank Reset problem |
| |
| Resetting the Maintenance Tank may cause ink cartridges
to become inoperable
On recent 9600 models resetting the maintenance tank (following the
procedure I described earlier in this diary) may result in one of your
ink cartridges becoming inoperable (read “useless”). I
have had several reports of this happening to diary readers. Apparently
this problem occurs only on recent 9600. I have not had this happen
on mine. I have one of the first units, about 3 years old as of today.
What seems to happen is that the chip on one the ink cartridge becomes
corrupted and erroneously says that this cartridge is empty.
Should you take a chance?
The cost of one 220ml ink cartridge is higher
than the cost of a new maintenance tank. Add to that the trouble
of figuring out what is
wrong, calling Epson technical support and you may find that the
trouble is not worth it. Therefore, I don’t think you should
take a chance, especially if you have a recent unit.
Is there a solution that will allow me to reset the maintenance tank
and not damage my ink carts?
There is one that I just thought of but
have not tried. It goes like this: keep a spare set of empty ink
cartridges and load them in your
printer prior to performing the maintenance tank reset process. Then
reload the full ink cartridges after completing the reset. I can’t
guarantee that it will work. It may also cause additional problems
so use it with care.
|
| |
|
| |
| 4/28/2005 Epson 9600/7600 firmware update Version:
BW1452_Q.UPG |
| |
Notes
1-This Firmware update is for both the 9600 and 7600
2- The Firmware update is installed with the Epson Printer Service
Utility
3- The Epson Printer Service Utility is compatible with Windows and
Mac OS 9. If you run Mac OS X you need to launch Classic in order
to run
the Epson Printer Service Utility.
4- I successfully installed this update on my 9600 running Mac OS
10.3.6 and Classic.
5- The Mac & Windows version can be downloaded from here.
What’s new?
1- Super Strong Cleaning Mode
This firmware update improves the printhead cleaning utility to help
clean particularly stubborn clogs. To do so it features what Epson
calls the “Super Strong Cleaning Mode” (SSCL)which lasts
3 minutes instead of the previous 1.5 minutes.
The new SSCL is effective but very ink thirsty. Use it as a last resource,
when the regular head cleaning routine fails. A single SSCL cycle will
consume nearly 100ml of ink total. While less expensive than calling
an Epson technician this option still needs to be used wisely.
Epson recommends that the SSCL mode be used only “after normal
cleanings have failed to resolve nozzle issues.” I concur.
|
| |
|
| |
| 1/19/2005 |
| |
| Here is a new link to a very complete service manual
for the 7600/9600. This manual is the most complete I have seen so far:
http://web.archive.org/web/20030812073637/www.visual-artists.com/Manuals/SP76_9600_A.pdf
It will take some time to download, even with a cable connection,
as the PDF file is 18.7 mb. |
| |
|
| |
| 1/5/2005 Field repair guide and exploded diagram |
| |
| I just found a website where you can download a repair
guide and exploded diagram for the 9600/7600 for free: EserviceInfo.com
(ESI) This is the site’s description as listed on the home page.
Here you can find free datasheets, service manuals, schema, schematic
diagrams and software downloads, service menu and mode information
and code calculators for many brands of equipment.
Home page:
http://www.eserviceinfo.com/
9600/7600 field repair guide download page (free download):
http://www.eserviceinfo.com/download.php?fileid=10251
9600 exploded diagram download page (free download):
http://fileshare.eshop.bg/downloadsm/11566/EPSON_9600.html
|
| |
|
|
| 12/15/2004 Diary available also on CD |
| |
The PDF version is available on my just-released
Briot’s View Articles CD. This CD features not only my 9600 diary
but also all my other diaries and articles available on outbackphoto.com
and on Luminous-landscape.com. The CD also contains several unpublished
articles such as my How to Stretch Canvas Prints article and other.
Each article and diary is in PDF format making them very easy to print
and read. Finally, the CD also features all the presentations I gave
at the Fine Art Digital Summit in 2003 and 2004.
The CD is available for $19.95, including shipping anywhere in the
world. You can order it by clicking here:
|
| |
|
| |
| 12/11/2004 See you in the new Alain’s Epson 4000
Diary! |
| |
Well, as I said a couple of entries ago, this diary is now coming to
an end. Unless something significant comes along in regards to the
9600/7600, I will now focus on my new diary (as of December 2004):
Alain’s Epson 4000 Diary.
This has been a very exciting and educational journey and I want to
thank all of you for making it a success. As of December 2004 this
diary received just about 100, 000 hits, quite a record for a printer
that is far from being the best selling Epson printer. While I don’t
have exact numbers I do know that Epson sells relatively few 9600 when
compared to smaller Ultrachrome printers such as the 2200, the 4000
or the R800.
Before I close I want to mention that this diary is now available
in PDF format, complete with a table of content and in chronological
order, starting with the first entry and proceeding to the last one.
The PDF version of the diary is also re-organized for easier reading
and some new material was added.
The PDF version is available on my just-released Briot’s View
Articles CD. This CD features not only my 9600 diary but also all my
other diaries and articles available on outbackphoto.com and on Luminous-landscape.com.
The CD also contains several unpublished articles such as my How to
Stretch Canvas Prints article and other. Each article and diary is
in PDF format making them very easy to print and read. Finally, the
CD also features all the presentations I gave at the Fine Art Digital
Summit in 2003 and 2004.
The CD is available for $19.95, including shipping anywhere in the
world. You can order it by clicking here.
Again, a big thank you to all of you who have helped make this diary
a success. See you in the new Epson 4000 diary! Please stay in touch
and do not hesitate to email me at alain@beautiful-landscape.com with
your comments or questions.
|
| |
|
| |
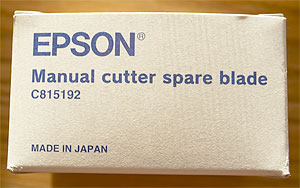
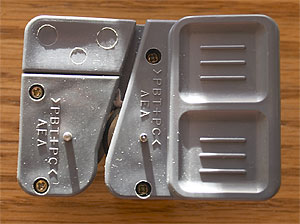
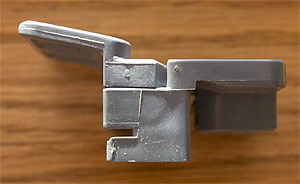
| 12/10/2004 Changing the blade on the Manual Cutter |
| |
I recently had to change the blade of the manual cutter. The blade wasn’t
dull but it was leaving black particles on the paper each time I used
it. It took me some time to find out where these black particles were
coming from. Under close inspection it turned out that the cutting blades
(there are 2, rolling one against the other to cut the paper) have a
black coating on them and that this coating was starting to come off.
This was due to the blades wearing out and starting to rub upon each
other.
The cost of a replacement hand-cutter blade is about $100. There is
no way to sharpen the blades so you have to replace the whole cutter
assembly. Doing so is very easy. Simply remove the screw located on
the left side of the cutter-holding bar, slide the old blade assembly
out, and then slide the new blade assembly in. There you are. It took
2 years in my case for the blades to wear out.
Please note that this is not the built in cutting blade. This is the
blade for the optional manual cutting attachment. The built in cutting
blade is located next to the print head and replacing it is an entirely
different process. I personally do not use the built in cutter because
doing so wastes a lot of paper.
Incidentally, the built-in cutting blade holder also acts as print
head locking mechanism. If you need to move the print head simply open
the printer door, push on the built in blade cutting assembly and the
head will be freed from its resting area. The built in cutter is easy
to locate: it is the only spring-mounted device near the print head.
It is located in front of the print head. Just push on it to release
the head.
Here are photographs of the paper cutter replacement blade and box:
|
| |
|
| |
| 12/9/2004 Loading large sheets or custom size sheets |
| |
You need to create a new sheet size in the page
Setup menu and type the exact dimensions of the sheet you are using.
Make sure that the width you enter matches the actual width of the
paper. That is because the print head will actually measure the sheet
of paper when it is loaded and if the sheet is smaller than the size
you enter the “paper not loaded” message will come up.
Also keep in mind that sheets smaller than 8.5” in width cannot
be loaded in the 9600. That’s because the minimum width the printer
will accept is 8.5”. I have tried several times but I have not
been able to load a sheet less than 8.5” wide. If you have, then
let me know. I don’t mind if you prove me wrong because my goal
is to provide accurate information.
|
| |
|
| |
| 12/8/2004 Service Manuals |
| |
Do you feel like learning more about how your printer operates? Do you
want to read the manual that Epson Techs use to fix your printer? If
yes, you can buy and download the service manual, and the parts list,
for your 9600 from this web site:
http://www.2manuals.com/index.php
From there do a search for either Epson 7600 or 9600. You can also
find the manual to many other printers, either Epson or other brands.
Two documents are available for the 9600:
- the Printer Service Utility User’s Manual
- the Parts List
The Printer Service Utility User’s Manual is very “thin” and
duplicates information available from Epson, either in the printer
manual that comes with the 9600 or in the firmware update package
available from the Epson website (see prior entry on firmware update
in this diary). The Printer Service Utility User’s Manual does
includes software called the Epson Printer Service Utility. However,
it will only run on a PC to which the printer is connected. It says
in the manual that this program will only run on Windows 98. It did
install on my Sony Vaio running Windows 2000. However, my 9600 is
connected to my Mac G5 so I cannot use this program. So far I have
not taken the time to disconnect the printer, reconnect it to my
Sony Vaio, install the 9600 Windows driver and test the software.
The second document is the Parts List, which shows exploded diagrams
of the printer parts with all the parts names and numbers listed
separately. In my estimate this is more interesting than the service
manual (and 1/3rd the cost), unless you want and can run the Printer
Service Utility software.
Keep in mind that making sense of black and white exploded diagrams
and parts list is not easy. Neither the “manual” nor
the parts list explains how to take your printer apart or how to
put it back together. Also keep in mind that it is a lot more difficult
to put something back together than it is to take it apart… We’ve
all had the experience of opening a watch, “fixing it” and
then having parts leftover after we reassembled it… Those parts
did come from inside the watch, and they must have a purpose. If
you have had the experience of staring at those parts and wondering, “where
do they go and what purpose do they serve? “ you may want to
think twice before dismantling your wide format printer…
The cost for the 9600 manual is $8.99. The parts list is $2.99.
They can be downloaded separately.
The service manual and the parts list are provided as PDF files,
which, as any PDF file, can be opened on a Mac or PC.
Please note that we do not recommend you work on your printer yourself
besides regular cleaning and maintenance (remember the watch story).
If you decide to do so we will not accept responsibility for any
problems you may encounter. Repairs are best left to a certified
Epson technician. Epson Technicians do charge a fair amount but they
have factory training, extensive experience and their repairs are
guaranteed by Epson. Fixing your printer yourself may save you money
initially. But, if your repairs do not work you may end up spending
more time and money than if you had called an Epson technician in
the first place.
 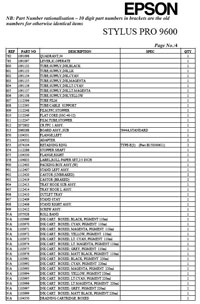
Here is a screen shot of two pages of the Epson 9600 Parts List
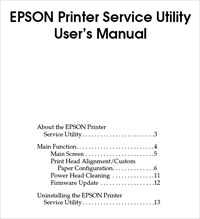
Here is a screen shot of the table of contents of the Epson Service
Manual:
|
| |
|
| |
| 12/7/2004 Controlling the Amount of ink laid down
through the Printer Driver->Print settings dialog box |
| |
Selecting a specific Media
Type from the drop-down list in the Printer Driver>Print settings
dialog box essentially changes the amount of ink laid down on the
canvas.
On the Epson 2200 as you go down the list the ink amount goes up.
This means that when you make a paper selection lower and lower down
the list, you get more and more ink laid onto the paper. The lowest
amount of ink laid down, for the 2200, is with “plain paper” selected
and the highest amount of ink laid down is with “Watercolor Paper
Radiant White“ selected.
On the 9600 the list is not organized the same way. The 9600 Media
list may be reversed, i.e. it may go from the highest amount of ink
(at the top of the list) to the lowest amount of ink (at the bottom
of the list). I am not absolutely sure, but if it is then the Enhanced
Matte Poster board which is the very last setting, at the bottom of
the list, would get the highest amount of ink while the Double weight
Matte Paper which is at the top of the list would get the lowest amount
of ink. If you know for sure email me!
|
| |
|
| |
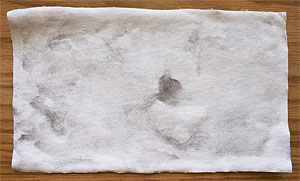
| 12/6/2004 Premier Art Print Shield Spray Coating |
| |
This is the Spray recommended by Premier Art for the Water Resistant
canvas. Why do you have to spray water-resistant canvas? Well, good
question! After all, the idea behind using water-resistant canvas is
to not have to coat it. But, Premier Art does recommend coating this
canvas anyway.
This fact first motivated me to use only Epson Canvas and not Premier
Art Water Resistant Canvas. Since I will have to coat both of them,
I might as well use a canvas that does need coating in the first
place and is therefore less expensive since it is not pre-coated.
Plus, if I decide to not Spray the regular Epson Canvas I get a matte
surface, which I very much like. If I coat it I get a glossier surface,
which is nice too but has a sheen and a slight glare to it.
But, to make sure I made the right choice I conducted a test which
proved extremely worthwhile: I took four canvas prints as follows,
put them in the sink and ran them under running water. Here are the
four prints:
• Print #1 was made on regular Epson Canvas
•
Print #2 was made on regular Epson Canvas coated with Premier Art
Print Shield Spray
•
Print #3 was made on Premier Art water resistant Canvas
•
Print #4 was made on Premier Art water resistant Canvas coated with
Premier Art Print Shield Spray
The results were as follows together with photographs of the prints
after being washed:
Print #1 lost most of the ink on the canvas right after being placed
under water. After rubbing it with my hands all that was left was
an artistic looking smudge. Both the ink and the canvas coating ran
off:
Print #2 held up pretty good under running water but started loosing
a lot of ink and some canvas coating after heavy rubbing:
Print #3 held up perfectly under running water without any ill consequences.
After heavy rubbing it started loosing some ink:
Print #4 held up perfectly under running water. After VERY heavy
rubbing some of the ink came off:
Conclusions
Being concerned with your canvas prints being waterproof – or
being water resistant- is important. After all, it is likely that
water -- or a cocktail :-) -- may be splashed onto the print at
some time.
To make your canvas prints waterproof your best bet is to use the
Premier Art water resistant Canvas and either spray it with Premier
Art Print Shield Spray or not. As my tests showed me, the Premier
Art Waterproof Canvas is waterproof right out of the box. Spraying
it with the Premier Art Print Shield Spray does reinforce its waterproof
quality but unless you rub the print heavily with water no damage
will occur. Since the typical risk is water splashed on the print,
and not heavy rubbing under running water, I believe coating Premier
Art water resistant Canvas is optional.
If you are concerned with waterproofness I definitely recommend
staying away from the regular Epson canvas altogether since my tests
show that even coated it is only marginally waterproof and that uncoated
it is a complete disaster in terms of waterproofness.
Do keep in mind that the above comments are only indicative of the
waterproofness of each canvas and do not address the print quality,
color and contrast of these two canvas materials. Color and contrast
issues were covered separately in the previous diary entry.
|
| |
|
| |
| 12/5/2004 Epson 9600 Premier Art water resistant Canvas
for Epson |
| |
I started using the Premier Art Water Resistant Canvas for Epson. Here
are some of the most important aspects of this paper:
- You need to use Watercolor Paper Radiant White as paper choice
in the Printer Driver > Print settings dialog box
This canvas has a higher contrast than the regular Epson Canvas.
It prints well with the Bill Atkinson Premier Art Canvas profile
available at
http://www.homepage.mac.com/billatkinson/
- It is slightly sticky to the touch and has a certain smell to
it while the regular Epson canvas has neither.
-It has a shiny or glossy finish and appearance. The shiny finish
is more noticeable after printing. While this is good for light reflectance,
it does hinder viewing the print since at certain viewing angles
the print shimmers making it hard to see. Hopefully spraying the
print will not diminish this effect. In my view a matte canvas finish
is preferable. I believe Premier Art also makes a matte canvas.
- Premier Art, the same company that makes the Premier Art Print
Shield Spray, makes it. In fact, on the flyer included with the Premier
Art Canvas, they recommend you spray the finished print with…guess
what… their spray! (why does this not come as a surprise? If
you know, email me!) I was surprised that they recommend spraying
their canvas since it is advertised as being waterproof. Usually,
waterproofing is one of the most compelling reasons for spraying
a print.
Well, the reason why they recommend you spray the finished print
is because the canvas is coated with an ink-receiving layer that
remains receptive, i.e. subject to change when exposed to the air
and other contaminant. The ink-receiving layer will cause the print
to deteriorate if it isn’t “deactivated.” The main
risk is yellowing of the print, caused by the ink-receiving layer
turning yellow. Spraying the print “deactivates” the
coating by sealing it under the layer of spray, thereby preventing
the print from yellowing.
Two other ways to prevent yellowing are to either frame the print
under glass or laminate it. In either case the print is isolated
from the air and from airborne contaminants,
In my estimate neither laminating a canvas print nor framing it
under glass are valid options. To me a canvas print needs to be mounted
and framed like a painting, by stretching it over stretcher bars
and framing it without glass. If you want to learn how to stretch
and frame your canvas print this way read my “How to stretch
your canvas Prints” article in PDF format. This article is
now available on my “Briot’s View Articles CD” together
with a formatted version of this diary complete with table of contents
for easy searching, and copies of all my other diaries and articles
published so far (over 30 articles total. You can order this CD here
for $19.95 only. This price includes shipping anywhere
in the world.
- Besides the increased contrast and the waterproof quality I do
not see much of a difference with the regular Epson canvas. The weave
is the same, and the canvas thickness is the same. Since the canvas
has to be coated you can dismiss the waterproof aspect since coating
the canvas will make it waterproof anyway. That leaves you with the
higher contrast as sole benefit of using this canvas instead of the
regular Epson canvas. On the other hand the glossy aspect makes me
think I may prefer the regular Epson Canvas.
|
| |
|
| |
| 12/4/2004 Welcome back |
| |
I have not added new entries in this diary for some time. This is because
I have just about covered every aspect of this printer :-) This diary
has been a very interesting and informative journey.
I have a couple more entries to add at this time and then it will
be time to move on to the next Epson printer. I just purchased an Epson
4000 and I started a diary on this site about this new Epson Printer:
Alain’s Epson 4000 diary. Take a look at this new diary because
I believe you will find it just as helpful, interesting and thought
provoking as my other diaries. You will also find out that the Epson
9600/7600 and the Epson 4000 have quite a few things in common. Therefore,
some of what I will be writing in my new Epson 4000 diary will apply
also to the Epson9600/7600, such as which papers I am currently using,
how to print with RIPS and so on.
To continue with my previous entry here is a photograph of the completed
canvas print I was working on in the last entry. Here it is, stretched,
framed and proudly displayed as a centerpiece:

|
| |
|
| |
| 7/28/2004 Very large prints |
| |
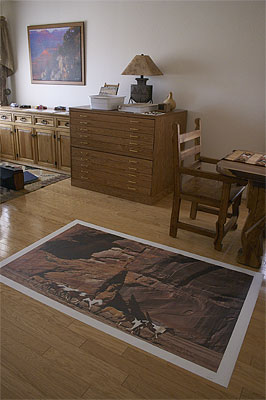
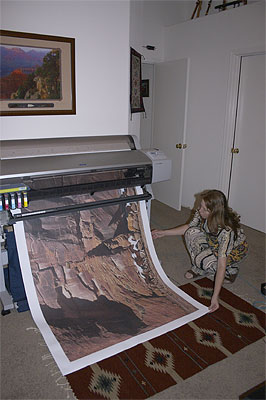
| Today I printed the largest print so far on the 9600.
This print is precisely 35"x70". It is made from a 6x4.5 transparency
scanned at 8000 dpi on a Howtek drum scanner. The transparency was taken
with a Fuji 645zi. The resulting scan is about 800mb. The original file
was cropped at the top. I previously printed this image in
a longer panoramic version. This previous version is available here.
This time I used more of the image and did a taller panoramic version.
I like this new version very much.
The image was printed on Epson Canvas using Bill Atkinson's Epson
Canvas profile. Several test images (6"x10")were necessary
to insure that the color balance, the contrast and the density were
optimized before the final print was started. I printed this image
using the Super Microweave option in the printer driver. This increased
the printing time considerably to well over an hour. However it insured
a very fine print quality.
I had an interesting problem while attempting to print this image.
I could not print the original 700mb, 300 dpi file. I kept getting
an error message. Assuming this file was too large to be printed, or
that I did not have enough Ram to print it, I progressively lowered
the resolution to 240dpi while keeping the original image size. It
printed without any problem at 240dpi. While the 240dpi print is beautiful
it would be good to know why I couldn't print it at a higher resolution
especially since I had no problems printing 40x50 files at 300 dpi
in the past. I print from Photoshop CS running on a double processor
Macintosh G5 with 3.5 gigabytes of ram and a 130GB hard disc. If anyone
knows why I had this problem please let me know as I find it puzzling.
The print will be stretched on stretcher bars custom cut and assembled
to the exact size of this print. If you are interested in learning
more about this mounting process I wrote a detailed and illustrated
article describing how to do it. This article is available as a pdf
file. You can get the PDF from here.
|
| |
|
| |
| 6/3/2004 How to calculate how much to charge for inkjet
prints |
| |
Calculating how much you need to charge for inkjet prints can be challenging.
Many factors go into figuring out the price you charge your customers.
Keeping track of all these factors can be challenging.
I found an interesting solution in the form of a pricing software
package offered by a company called Estimate. This software solution
will work particularly well if you are in a “print for pay” situation,
for example if you run a print shop and are making inkjet prints from
customer files or if you photograph artwork and then create Giclee
reproductions of the artist’s work. If you are an artist, and
are printing and selling your own work, you will have to include an
extra pricing factor for the artistic value of your work.
This full-featured demo version will run for 60 days. After this evaluation
period you can upgrade to the permanent version for the price indicated
on their web site.
Note that the part of estimate that applies to inkjet printing specifically
is found under the “Quick Quote” menu and then under “Wide
Format Prints”. Since the “Wide Format Prints” is
a plugin you will have to add it to your order if you upgrade to the
permanent version of Estimate.
Estimate, Price Watch and Vendor Mate are Windows-based programs.
Please note that I have no connection with Estimate and that I do
not derive financial benefits from this diary entry. I received Estimate
as part of a software package for a new mat cutter and thought it would
be of interest to 7600 and 9600 users. Estimate can calculate pricing
for a variety of applications besides Inkjet printing |
| |
|
| |
| 6/1/2004 How to flatten your 9600/7600 prints |
| |
Curling is a serious problem with photographs printed on roll paper.
In this entry I provide two ways you can de-curl your inkjet prints.
1- First, Jerry McCollum developed a personal technique aimed at removing
curl. Here is how Jerry does it together with instruction on how to
build the jig you will need. Please note that I did not try this technique
myself.
Materials needed:
- 3 inch PVC pipe
- 0.010" polycarbonate sheeting (comes in rolls, look for it
on Google)
- packaging tape and a sheet of paper
I routinely cut 36" wide rolls into 24x36 sheets for my 7600.
I currently use Hawk Mountain paper.
After cutting the sheets with a standard mat cutter, they roll themselves
into tubes which must be de-curled into sheets before using them in
the 7600.
I made two de-curlers. While one unit is de-curling, I am loading
the other and then switching back and forth every minute to load tubes
and unload sheets.
My tubes are 40" long
The polycarbonate sheets are 40x28"
The TWO sheets of 0.010" polycarbonate material I use on each
tube gives me superior quality.
The polycarbonate sheets are taped to the PVC tube so that they open
and close like 2 pages in a book. There is no tape between the two
sheets. A piece of paper the thickness of the material I normally cut
is glued around the PVC tube up to the edges of the polycarbonate sheets.
This creates a contiguous surface when the tube is rolled (no seam
pressure marks).
Use is simple. Work the edge of the curled sheet of paper between
the polycarbonate sheets. The 0.010" polycarbonate is just stiff
enough to keep the paper flat so it slides easily. Once the paper is
slid between the polycarbonate sheets the tube is flipped and rolled.
A simple Velcro band keeps the tube rolled while the other tube is
loaded in exactly the same way. Once the second tube is loaded, the
first tube is allowed to unroll.
Voila - flat sheets!!
Polycarbonate is the ideal material for this process because it takes
repeated rollings yet always remains stiff. Through trial and error,
I found that 2 sheets of the 0.010" polycarbonate are ideal for
my sandwich on papers ranging from 100 gsm to 400 gsm.
2- Here is a second way to remove curl. This time you don’t
need to buy any materials since you can reuse what you already have.
- Use the cardboard tube at the center of Epson 24” or 44” roll
papers
- Tape a long piece of 24” or 44” archival paper to this
tube
- Place the photograph between the archival paper and the tube. Make
sure the printed side is facing the archival paper
- Roll the curled photo paper and the Archival paper around the tube |
| |
|
| |
| 4/25/2004 How to change from matte black to photo black
without wasting money and ink |
| |
Today I received this tip from Rüdiger Schäfer who lives
in South Africa. Rüdiger has posted this tip to the Yahoo Epson
wide format forum and forum members confirmed that it works. I have
not yet tested it because I do not need to change black inks at this
time. However I decided to post the tip to my diary right away so that
you can benefit from it immediately.
If you try this tip please email me at alain@beautiful-landscape.com
to let me know how it worked for you.
Here it is:
How to change the photo/matte ink in the Epson 7600 and 9600 printers
without using the costly Epson draining procedure:
1 – Make sure your printer is not switched on
2 - Open the ink cartridge lever in the ink cartridge bay
3 - Replace the photo black cartridge with the matte black cartridge
(or vice versa)
4 - Leave the ink lever open !
5 –Using the printer control panel go into Maintenance Mode
2 by by switching power ON while pushing the 'Paper source', 'Cut/Eject',
and 'Paper Feed down' buttons.
6 - Press the 'Paper Feed down' button until you see "SERVICE
CONFIG" on the display - press the 'arrow right' button. It then
shows 'XXD' in the lower part of the display.
7 - Press the 'Paper Feed down' button until you see "NPD" -
press 'arrow right' button. A value of '1' appears in the display.
8 - There are 3 possible value settings for NPD:
0 - no ink check
1 - pigmented ink (there should be s star "*" at this setting)
2 - dye inks
9 - Change NPD setting to '0' (no ink check) and press "Enter" -
a star should now show next to the '0' value
10 -Switch printer off
11 - Switch printer on
12 - Close the ink lever in the ink cartridge bay
13 - Printer and driver shows the matte black ink is installed (or
photo black ink)
You can use the same procedure to switch from matte black to photo
black or from photo black to matte black.
What happens is that once you change the ink in that way the printer
re-sets the 'NPD' value back to '1' the next time you switch on the
printer in the normal way (non maintenance mode).
At that point the previous black ink, either matte or photo black,
has not been flushed our of the printer. Here is what you need to do
to flush the remaining ink:
A- With the 7600:
The 7600 uses approximately 10 to12 ml of ink before the previous
black ink is flushed out.
1 - Create a 23"x 40" image in Photoshop and fill it with
pure black (RGB 0,0,0).
2 - I use inexpensive matte paper and print that image at 720dpi.
3 - When you look at the finished print you will see that 2/3 of
the print is photo ink as it looks a little bit dull and the rest of
the print shows the nice dark matte ink.
4 - When this image is done printing the ink line is charged with
matte black (or photo black).
B – With the 9600:
The 9600 uses approximately 20-22ml of ink before the previous black
ink is flushed out.
Use the exact same procedure as described above but create a larger
image: 43"x40".
This larger image is needed to flush the longer ink lines of the
9600:
1 - Create a 43"x40" image in Photoshop and fill it with
pure black (RGB 0,0,0).
2 - I use inexpensive matte paper and print that image at 720dpi.
3 - When you look at the finished print you will see that 2/3 of
the print is photo ink as it looks a little bit dull and the rest of
the print shows the nice dark matte ink.
4 - When this image is done printing the ink line is charged with
matte black (or photo black).
|
| |
|
| |
| 4/20/2004 Lightfastness |
| |
Recently I received a number of emails asking me to compare the lightfastness
of Ultrachrome prints on glossy and matte papers. This is a relevant
matter in the wake of Epson’s release of the R800, a printer
able to create glossy prints without bronzing. It is also of importance
to 9600-7600 users who are printing on glossy and matte papers.
Apparently there seems to be a myth that goes something like this:
“Ultrachrome prints on matte papers are more archival than ultrachrome
prints on glossy papers. “ Let’s take an objective look
at this subject.
First, the archivability of a print needs to be looked at on a paper
by paper basis, not on a paper category --i.e. glossy vs matte, matte
vs glossy, etc.-- basis.
Second, we need to look at color prints and black and white prints
separately. As we will see color prints and black and white prints,
done on the same paper, do not have the same longevity.
Third, Wilhem Imaging provides us with reliable data in regards to
the longevity of matte versus glossy papers done on the Epson 9600:
http://www.wilhelm-research.com/epson_9600_preview.html
1-Color Ultrachrome prints
According to the Wilhem pdf chart, and looking only at uncoated Ultrachrome
prints framed under glass, Enhanced Matte Paper has a display life
of 64 years while Epson Premium Glossy Photo Paper is listed at 85
years (displayed prints not framed). According to this data Ultrachrome
prints on Epson Premium Glossy Photo Paper have a higher longevity
--9 years more-- than Ultrachrome prints on Epson Enhanced matte paper.
According to the chart Epson Premium Glossy Photo Paper outlasts all
other Epson papers except for the Epson Watercolor Paper Radiant White
(Sheet) and Epson Ultrasmooth Fine Art paper.
One thing which helps explain the high longevity of prints done on
Epson Premium Glossy Photo paper is that this paper, as well as other
glossy and luster papers, use a very different type of coating technology
than matte papers. Many glossy and luster papers use an ink-encapsulating
coating. When the inks are deposited on the paper the liquid ink softens
the coating which becomes porous. The ink immediately starts to “sink” into
the wet coating and when this coating dries it effectively seals the
inks into the coating layer, effectively encapsulating them.
The Epson R800, which embodies Epson’s latest ink technology,
adds one more layer of protection by applying a clear varnish to the
print after printing is completed. This varnish further seals the inks
in the print, preventing them from evaporating or migrating to the
surface of the paper. The paper of choice for the R800 is Epson Premium
Glossy Photo paper. It’s excellent lightfastness is great news
to those of us who enjoy printing on glossy papers.
Glossy prints have one additional benefit when compared to prints
on matte papers: they are not affected by scuffing. While scuffing can be minimized by coating the print and by careful handling it is
a serious problem with matte papers.
2- Black and white Ultrachrome prints made with the full color Ultrachrome
inkset
When looking at black and white prints Enhanced Matte paper is the
longest lasting at 150 years. Second is Epson Ultrasmooth at 140 years
and third Epson Premium Glossy Photo paper at 135 years.
It is interesting to note that longevity ratings are much higher for
black and white prints. This is most likely due to the fact that, while
all the inks are used, the main component of a black and white print
is black and light-black ink. Clearly. Black ink is far less subject
to fading.
Methodology
Again, I am only looking at uncoated Ultrachrome prints, framed under
glass. The reason for looking at uncoated prints is that potentially
all prints can be coated but the chart only shows coating longevity
ratings for a few papers. The reason for looking at prints framed under
glass is that this is that this is the presentation Wilhem considers “the
single most important of the three display conditions listed.” I
also had to make a choice to avoid making this comparison unnecessarily
complicated.
|
| |
|
| |
| 4/16/2004 Making big prints (42”x72”) in
Windows XP |
| |
I received this via email today. Jim had a problem
printing large images to his Epson 9600. His prints are 42”x72” precisely.
Here is the solution he implemented at the recommendation of Epson Technical
support:
- First make sure (in XP) you have the SP1 and 1a service pack installed.
- Open the 9600 printer properties (start/printers and faxes/9600/
advanced tab/..) and click off "enable advanced printing features."
- Save that.
- In PS, click print with preview, open the printer and ensure the
paper size is bigger than the print (roll paper selected, paper size
is user
defined, make a 44x76 page and save it).
- In the driver window, turn off "finest detail" (doesn't
matter what the DPI of the print is, 360, 720 or 1440. Finest detail
only applies to sharpened text).
- Save that and go back to your print with preview window.
- Image should appear correctly for printing.
- Hit print!
This worked perfectly! |
| |
|
| |
| 4/7/2004 Maintenance tank - replace or reset? |
| |
In recent weeks I have received a high number of
emails asking about what to do when the maintenance tank is nearly
full and the printer is saying so. It seems that a number of 9600's
are getting to the point where their maintenance tanks need attention!
My recommendation is this: pull the maintenance tank out of the printer
and inspect it visually. See if the tank is full of ink or if the pads
still show some white padding. See if the ink is leaking
out of the tank (hopefully not).
If the tank is full and the white padding is saturated with ink, replace
the tank. If ink is leaking out replace the tank immediately.
If the padding is still able to absorb ink, and if it shows some white
padding, reset the tank according to the instructions I provided earlier
on in this diary. To see these instructions scroll down on this page
and you will find them.
Resetting the tank is done through the printer control panel. Once
the maintenance tank is reset the printer thinks a new maintenance
tank has been installed and the maintenance tank counter goes back
to zero. You didn't physically change the tank but you made the printer
believe you did. This saves you the cost of a new tank and has no adverse
effects on the printer as long as you make sure that the tank still
had some white absorbent material in it prior to resetting.
After you reset the tank you will need to monitor the tank's capacity
on a regular basis. If you use your printer a lot I recommend you do
this once a week. Doing so is easy and only takes a few seconds. Make
it a habit, each Monday for example, so that you don't end up with
a full tank which is leaking ink all over the place! You want to save
money but not create a mess which is going to take forever to clean
and which may damage your printer.
I also heard that recent Epson maintenance tanks use a lighter padding
material than previous maintenance tanks. If I am correct this new
and lighter padding will result in maintenance tanks which fill up
faster, which may or may not be resettable, or which can be reset only
once instead of several times. If you purchased your printer a year
ago or less you may have one of these new tanks. In this case, if you
reset your maintenance tank, you need to be particularly vigilant about
how full it really is. |
| |
|
| |
| 2/27/2004 Epson Ultrasmooth paper |
| |
I just tried the new Epson Ultrasmooth paper on my Epson 9600. I have
to say that this is a success. I love this paper!
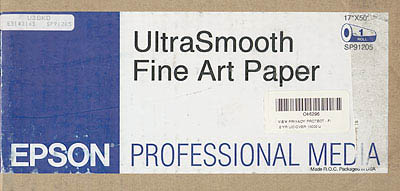
Ultrasmooth has been promised by Epson for a long time and is just
becoming available. It comes in both rolls and sheets, in 250 gram
and 500 gram versions. The 500 gram version is only available in sheets
since it is too thick to be rolled.
At this time I tried the 250gram, 17”x 50 feet roll. The roll
fits in the 9600 although it is much smaller than the usual 44” rolls
I normally use.
Since Epson does not provide profiles for Ultrasmooth yet, and since
I did not have this paper profiled yet either, I used my Epson Enhanced
Matte profile with Ultrasmooth as recommended by Epson.
The results are great. The prints look wonderful with this profile.
I will of course have it profiled but at this time I can say that using
enhanced matte profiles with Ultrasmooth works very well.
The quality of Ultrasmooth can best be described as “Fine Art
Paper.” This paper does not have optical brighteners, meaning
that you don’t get this pure white, sometimes almost “too
white”appearance that some papers have. Instead you get a nice,
smooth, velvety quality with an off-white tone to it.
This paper also has one of the finest textures I have ever seen on
a matte paper. The smallest details are rendered perfectly and come
out extremely sharp.
I plan to make this paper my primary paper for fine art. I also plan
to purchase 24”x30”sheets as soon as possible. These are
500 gram sheets which mean you do not have to mat or dry mount these
prints. You can simply leave a nice wide border all around the print,
create a deckled edge, and add your embossing stamp for a beautiful “Museum
quality”appearance.
My current print of the month (actually 2 prints this month) are printed
on Epson Ultrasmooth. Click on “Prints” on this site’s
homepage to read all about it. If you want to see this quality for
yourself this is a great opportunity to do so while building up your
fine art photographs collection. And if you haven’t tried Epson
Ultrasmooth yet you owe it to yourself to give it a try. If you like
Enhanced Matte you will love Ultrasmooth! |
| |
|
|
|
|
| |
| |
| Alain Briot |
| |
| |
|
|


