Digital Outback Photo
- Photography using Digital SLRs


Printing Insights #030

Alain's Epson 4000 Experience Diary


A review diary by Alain Briot


Improve your Digital Workflow

"Just bought your latest e-book its really great, I am now working in layers much more efficiently. Also now using ACR properly. Good piece of work, well worth the money. " Gary Yelland


We are very pleased that Alain Briot shares his experience with his Epson 4000 printer. Alain is a very well known professional landscape photographer. Alain lives in Arizona.

Email Alain
Visit Alain's website

 
The diary always has the latest entry on top


6/29/2005 Diary Closed
 

I have replaced my trusty Epson 4000 with an Epson 4800. As a result this diary is now closed. A PDF version of the Epson 4000 diary, as well as the Epson 9600 diary and over 40 essays, articles, reviews and other diaries is available on my Briot’s View CD. The CD now features an interactive table of contents which allow you to see a listing of all the articles and access any of them from this table of contents. Here is a view of the table of contents:


This CD is available here.

Your purchase makes it possible for me to continue writing essays and reviews for Digital Outback Photo.


2/28/2005 Ink use on the 4000
 

How the 4000 uses the two different blacks – the Matte and the Photo (or glossy) black- is somewhat of a mystery at first since there is no way to select any of those in the printer driver.

This selection is made by the printer driver based on which paper you select. If you select a glossy paper the printer automatically selects the Photo Black ink. If you select a matte paper the printer automatically selects the Matte Black ink. Just choose the paper you have loaded in the printer and you are all set.

Also puzzling to some if the fact that the level of both black cartridges goes down even if one never prints on glossy paper (or, alternatively, if one never prints on matte paper). This is because when cleaning the print head all the cartridges are used, so that all the nozzles are cleared, even those that haven’t been used for actual printing. The printer uses this approach because even if you do not use one of the two blacks the nozzles for these cartridges can still be clogged since ink does go into these nozzles anyway. So, even if you never use one of two black inks, you will have to replace both of them sooner or later. Bummer. I know. But there is no way around it at this time.

Finally, I suggest that when you have chosen all the settings you like for a given type of paper you save these settings under a specific name in the driver. That way when you print again on the same paper you can just select the option you just created and not have to go through all the dialog boxes again. Keep in mind that paper is only one of the options you need to select. You also have to select other options under Color Management, page setup and so on. How do you do that? Which options to choose? Stay tuned for another entry or… attend the Antelope Canyon Digital Summit and create Fine Art prints from your photographs under the guidance of Uwe and I. You find more info here.


2/27/2005 Epson 4000 print driver settings
 

The tips below refer to the Epson Driver running under Mac OS X. Most of these choices are similar on windows but accessed differently. If you print from Photoshop you will also need to make color management selections in the Photoshop Print Driver area. How do you do that? Stay tuned for another entry later on on that subject. For now let’s take a close look at the Epson 4000 Print Driver.

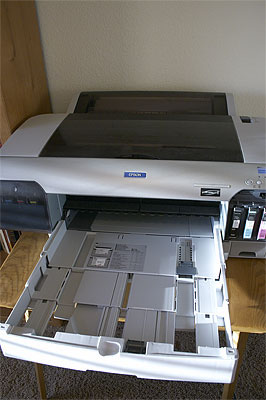
1- Select printer. On Mac OS X you have different “versions” of the same printer
depending on whether you want to print on a roll, through the sheet feeder, etc. If you are just loading sheets in the printer select “Stylus Pro 4000 (Standard)” If you are using roll paper select “Stylus Pro 4000 (Roll Paper)”

2-Presets: this is where you store your custom set of options and choices. I strongly recommend, as I said in my previous entry, that you save your paper, ink, etc. settings in a custom preset because once this is done you can just select it from the drop down list and all your choices will be brought back.

3-Copies & pages: This is where you indicate how many prints of each file you want and whether you want to print all the pages or certain pages only. Keep in mind that when you save a file then open it again later to print it the driver will remember how many copies you typed in the driver. If you typed “4” and you now want only print, you need to type “1” otherwise the driver will use your previous choice and print 4 photographs…

4-Layout. I rarely if ever use this setting as it is used for tiling prints that are too big to print on one page. I print big prints on the 9600 :- ) Your situation may be different and you may have a use for this feature.

5- Output options: this is for when you don’t wish to actually send the file to the printer and instead wish to save it as a PDF or postscript file. However, the “Save as PDF” option is always present at the bottom of the printer driver so this is where I click when I do want to save the file as a PDF instead of printing it. When do I want to do that? For example if I want to save a web page. Saving it as a PDF is a lot more practical than saving it as html or printing it on paper in my opinion. I also use this option to save a file in PDF format when there is no Export to PDF option in the program I created the file in.

6-Scheduler. I never use this option. I guess I always want to print right now :- ) But, if you want to print later than now, you can say when in this part of the driver.

7-Paper Handling. Same thing here. I have no use for it. But, if you are printing double sided pages, you will have to print the odd (or even) pages first and then the other ones afterwards. Just make sure you load the pages that you already printed on the right way!

8-Color Sync. I don’t touch this part either. I make my color control selections in Photoshop and disable color control in the print driver. If you follow this approach (which you should) you can disregard this section.

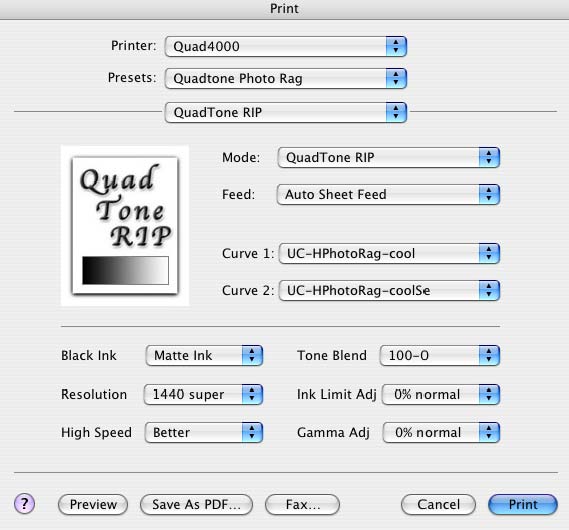
9-Print settings. I spend most of my time here. Here are all the settings, one by one, in the order they appear on this dialog box:


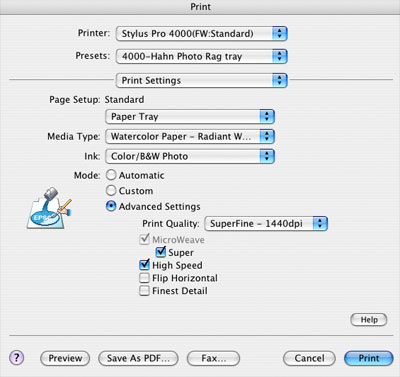
Paper Tray-Manual feed: self explanatory. I always use paper tray but for very heavy media you may want to use Manual Feed. In this case you will be feeding the media from the back of the printer.

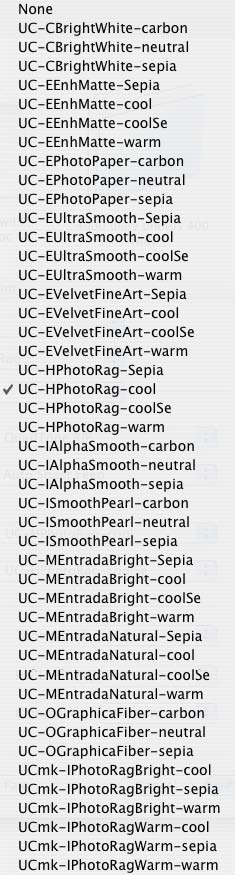
Media type: very important and you need to make sure you select the same media that you loaded in your printer. If you use paper other than Epson you may have to select a specific media. For example, for Hahnemuhle Photo Rag you need to select Watercolor Paper-Radiant White. Why? Because the media type selection primarily affects the amount of ink laid down by the printer. Watercolor Paper-Radiant White is a setting that lays down a high amount of ink, which is exactly what is necessary for cotton based papers that are by nature very absorbent.


Ink: I always select Color/B&W photo. Black is for when you print text or line drawings. If you print black and white photographs make sure you select Color/B&W Photo.

Mode: I always select Advanced Settings because this is the only setting that gives you total control about dpi, speed, etc.
Here are my settings under Advanced Settings
Print Quality: Superfine – 1440dpi Why?
1- because 2880 is not available with all papers, for example it is not available with Watercolor Paper-Radiant White
2- Because 2880 does not result in a visible quality improvement. There is a difference if you look at your prints under a magnifier but not when you look at your prints with the naked eye and from normal viewing distance. Also note that 2880 dpi printing is quite slow.

Microweave: I always check MicroWeave and Super. I may select Finest Details if the image needs it and I am printing on Glossy Paper. On watercolor paper Finest Details does not result in a visible difference.

Flip Horizontal: I do not check Flip Horizontal ever. If I need to flip the photo I do it in Photoshop.

High Speed: this setting can be on or off. If you get banding turn it off as it may be the cause of it. High speed On means bi-directional printing. Off means unidirectional printing. In layman terms this means that when it is On the printer prints each time it goes over the print. When it is Off the printer prints when it first goes over the print and does not print when it comes back over the print. There is no quality difference but the print heads get a break, so to speak, with high speed off, and this may prevent banding. What I found is that with new printers high speed can be On without any problems. When a printer starts to “age” it often needs to be turned Off as banding is more likely to occur.

10- Color Management: For me this setting is always on “Off-No Color Management” since I make all my color management selections in Photoshop. It should be Off for you as well. As I said I will take a close look at Photoshop printing settings in another entry.

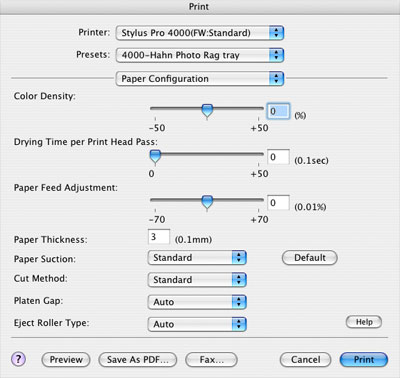
11-Paper Configuration: I have not made adjustments in this area of the printer driver yet. This section does offer a lot of controls over drying times, paper feed and so on. However, in my experience these settings do not have to be changed unless you find yourself having problems with the specific paper you are using.

12-Summary: that’s it, here’s the list of all your choices. A practical option when you want to take a look at everything at once and review the choices you made.

You are done! Again, save your settings as a preset so you don’t have to go through this each and every time you want to print on the same paper! Make a preset for all the papers you use on a regular basis.


2/15/2005 How to maintain your printer – printhead and print rollers cleaning
 

Maintaining your printer in perfect running condition is not always an easy task, especially when you use your printer a lot or when it is getting older. Two of the most common problems are ink clogs and rollers that stop pulling the paper properly.

1-Ink Clogs

Ink clogs are first taken care of through the use of the built in print cleaning utility. The 4000 has an automatic cleaning utility as we saw in my previous entry and this makes life a lot easier.

However, there are times when the printer cleaning utility will not be sufficient to remove the ink clog. For example, ink may have dried up on the head, because the printer wasn’t used for some time (or for some other reason). When that happens you need to use a solvent to dissolve dried ink and unclog the head.

Alcohol and Windex are often used. But, to be sure that you do not damage your print head, the best is to use the Epson Stylus Head Cleaning Solution. This is the same solvent that Epson technicians use. I just found a source for it. At $10 this is a small expense. Plus, this solvent will work with most likely all inkjet printers. Here is the link. Personally, now that I know where to get it, I wouldn’t be caught using my printer without this product.

2-Rollers

The roller problems essentially affect printers such as the 4000 on which paper is not gravity fed, as on the 2200,and R800 for example. Instead, in the 4000 paper is pulled into the printer from an horizontal paper tray. Therefore, the print rollers are 100% responsible for properly pulling and loading the paper. Unfortunately, these rubber rollers gets coated with paper dust and start to loose their grip. The solution is to wipe the rollers with the Rubber Roller Rejuvenator & Cleaner. This solution, for which I also just found a source (the same as the head cleaning solution) will clean and restore grip to the rollers. In the 4000 the rollers you want to clean are located inside of the printer, at the back of the paper tray and are accessible by removing paper and paper tray and looking down into the printer behind where you place the paper.

If your 4000 is not pulling the paper into the printer, and if you are getting error messages because of it, try cleaning the rollers. Most of the time it will take care of the problem. This needs to be done quite often if you are using fine art papers, such as Hahnemuhle, Moab, Epson Ultrasmooth and many other similar papers. This is because those are cotton based papers which contain a lot of lint. When this lint gets deposited on the rollers it causes them to loose their grip and in turn makes the rollers unable to pull the paper into the printer. This problem will also happen if you print a lot, whether on fine art or on glossy paper.

Here is the link to the Rubber Roller Rejuvenator. The cost of a 6.5oz can of Rubber Roller Rejuvenator is only $10. The cost of a call to Epson Service is several hundred dollars… Again, I wouldn’t be caught without it myself!

Please note that I am not affiliated with this vendor (Fixyourownprinter.com), have no commercial interests with them, and pay for my own supplies of head and roller cleaning solutions. My goal in providing you with this information is solely to help you maintain your printer and save you the aggravation of having to make the expensive decision of calling an Epson technician to fix a problem you can easily take care yourself.


Resources: www.fixyourownprinter.com/


2/10/2005 The Quadtone Rip
 

Why use a RIP (Raster Image Processing) instead of the Epson print driver? There are a number of reasons, among which:

- To bypass the maximum print length set by Epson for each of their printers. In the case of the 4000 this maximum print length is, I believe, 44”. This means you will not be able to make a print longer than 44” using the Epson print driver. Because a RIP bypasses the Epson driver and provides it’s own print driver routines, the maximum length is set by the RIP. This length is usually greater than the one set by Epson.

- To be able to use a different type of printing algorithm or dot pattern than the one offered by Epson.

- To get truly neutral black and white prints (prints that are really black and white without having to play with the color settings in the driver or in Photoshop).

- To be able to lay multiple images on one page easily

- To be able to use different profiles for different image on the same page

These are just some of the advantages offered by a RIP engine. In this entry I want to focus on the Quadtone RIP (see Uwe's review here) which I use to print my black and white images.

The Quadtone RIP only offers black and white printing. Under Mac OS X it comes up as a separate printer selection in the Printer selection dialog Box. This selection is titled “Quad 4000.” Print Setting choices are offered under a new “Quadtone RIP” menu which comes up once you select “Quad 4000” as your printer.

Quadtone RIP only runs over a USB connection. Personally, I prefer to run my printers over a Firewire connection which I find to be trouble free. Since the 4000 comes standard with both Firewire and USB ports I simply run two cables –a Firewire and a USB cable- to the printer and use the Firewire connection when I print from the Epson driver and the USB connection when I print from the Quadtone RIP driver. I find that this approach works very well for me.

In my case I use the Quadtone RIP to get truly neutral black and white prints, something which is very challenging (not to say nearly impossible) to obtain from the Epson Driver.

Quadtone Rip delivers beautiful black and white prints with virtually no testing required. The first print I did with it was perfect and I haven’t had any problem. I use the settings indicated on the screen shot below. Quadtone RIP gives you a choice of custom curves proprietary to this RIP. These curves are really the heart of Quadtone RIP since they are responsible for the print quality delivered by the RIP engine. You can select two curves for any print you make. This can be twice the same curve, or a mix of two curves, for example a true black and white curve and a slightly warm black and white curve. The variations are subtle. So far I have used primarily pure black and white curves, since I did not want to give a cold or a warm tint to my prints.

Quadtone is shareware. You can download it here:

http://harrington.com/QuadToneRIP.html

The program is fully operative when you download it. After testing it, if you like the program and decide to continue using it, the cost is only $50. This is a very low price to pay for a solution which delivers what I consider to be world class black and white printing. Needless to say it costs hundreds of dollars less than other RIP engines. You can register and pay for Quadtone RIP via Paypal by clicking here: https://www.paypal.com/cgi-bin/webscr


Screen shot of the Quadtone RIP print dialog box under Mac OSX.

These are the settings I use most often. The first curve (Under “Curve 1) is for Ultrachrome Ink (IC) and Hahnemuhle Photo Rag paper (HPhotoRag) and for a cool print “color” rendition (-cool).

Here is the complete list of curves that came with my version of Quadtone RIP.

New curves are being added regularly so more curves may be available by the time you read this.

Here’s how to “decipher” the curves names:
• UC= Ultrachrome ink.
• The first letter after the dash is the first letter of the paper manufacturer (M= Moab, H= Hahnemuhle, etc.).
• The name after this letter is the abreviated name for each specific paper (“EnhMatte” = Enhanced Matte for example).
• Finally, the last word indicates the “color” that each specific curve will impart to the print (cool, warm, sepia, neutral etc.).


2/9/2005 Epson 4000 Head Cleaning
 

Like the R800 the 4000 provides an automatic head cleaning process during which the printer prints a series of color squares, examines them and then either cleans the head or not depending on whether some of the nozzles are clogged or not.

This is a great feature since it allows you to let the printer figure out if it needs cleaning or not instead of having to generate a print test, evaluate it and then start a cleaning cycle or not.

Automatic cleaning uses more ink but saves time. Which one is the most important to you is your call. In a busy printshop time is of the essence. In the case of a badly clogged printhead which will require multiple cleaning cycles automatic cleaning will save your sanity as the print head cleaning printout below will testify. The printer will continue printing color squares until all the nozzles are unclogged, without asking for any help. How much better does it get? This particular cleaning example would have required at least 2 cleaning cycles, requiring my full attention during the duration of the process. With automatic cleaning all I had to do was start the process then move on to something else. Time, money or your sanity? It’s your call with the 4000!

The regular printhead test generated by the Epson 4000. None of the nozzles are clogged on this test. If one had been clogged I would have had to initiate a cleaning cycle manually.


The automatic print head test and cleaning process generated by the 4000. This example shows two cleaning cycles followed by a successful test free of any head clog. The printer will continue cleaning the head and printing a test pattern until all the nozzles are unclogged.


2/3/2005 Epson 9600, 7600 & 4000: similarities and differences
 
The Epson 4000 has a number of similarities with the 9600/7600 (I refer to both printers as ”9600” below) as well as several differences. Let’s take a close look at them.

Similarities

• The 4000 uses the same maintenance tank as the 9600 meaning if you have both printers you can stock only one tank for both. However, as we saw in the previous entry the maintenance tank can easily be reset making stocking this item a non-necessity.

• The 4000 uses the same ink cartridges as the 9600 meaning you can stock one set of cartridges and use them in either printer. You can also swap ink cartridges from one printer to the other in case you run out of one color and do not have a new cartridge. Just take the partially full cartridge out of one printer, the empty cartridge out of the other printer and exchange them. There will be no damage and no ill consequences to either printer. Trust me, I tried it. The printers will be able to tell exactly how much ink is in both cartridges because that information is stored on the cartridge’s chip, not in the printer.

• Both printers can use 110ml and 220ml cartridges. If you have been told, or have read, that the 4000 will tip forward if 220ml carts are used you were mislead. I have mine loaded with 220ml carts and it didn’t tip over. If you have been told that 220ml carts make the printer larger (extending forward further) you have been misled also. 220ml cartridges come exactly to the end of the paper tray. This seems to indicate that Epson planned for users to install 220ml carts. At any rate why would you use 110ml cartridges since they cost approximately 2/3rd the price of 220ml carts?

• Both printers feature a built in roll paper holder and removable spindles. One can also buy spare spindles and leave them mounted on partially used rolls to save time.

• Both printers feature a built in paper cutter.

• The built in cutter blade is the same in both printers meaning that you can stock one replacement blade and use it in either printer.

Differences


•The 4000 features an automatic print head test and head cleaning mode. The 9600 has only the regular head test and head cleaning mode. I will go into more details about this automated mode in my next entry.

• In my estimate the built in paper cutter of the 4000 is less paper-wasteful than the one in the 9600. The cuts are much closer to the print resulting is far less waste of perfectly usable paper.

• The 4000 features a paper tray in addition to a roll paper holder and single sheet feeder. This is a very welcome feature as it makes printing on sheet paper much much faster. In fact this option alone was 80% responsible for my decision to purchase the 4000. When printing on sheet paper in the 9600 one has to feed each sheet one at a time, resulting in massive loss of time, not to talk about having to stand next to the printer for hours. Not an option for large sheet printing projects!

• The roll paper holder mechanism of the 4000 does not result in creased paper when rolls are left fed in the printing mechanism overnight. On the 9600, leaving roll paper fed into the printer mechanism and pulled below the print head (as it has to be in order to print) results in the paper being noticeably creased. To avoid this mishap one has to pull the roll paper out of the printer everyday. In the 4000 you can leave roll paper into the printer permanently. What a relief. Again, this results in time savings as well as in less paper damage due to winding and unwinding the paper, not to talk about having a loose 44” wide piece of paper dangling behind the printer thereby prone to scratching, creasing and tearing

• The 4000 has both the matte and photo black inks installed permanently. Again, this results in huge savings in time and in money. I fully expect the next versions of wide format Epson printers to have this feature. It’s one of the most exciting improvements since Ultrachrome inks.

• The 4000 comes without a stand but a stand that doubles up as storage cabinet is available. The catch is this cabinet-stand costs nearly 1/4th the cost of the printer. The good news is if you have a sturdy table you probably don’t need a stand. It has to be a sturdy table though since the printer weights “approximately 88lbs without ink or paper” according to the printer manual. I considered getting the stand before remembering that I am not very fond of plastic furniture. The printer now resides on top of an oak file cabinet.

• The 4000 cannot print 44” wide (or 24” wide). The maximum roll or sheet paper width is 17”.


Epson 4000 with fully extended paper tray


2/3/2005 How to reset the maintenance tank on the Epson 4000
 

Just like the 9600 the 4000 has a maintenance tank. In fact, I believe it is the same part number. The two tanks are similar.

But, as we know, the tank isn’t full when the printer says it is. Therefore it pays to reset the counter and continue using the same tank. Here is the process to get that done and save yourself some money in the process. You won’t find this in the Epson Manual!

(use this process at your own risk)

While Powering up the printer, hold down the three left most ARROW buttons:
- Left Arrow
- Down arrow
- Up arrow

Do not press the Right Arrow button!

You will get a “Self Testing” message. Disregard it

You will get a different set of menus than normal.

Use the Up Arrow button to select the “Clear Counters” menu.

Press the right arrow button (the Menu button).

From there you can reset the maintenance tank

Turn your printer off then turn it back on.

If you go back to the regular printer Menu your maintenance tank will now show as being “empty.”


12/4/2004 Getting Started
 

Why another Epson Printer?

I am the proud owner of yet one more Epson printer: the Epson 4000. This printer is added to my already long list of currently owned Epson printers: the 9600, 2200 and R800. Plus, in the past I have owned many other Epson printers, now retired or sold, the C80 and the 3000 among others.

So without delay let’s address the question in everyone’s mind: why get one more Epson printer? Wouldn’t three printers do it? Well, no. Not quite. Here is why.

Let me start by weeding-out the ranks. The 2200 is gone, because I see no benefit to having both the 2200 and the 4000. Don’t get me wrong. I have no qualms with the 2200. It is a great printer in its own right. However, in my situation the 2200 and the 4000 serve the same purpose. They both have dual matte & glossy blacks and they both can print 12 inches wide but the prize goes to the 4000 because it can use 220ml cartridges and print up to 17” wide, not to say anything about its much higher speed and it’s industrial quality built (the 4000 weights nearly 100 lbs !). I will say more on these last two points later on in this diary.

So that leaves us with the R800 and the 9600. Let’s talk about the R800 first. This is the only Ultrachrome printer to feature the Gloss Enhancer as well as blue and red inks for, respectively, no bronzing and an increased color gamut. Plus, it can print on CD’s, a feature I like a lot (I use it to print the design on my new “Briot’s View Articles CD” for example). These three assets are what keeps me from saying “you’re fired,” as Donald Trump would put it, to the R800.

What about the 9600? Easy. It’s the only 44” wide Ultrachrome Epson printer. Since I specialize in very large prints this one is guaranteed to remain in my studio until a worthy replacement comes along (a 44” Gloss Enhancer-enabled printer or maybe a 60” model – who knows?).

So why the 4000? In short because it is a production beast when it comes to making prints up to 16” wide (when adding a 0.5” border on each side). The 4000 is fast (the fastest Epson Ultrachrome printer so far), it can use both roll paper and sheet paper and it does feature a paper tray. This feature enables me to fill up the paper tray, load the spooler and let it print all night long if I feel like it. This is something the 9600 definitely cannot do. If you print on sheet paper with the 9600, each sheet must be fed one at a time. This is a very time-consuming endeavor to say the least.

The 9600 excels at printing huge prints on roll paper. The 4000 excels at making prints up to 16” wide on either roll paper or sheet paper. The 9600 is great if you use only either matte black or photo black. If you need to swap between both blacks, because you print on both photo papers and fine art papers, the waste in time and cost associated with ink swapping makes you quickly realize you need a printer that has both inks present at the same time. The 4000 is the first production Epson printer to offer this ability. I dig it.

The sheet-fed printing ability of the 4000, the combined presence of matte black & photo black, the unrivaled printing speed, the smart print head testing capability, the fact a cabinet is available to support it, and the fact it can use 220ml ink cartridges, thereby making my stock of 220ml cart serve two printers instead of one, makes it a clear winner and a logical addition to my printer lineup.

So, why so many different Epson printers? Because they each have unique abilities and because I need all their printing capabilities combined. Since so far this isn’t available in a single printer, I have them all. Not a bad deal when you can afford it.


For Comments post in our News Group

© 2000-2007 Digital Outback Photo