8/17/2006 Getting Started
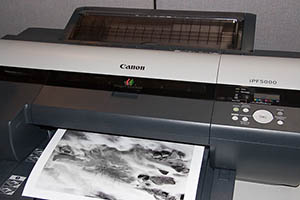
At PMA 2006 Canon announced their first 12 pigmented ink
printer: IPF 5000. We have now this printer installed in our printing
studio. Installation

Canon IPF 5000
Once you have the printer out of the box (it is very
heavy at 99 lbs. and you need a second person to get it out of the
box) the installation went smooth and we started printing about 30
minutes later. Twelve inks is impressive and we will likely check at
a later time whether it really improves the gamut in practice (there
are indications though that it matters).
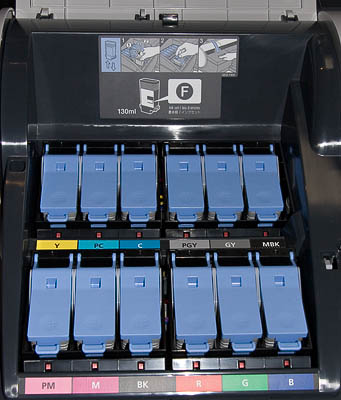
12 inks
The inks set:
- Cyan, Magenta, Yellow, Light Cyan, Light Magenta (that
is typical these days)
- Red, Green, Blue (this makes a difference
as these colors don't need to be mixed from other colors)
- Black, Matte Black, Gray and Photo Gray (a lighter gray)
The ink tanks normally carry 130ml ink but the starter
ink tanks hold only 90ml. While we find it kind of strange to have
starter
ink
tanks with less inks it is on the other side no big deal
if you deal with a printer of this level. Important to note is that
the IPF 5000 does not require to switch inks when changing from matte
to glossy media or back.
Paper Feeder options
- Cassette for thinner and flexible papers
- Top single sheet feeder
- Rolls up to 17" wide and cores 2" or 3" thick (roll adapter costs
extra)
Setting up the Printer
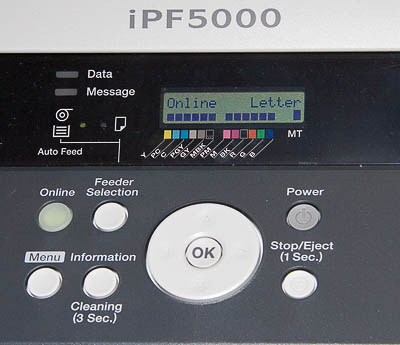
IPF 5000 controls
Different from many other printers you need to setup
the right paper size and paper type on both ends: the printer and
the driver. If there is a size mismatch it won't print. This maybe
sometimes a hassle but no big deal. On the other side it prevents a
bad mismatch. If the paper type does not match this is less of a deal
as you get a warning. Better of course have both sides match. The software
comes with an extra utility to add new paper types. If we use non Canon
papers we prefer to set both ends to a paper that comes close.
Printing from Photoshop
Why don't we just say printing here and mention
Photoshop? The reason is that the IPF 5000 software comes with
an extra Photoshop Export plugin to ease printing. If you use other
applications you may need to use the normal drivers.
What is so special about this Photoshop plugin?
Printing from Photoshop is no real pleasure. You
have at least three dialogs to synchronize to get a proper print:
- Photoshop Print dialog
- Print Size dialog
- Driver dialog
If something does not match you wasted time, ink and paper (and
may even spill inks in the printer). The new Canon export plugin
is a one stop printer control and seems to even get around the
normal driver's 8-bit limitations. There is also one other potential
benefit:
- Allows 16 bit data transfer to the printer and may avoid posterization
in some cases
We will compare the normal driver and the plugin sometimes later.
Because we mostly print from Photoshop anyway there is no reason
for us not to use this new plugin.
Canon imagePROGRAF Print Plug-In for Photoshop
This plug-in controls your complete
print job with all parameters.
Main Tab
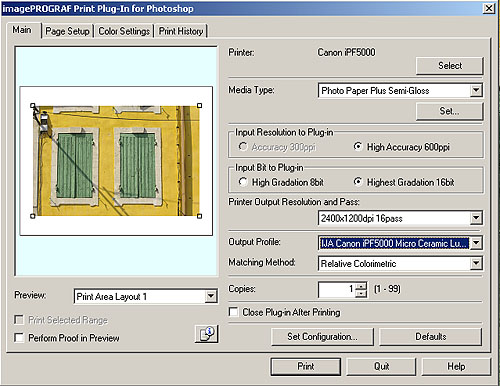
Plug-In main tab
The main tab controls:
- Printer (if you have more than one)
- Media type (select the Canon media type or a paper type that
comes close)
- Input resolution (we use 600ppi)
- Input bit depth (we use 16 bit which of course makes more sense
with 16 bit images)
- Output resolution (we mainly use the maximum 2400x1200dpi 16pass)
- Output profile (can be also "Auto (Monochrome Photo)" for B&W)
- Matching method is the so called rendering intent (we mostly
use "Relative Colorimetric")
- Set Configuration allows to set the upscaling algorithm and
extra sharpening (we left it at zero so far)
- for the other entries you should consult the manual or play
with the dialogs)
Page setup tab 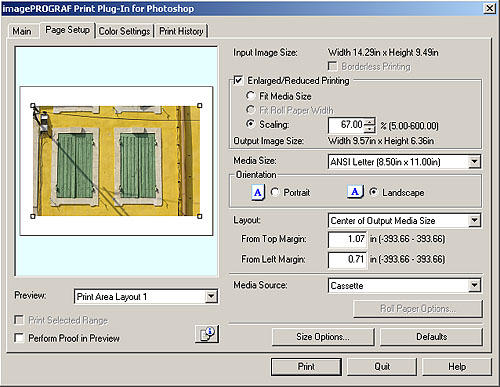
Page setup
- You can resize but we prefer to do this in Photoshop because
we don't find scaling by percentage that appealing (this is actually
our only minor issue so far)
- Media size (needs to match with the printer setting)
- Orientation (Portrait or Landscape)
- Layout
- Media source (also needs to match printer settings)
- Size options allows you to create new custom paper sizes
Color settings
In normal color mode you
get the following dialog. We never tweak colors in the driver and
leave all at the default. 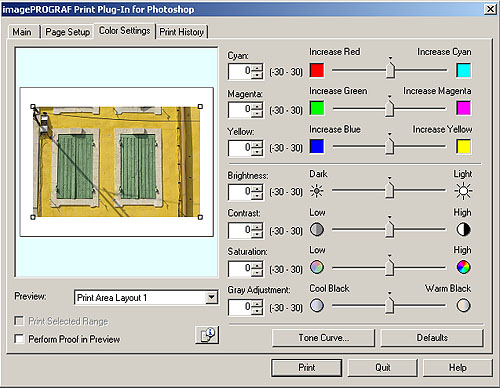
Color settings for color images
In "Auto (Monochrome Photo)" mode
you have a different dialog:
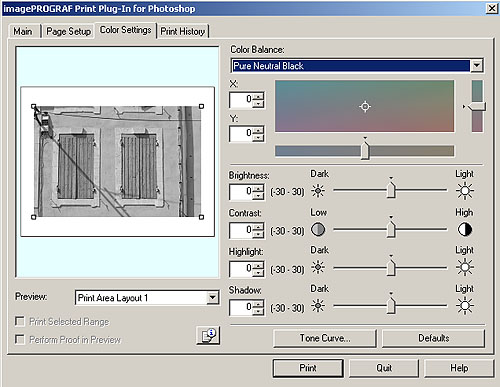
B&W settings
This dialog is used to tweak
the B&W output. Most important to us is the control of the
B&W
tone. We used e.g. X=-2 and Y=-10. You may also tweak the Tone
Curve
to better match the preview and the print:

We will later also check out the B&W
profiling with QTR tools.
Print History
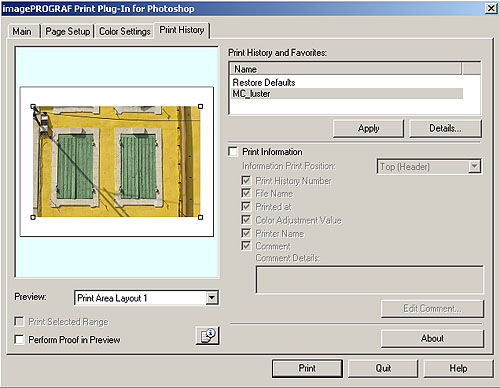
Print History
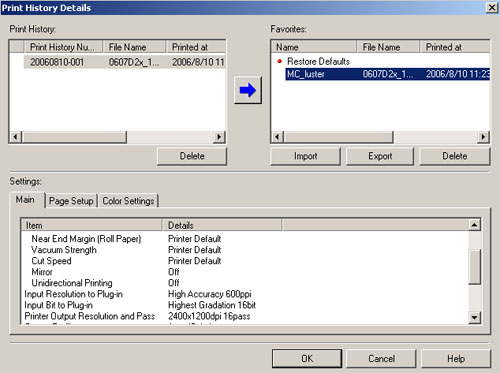
Print History Details
This tab is very helpful for your
print workflow as it serves two purposes:
- Revisit and recall recently printed jobs (last 100 are
recorded)
- Save print job settings as favorites that can be later applied
to new prints
This is a very useful tool.
Conclusion on the PS plug-in
Overall we love this plug-in and don't want to be without. We
have to check into the 16bit operation later. We
just would wish the following improvements:
- Allow resizing by entering width or height
- Allow a larger preview (means resizing of the full dialog
box
We will cover different papers
used with the IPF 5000.
Printing with Paper #1: Canon Heavyweight Satin
Photographic Paper
Paper Data
- 300gsm
- 16x100' roll
- Satin surface
- Item Code: 0849V330
Of all more glossy surfaces we prefer satin or semi-gloss look.
This Canon paper pleases us a lot. With 300gsm it feels solid.
Paper handling by the roll feeder works just fine so far. There
is a special dialog in the plugin to control the roll feeder:

Roll Paper Options
- Roll width (mainly 16" or 17", our roll came in
16")
- Automatic Cutting (yes, no, print cut line)
- "No Spaces on Top or Bottom" prevents paper waste.
We found the default border just right for our print and left
this option
off.
The Heavyweight Satin
Photographic Paper did not show up in the printer or driver settings.
We used the settings for "Semi-Glossy Photo Paper" and
got very pleasing results using the generic profiles of the printer.
We
have to create more dedicated profiles in the future but are
actually very happy so far.
Color Prints
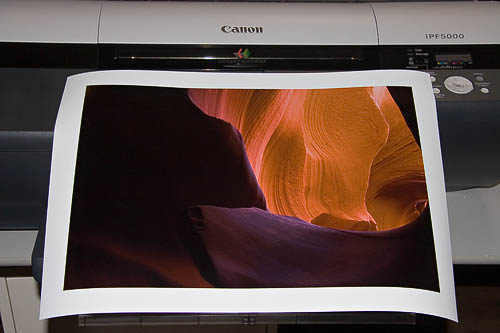
Color print on Satin
To our eyes the color prints look excellent and at 2400x1200dpi
16pass you need a good loupe to detect the dot pattern. Even
then the dot pattern looks very smooth. Actually we find the
color prints on this as good as on any printer that we used
with a Satin paper. Very satisfying.
B&W Prints
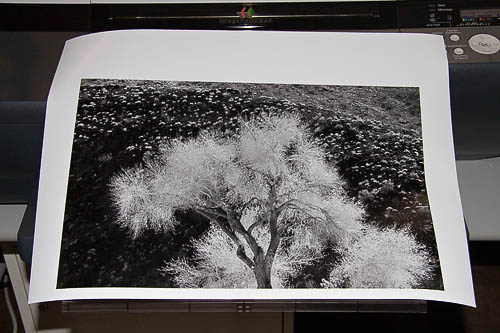
B&W print on Satin
The B&W print was made using the "Auto
(Monochrome Photo)" mode and the above mentioned toning settings.
There is some slight bronzing visible but really needs a close
inspection. We personally don't find this to be a problem even
for prints that are in an open portfolio. Otherwise the B&W
prints looked excellent and we did not find any objectionable metamerism.
For
us this printer paper combination provides excellent
results. We are especially impressed by the B&W performance.
To be continued...
|