10/3/2005 Getting Started
I’ve been a BetterLight user for a few years
now. With their recent release of a USB based product, I have decided
to document what the product is, and how I use it for landscape/fine
art photography. Because there is a lot involved with this product,
and it’s not something that is used as a DSLR would be, I’m
going to discuss it in an on-going diary format.
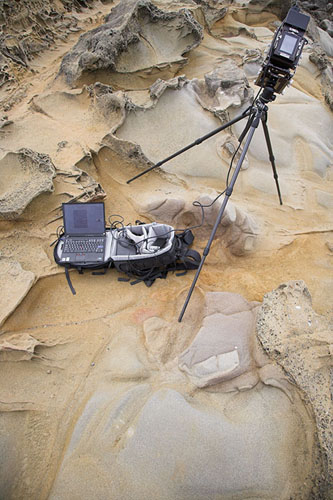
The new unit is much smaller, lighter and faster. This has suddenly
made it much more approachable as a constant companion with my 4x5
gear. It weighs less, and fits in a smaller package than my film and
film holders would.

Old vs. New
First of all, using a BetterLight for landscape photography isn’t
for everyone. With the inherent quality, it brings restrictions and
complications. By the same token, using a 4x5, 8x10 or 11x14 view camera
isn’t for everyone.. and also brings restrictions and complications.
This doesn’t make those cameras unusable for landscape photography,
just as the restrictions don’t prohibit it for the BetterLight.
As an example, take a look at the work by Kenro Izu. He’s hauled
an 11x14 view camera all over the world, and has taken world class
landscape images with it.
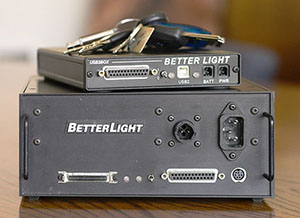
What is a BetterLight back? A quick browse of http://www.betterlight.com will give the product descriptions and more technical and sales information
than I could begin to add here. I decided on the 6000-2 model. This
means it has a native resolution of 6000x8000 pixels, and uses the
2nd generation Kodak tri-linear array. This provides much better noise
handling, which means you can shoot more often in lower light. ISO
ranges from 200 – 3200. Most of my images are taken in fairly
low light, so I’m usually in the 1600-3200 ISO range. This isn’t
as bad as it sounds, and one of the future entries will be a comparison
of ISO quality of the 1DsMk2 and the BetterLight.
The image capture sensor is a tri-linear array. This means there are
three arrays of pixels, 6000 pixels long. Each array has a filter
in front of it: Red, Green, and Blue. This array scans the
film plane and captures the image, three rows of pixels at a time.
This is a plus, and a minus. One of the attributes of the scanning
back are the physical pixels. During the scan, the array moves linearly
across the film plane. As a result, the color information is captured
at slightly different times. If there is subject movement in the
interval between pixel scans, then you end up with color fringing,:
a rainbow pattern that can be found at the edges of the moving object.
The really good thing about this, though, is that *all* color information
is captured for every pixel. This means there is no Bayer interpolation
for the final image. All color and all resolution data is true, not
interpolated. As a result, you end up with much more image information,
and much truer color rendition than with any digital SLR (with the
exception of the Foveon based Sigma cameras). Although the image resolution
is 6000x8000 pixels, giving 48Mp, the resulting image quality would
be comparative to a 96-144Mp image coming from a 1DsMk2 (this is image
dependent). This comparison will be examined in a future installment
of this series.Suffice it now to say, the detail in the images captured
by this back exceed 4x5 sheet film (at least 100ISO Fuji Provia).
At each length of pixel locations (6000 long), an exposure occurs.
This is referred to as the scan time, which ranges from 1/8 second
to 1/240 second. If the scan time is 1/240 second, then the array takes
an exposure at 1/240 second, then moves, next exposure, move. It does
this 8000 times, resulting in about a 35 second exposure. If you only
had enough light for a 1/8 second scan time then the total exposure
would be 16 minutes long. Most of my exposures range between 35 seconds
and 4 minutes. You can adjust the ISO settings (which will increase
noise) to allow for shorter scan times.
I am leaving on a 3 week trip to Thailand and Cambodia. I will be using
both the 1DsMk2 and the BetterLight during the trip. I will also
be writing a trip report that will be published here on my return
as part of this diary. In the trip report the pros and cons
of both cameras will be compared, as well as the resulting images
examined.
|