| |
Alain's
Canon 300D Journey
A review diary by Alain Briot
@Digital Outback Photo
|
| |
| This review will be written again in the form of a
diary. Most recent findings on top. |
| |

Improve your Digital Workflow
Testimonial
"If
you are just now venturing into the world of fine art digital photography
you can immerce yourself in new knowledge about almost every aspect
that I can think of. The photographs on the Outback Photo site
are stunning, to say the least! The books and handbooks offer a
true wealth of knowledge because they are so well thought out and
organized in a concise manner, with numerous examples. There are
vast quantities of other resources available as well, through linking
to other sites. There are interesting and provocative stories and
essays written by both Uwe and Bettina Steinmueller and many others.
I first found the site while checking reviews of the Canon Digital
Rebel and I haven't stopped exploring ... where do Uwe and Bettina
find the time to give so much? They are excellent teachers." Eleanor
T. Culling 2/25/2004
If you work with Photoshop
CS or Capture One our e-books
DOP1009 or DOP2000 are the right choice for the Canon
300D. If you use Photoshop Elements we recommend DOP1008. DOP2000
is the more complete handbook.
|
| |
Email: alain@beautiful-landscape.com
|
| |
|
| |
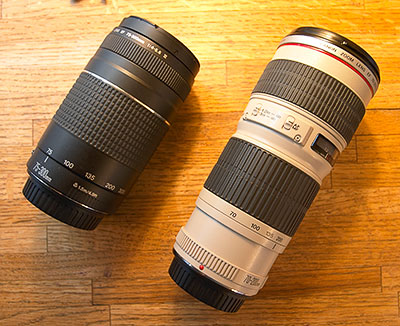
| 1/29/2005 Telephoto zoom lenses |
| |
| Choosing a lens is always a difficult choice provided
the wide variety of lenses available from Canon. This is particularly
true for telephoto lenses. While a telephoto can easily be used on a
tripod, thereby making maximum aperture of secondary importance, the
availability of fast, 2.8 telephoto lenses makes using a telephoto handheld
possible. But there is a catch: fast telephoto lenses are both expensive
and heavy.
I first chose the Canon 75-300 f4-5.6 III as a telephoto lens for
the 300D. While very light and versatile this lens is not at the top
in terms of optical quality. However, the compactness of this lens,
the fact it is lightweight , its long zoom range and its sub $200 price
combine to make it a very attractive purchase.
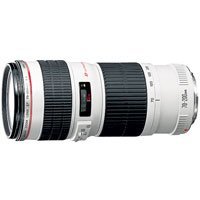
I have now upgraded to the Canon 70-200 f4 L. This is an L lens, Canon’s
top of the line series, with magnificent optical quality. At a price
below $600 this lens is also very attractively priced. Sure, it is
$400 more than my previous telephoto, but given the dramatic improvement
in quality $400 is a reasonable price to pay.
The great thing about the 70-200 f4 is that it is just a little larger
than the 75-300 f4-5.6 III. To me that is a plus because my goal is
to keep the size of my 35mm kit as small as possible. I do however
regret that the lens only goes to 200 while the 75-300 obviously went
to 300.
I consider the 70-200 f4 to be a great buy. It is very reasonably
priced when compared to the f2.8 version of the same lens, the 70-200
f.2.8L, which costs over $1200 or the 2.8 IS (Images Stabilized)
version which costs over $2000. In my estimate this lens offers an
excellent
price/quality ratio . Since I mostly use telephotos with the camera
on a tripod, the maximum opening is of less concern to me than if
I shot handheld.
Editors note: Also look at our Canon Lens
overview.
|
| |
|
| |
| 1/28/05 The A-DEP Mode |
| |
| How to get your 300D to calculate depth
of field for you.
I regularly get the question "How does one calculate DOF using
a lens that has no distance scale (like the Canon EFS 18-55 or the
EF 50 1.8)? Is the A-DEP mode useful?”
It always amazes me how few people use the A-DEP setting. Even more
amazing is how many do not know what this setting is for or even that
it exists. In short, if you are not familiar with this program mode,
A-DEP will calculate the aperture so that everything in your photograph
is in sharp focus. It will then set the camera at this aperture and
finally select the shutter speed for a proper exposure. In short, A-DEP
is an aperture priority mode with maximum depth of field calculation
for the specific composition in your viewfinder.
The only catch with A-DEP is that you have to watch carefully which
of the little red squares in the viewfinder are lit when you focus
since objects without sharp edges may not be taken into account by
the camera and hence won’t be in sharp focus on the final image.
If this is the case simply move the camera slightly to line up the
red squares with a sharp edge area so that the camera can calculate
the depth of field for all elements in the image.
I personally always use the"A-DEP" setting in the 300D when
I shoot landscapes on a tripod. I don't see any reason why I wouldn't
want everything sharp or why I would want to guess the depth of field
when the camera can calculate it perfectly all by itself. A-DEP is
one of the huge advantages brought by camerassuch as the Canon 300D.
A simlar setting is available on the Canon 10D, 20D, and so on. I wish
there was such a setting on my Linhof 4x5 camera! The A-DEP option
is the last one on the "program" ring on
top of the camera, just after the "M" (manual) setting.
You can also calculate the depth of field with software programs.
However, this is of little use when you are in the field, the sun is
setting, you only have a few minutes to work, you don't have your computer
with you, and so on. Portable depth of field calculators solve this
problem, yet, they are time consuming to use and usually remain in
the camera bag. And again, why bother since A-DEP works so well!
If you want to investigate the field of Depth of Field yourself check
out the following links:
This link has an online depth of field calculator:
http://www.dofmaster.com/dofjs.html
and this one has a free depth of field program for Windows :
http://dfleming.ameranet.com/custom.html
|
| |
|
| |
| 12/24/2004 Long exposures and hot pixels removal with
the 300D |
| |
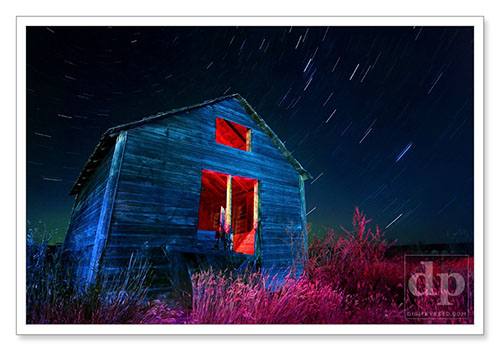
Haunted
Grainery © Sean McCormick
Have you tried doing very long exposures with your 300D? If yes know
that the camera will calculate proper exposures up to 30” in
automatic mode. With the Canon RS-60E3 Remote Switch you can do exposures
up to several hours if you want.
One of the problems you will encounter with long exposures is what
is commonly referred to as Hot Pixels. Hot pixels are sensor pixels
that turn white during a very long exposure.
Because the 300D, and all other Canon DSLR cameras, uses a CMOS sensor
it exhibits a much lower number of hot pixels than digital cameras
using a CCD sensor. However, you will still get hot pixels during long
exposures, although far less than with a CCD camera.
An efficient way to remove hot pixels is to use Black Frame NR, a
free hot pixel removal tool from MediaChance: http://www.mediachance.com/digicam/blackframe.htm
Black Frame NR uses a black frame taken with the lens cap on to remove
hot pixels from a digital image with deadly accuracy. After processing
the image with Black Frame NR you can “polish” the image
with Neat Image to remove any noise that would be present in the photograph:
PixelZap is an alternative program to BlackFrame NR. It will remove
hot pixels without the dark frame, but it does a better job with one:
http://tawbaware.com/pixelzap.htm
Another good program is Image Stacker:
http://tawbaware.com/imgstack.htm
There are two good things about this program. First, it has dark frame
pixel removal built in. Second, if you are unable to make single long
exposures with your digital camera because you don't have the wired
remote, you can take a pile of short exposures and then stack them
into a single exposure using this program. This is very nice for people
who can't afford Photoshop and don't know how to stack multiple exposures
using Screen blend mode.
The combination of the 300D CMOS sensor, hot pixels removal programs
and Neat Image will allow you to create very smooth long exposure photographs.
At this time of year (Christmas 2004) this may be just what you need
to capture Christmas light displays at night!
If you want to see some beautiful examples of images created with
this technique visit this page showing images created by Sean McCormick
of Edmonton, AB, Canada: http://www.digiteyesed.com/portfolio/lightpainting.php
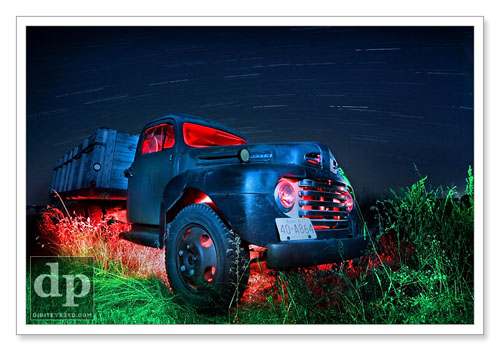
Infernal Ford © Sean McCormick
Sean creates low light images using a Canon 300D and colored flash
strobes. Sean is the inspiration behind this diary entry. The software
descriptions above were written by Sean.
Here is Sean’s workflow for the images above:
1. Conversion of Canon RAW file to 8-bit TIFF format
2. Hot pixel removal using Black Frame NR
3. Noise removal using Neat Image and stored ISO 200 profile
4. Manual cleanup of missed hot pixels in Photoshop
5. Level adjustment in Photoshop
6. Apply digital 82C cooling filter at 25% to simulate tungsten-balanced
slide film
7. 15% boost to color saturation
8. Unsharp mask
If you have any questions about this technique feel free to email
Sean at: sean@digiteyesed.com
Unfortunately none of these programs are available for Macintosh.
Since I use a Mac, I’m out of luck… It used to be that
graphic programs were produced first for Macintosh and then ported
to Windows. It looks like things have changed drastically… so
much so that I may have to switch to Windows for my photography work.
In fact, I already use a Sony Vaio Laptop to run programs not available
for the Macintosh. The times sure are a changing… again.
|
| |
|
| |
| 12/22/2004 New Canon Lenses |
| |
| I just purchased two new Canon lenses. I plan to use
these lenses with the 300D for the time and eventually with other Canon
digital cameras as I upgrade them.
These two lenses are:
- 17-40mm L f4 zoom
- 50 mm f1.8
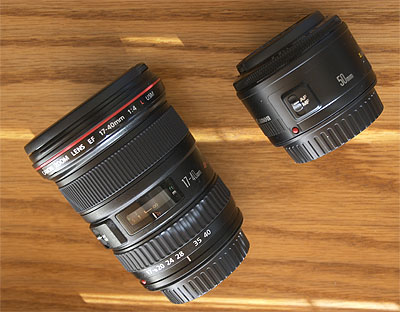
I chose the 17-40 L f4 zoom to replace the 18-55 dedicated
zoom that came with the 300D. The 17-40 is an L lens, one of
the most
popular
of all Canon lenses.
Canon L lenses have a red stripe around the front of the lens. Users
praise this lens and for good reason. It is an outstanding
lens both in terms of
the image quality it delivers, the focal lengths it covers
and the USM focus motor
it features. Focus is both swift and precise, without any lag, delay
or unnecessary hunting around until an appropriate focus point
is found. The cost of this
lens is also extremely reasonable for an L lens at about $675. Wide-angle
lenses on a full-frame sensor often results in photographs
which exhibit chromatic
aberration in the, especially if you photograph with the lens wide
open. However, on the 300D this is not a problem as the reduced
frame
means you are using
only the lens’ “sweet” spot and therefore getting
the best image quality from it. I chose the 50mm f1.8 because of it’s low price -$75 only- it’s
compactness and the fact a 50mm lens on the 300D is actually a 70 or
85mm equivalent due to the reduction factor caused by the sensor being
smaller than a 35mm film frame. This makes a 50mm lens an excellent
portrait lens or short telephoto. The very lightweight quality of this
lens, its compactness and its fast speed make it also the perfect lens
for low light conditions and/or for when you want to stay inconspicuous
or carry a very lightweight camera. This is especially true if you
use a metal-bodied Canon digital camera which are far heavier than
the 10D and which, when combined with a zoom lens such as the 17-40,
can get quite heavy to carry. What do you have to loose for $75, especially
since optical quality is actually quite good.
I plan to add the 70-200L f4 USM later on. The relatively low price
(about $550) of this L lens combined its excellent optical quality
make it a winner in my eyes. Yes, there are lighter and more compact
Canon zoom lenses in the same focal lengths, but not with the same
image quality, not L lenses either and for a lot more money. There
is also an f2.8 version of this lens, also L and with the added benefit
of Image Stabilization (IS) but it’s heavier weight make it less
appealing to me. Since optical quality and lightweight are my concern
more than lens speed and image stabilization, this lens is a very good
choice for me.
Find more on Canon lenses here.
|
| |
|
| |
| 12/20/2004 My opinion of the 300D so far and other
remarks about Canon digital cameras |
| |
| After nearly 1 year working with the 300D, and 7400
photographs taken with it, it is time for an evaluation of what I like
and dislike about it. Here we are:
What I like
- It is a lightweight camera
- It does not look like a pro camera which
is great when you don’t
want to be noticed
- The 18-55 dedicated lens is very nice and
practical
- With the 18-55 and a 70-300 zoom you have all you need
to cover nearly all photographic situations. Add the new
10-20
dedicated
zoom and there’s
almost nothing that will escape your lens!
- It is easy to
use
- The quality is identical to that of the 10D at a lower
cost and lower weight
- I created very nice images with
it that I can print up to 16x20, with upresing, if needed
- I can
use any Canon lens on it and most Canon accessories
- The new Canon
10-20 zoom gives the 300D super wide angle capabilities with excellent
glass quality
What I don’t like
- The plastic body is easily scratched.
- I suspect the body is also
easily broken. It fell several times but always in sand, so nothing
broke. On the other hand the
lightweight of the camera does prevent a harder fall.
- The
camera has at least a 3 second delay from the time you press the
shutter to the time you can take a photo after
it goes in sleep
mode. I find myself pressing the shutter repeatedly to
make sure the camera is ready to shoot at an instant notice.
- The
18-55 lens broke down once on my camera and on several student
cameras. Canon fixes them it for free if it breaks
during the warranty
period but it is a problem.
- A super wide angle, 10-20
zoom is available for the 300D but it will not work on any other
Canon Camera except
the
20D.
- Similarly, the 18-55 dedicated lens will not work
on any other Canon camera except the 20
- The shutter
feels “clunky” and slow when compared
to the 10D and other Canon cameras
- Mirror lockup is
not available
- It does not have the feel or the look of a professional
camera
- The battery is nowhere close to lasting
as long as the new 1Ds Mark II battery
- I cannot use it to take photographs
that I plan to enlarge beyond 11x14 or 16x20. This
means I
have to
have another
camera with me
in case I find a subject that I will want
to print large, or I will have
to return to the same location with another
camera later on. This can be a problem if the subject
is far away
or difficult to reach.
- All the LCD displays
are on the rear of the camera. I prefer the top display of the
10D,
20D and 1DsMarkII
combined
with
the LCD viewfinder
on the back.
- The software menus are separated
under several tabs instead of being all one below
the other
as in the
10D and other
Canon cameras
Would I upgrade to another Canon Digital camera?
Yes, definitely. The
300D has given me a positive experience and a good feel for Canon
digital cameras. I would definitely upgrade to
either the 20D or the 1Ds Mark II.
Do I have a favorite between these two other cameras?
You bet: the
1Ds Mark II. I had the opportunity to test it during the Fine Art
Digital Summit in November and I loved it. In fact, I may
very well purchase one soon unless some equivalent camera comes
out that outdoes the 1DsMark II price/quality ratio.
|
| |
|
| |
| 12/18/2004 What do I use the 300D for? |
| |
| I haven not written an entry for this diary in some
time. This is not to say I have not used the 300D. In fact, as of today,
I have taken over 7300 photographs with the Canon 300D.
What have I used it for? Here’s a short list of what I do with
it:
- I use it to create photographs that I know I will not be enlarging
much more than 8x10 or 11x14. However, on occasion, and with
a professional approach to upresing, I have created prints up to
16x20.
- I use it as a lightmeter when I shoot with 4x5. Not only does
it give me the exposure, it also shows me the photograph as
well as
the histogram for this exposure thereby allowing me to visualize
the final
image. I do make adjustments, when I decide on the final exposure,
for the difference in dynamic range between the film I use
(Fuji Provia 100F) and digital capture since digital capture has
a
much wider dynamic
range.
- I use it to create photographs that depart from my traditional
style, photographs which I would not do with 4x5 because I
am not sure how
they will turn out or if I will like them or not. In this sense
I use the 300D to “take chances” if you want, because
there is no cost in film, very little cost in time and because
I can see the
results right away. On several ocasions I have returned to
do with 4x5 a shot I originally created –and discovered-
with the 300D.
- I use it to document things when I travel, take
photographs of people (something very challenging to do with
4x5 :-) and
photograph
equipment
reviewed in my articles (such as my new Epson 4000 diary
elsewhere on this site).
|
| |
|
| |
| 6/28/2004 More Lens Baby |
| |
I took more
photos with the lensbaby today. One of the main advantages of this
lens is the possibility to create in and out of focus areas quickly
and easily. Normally, to get a pronounced out of focus effect on
a specific area of the image, you need to use some sort of gel on
the lens to blur specific areas. Cokin even sells a special gel for
this use, a sort of Vaseline. You can also use a veil or other semi-transparent
cloth
Of course, you can get out of focus areas with any
lenses. But, the areas that are out of focus have to be on a different
focus plane than the in-focus area. With the lensbaby this doesn’t
have to be the case. You can tilt the lens any which way you want to
get a specific area in focus or out of focus, no matter if it is close
to the in focus area.
Here are some images I created yesterday in my garden.
The extreme out of focus effect gets me dizzy sometimes!

|
| |
|
| |
| 6/26/2004 |
| |
| If you enjoyed my previous entry and are now photographing
with a lensbaby or thinking about doing so here is a useful tip regarding
metering with this lens on the 300D
I previously said the 300D cannot meter accurately with the lensbaby.
Well, I was wrong! If you set the metering mode to AV the 300D will
meter usefully and you will get properly exposed photographs automatically.
It makes sense since in this mode the f-stop is fixed and you control
the shutter speed only. Since there is not f-stop control on the lensbaby
it's just what we need!
The 300D also meters accurately with the lensbaby in Manual mode.
However, in this mode you have to control the exposure via the overexpose
/ underexpose adjustment. If you forget to adjust the settings to 0
you will get an over or under exposed photograph.
You can even use the built-in flash with the lensbaby. The 300D built-in
flash does go off and is metered properly in both AV and Manual mode.
|
| |
|
| |
| 6/25/2004 Lens Baby |
| |
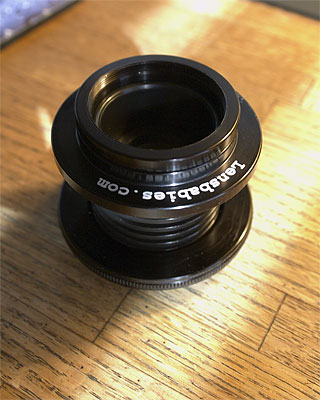
| Today I got a Lensbaby (www.lensbabies.com) for my
Canon 300D. What is it you might say? Well, read on as this may be one
of the most unique lenses you can possibly purchase for your 300D (or
other SLR’s).
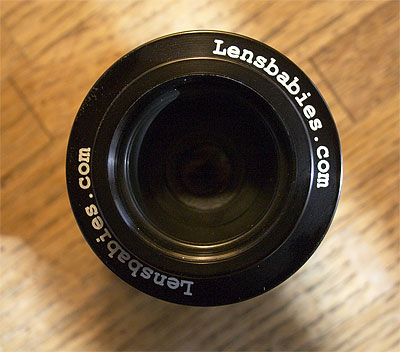
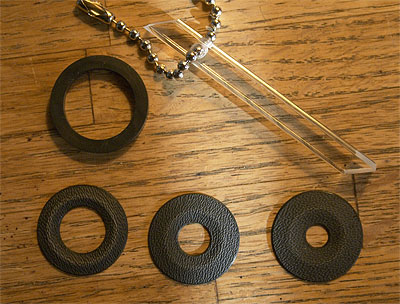
The lensbaby is basically a lens reduced to its simplest _expression.
It does not have the conventional aperture and focusing adjustments
that regular lenses have. The aperture is set via the use of 3 different
aperture rings –f8,5.6 and 2.8—that are made of plastic
and held in front of the lens via a rubberized ring.
To change the aperture one pries the rubber ring off with the provided
transparent acrylic tool, removes the aperture ring, replaces it with
a different aperture ring, and pushes the rubber holder back onto the
front of the lens.
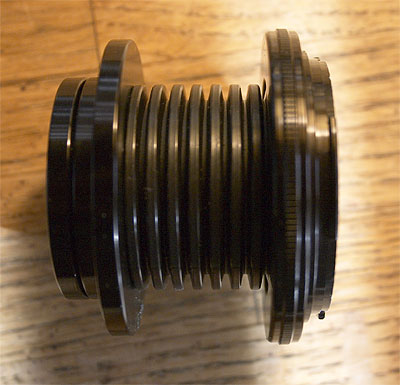
The lens has no rotating focusing mechanism. This is replaced by plastic
collapsible bellows. To “focus” the lens one pulls or pushes
on the lens to either extend or compact the bellows.
Since the bellows can be moved in any direction the lens can be pointed
downwards or upwards while the camera remains level.
So what can this lens do that other lenses can’t do? Well, for
one it is a lot of fun to use. It also provides one of the easiest
ways to create shallow depth of field images. Since the f-stop rings
all have rather large openings getting a lot of depth of field is challenging.
And since the lens can be focused at an inch or less close ups are
easy to do. These two factors –wide f-stop openings and close
up focusing range—contribute to create images where depth of
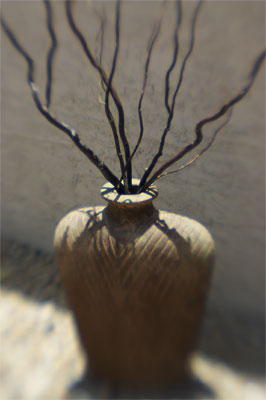
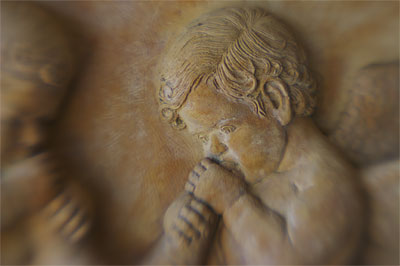
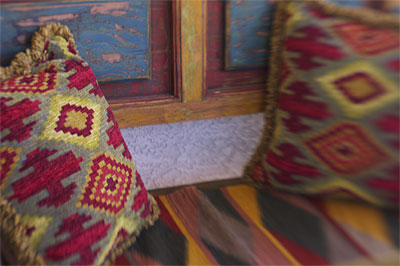
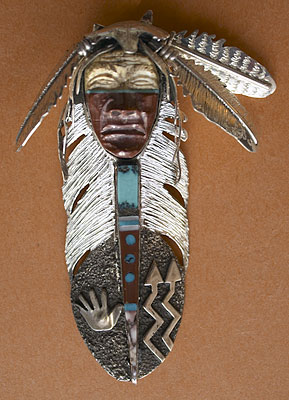
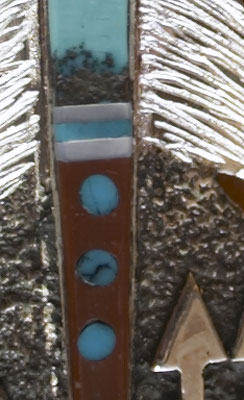
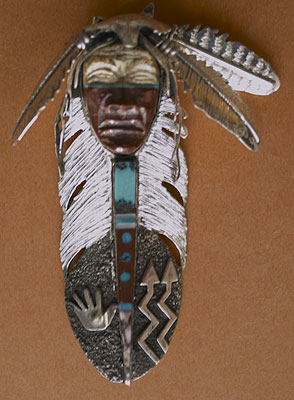
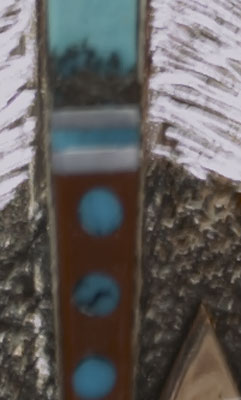
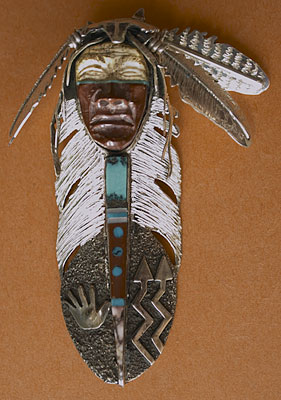
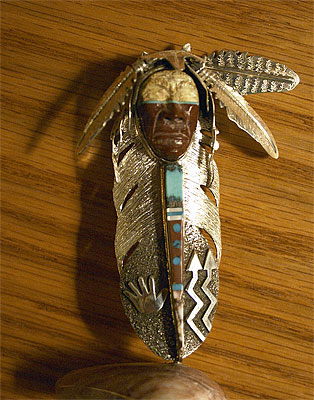
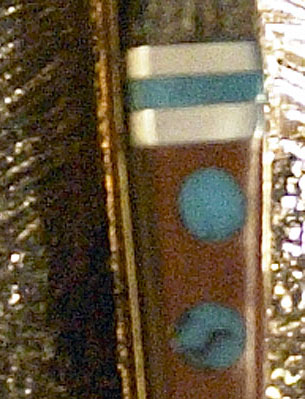
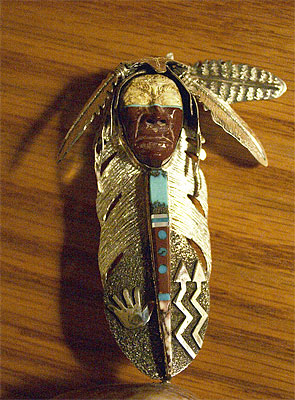
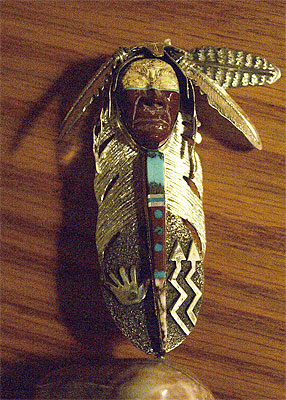
field is reduced to a bare minimum. Here are three images I created
using some of my personal Navajo jewelry collection:
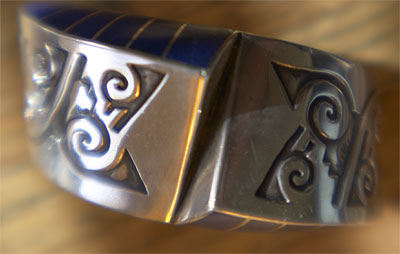
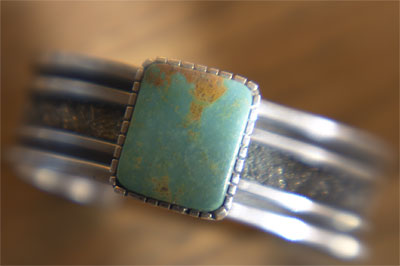
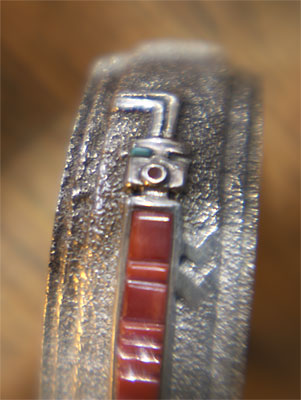
In these images I was very careful to focus on the area where I want
to draw the most attention. Areas out of focus are totally blurred.
I like the soft, diffused effect that these areas have.
I haven’t explored the possibilities of the lensbaby any further
so far. However, if I do I will make sure to post the results to this
diary. In the meantime, if you are ready for a wild purchase, one that
will take you as far from high tech lenses as you can possibly get
today, the lensbaby may be the one to get.
Do keep in mind that a digital SLR is the perfect companion for this
lens. This is because the lens has no electronic connection to the
camera. Hence, the camera built-in meter is useless and the camera
cannot calculate the exposure. With a digital camera this is not a
problem since you can see the photograph right away on the LCD panel
and make exposure corrections accordingly. Since you cannot change
the f-stop, other than by replacing the ring by a different one (something
which isn’t exactly a quick process), the way to increase or
decrease exposure is by changing the shutter speed. If you get into
very low speeds you can bump up the ISO setting. |
| |
|
| |
| 5/13/2004 8-55, f.3.5-5.6 Zoom lens back from Canon
Warranty service |
| |
Today I received my 18-55 zoom lens back from Canon. It was repaired
at no cost and works great. According to the letter that accompanied
the lens Canon did the following repairs:
- Replaced rear lens assembly
- Adjusted and checked all functions.
There was no cost for this service. It took a month from the day I
sent it to the day I got it back. |
| |
|
| |
| 4/21/2004 |
| |
| I sent my 18-55 lens for repair to Canon last week.
Today I received this email from Canon. It looks like the lens is on
its way to being repaired under the warranty. |
| |
|
| |
| 4/14/2004 18-55 dedicated lens sent for repairs |
| |
Today I sent the dedicated 18-55 zoom lens, the
one which comes with the 300D kit, to Canon for repairs. From what
I can tell the lens’ autofocus mechanism does not work. The lens
makes a whirring sound when the camera is turned on and immediately
an ‘Error 99” message comes up on the LCD panel. This repair
will take approximately 2 weeks based on what Canon told me.
|
| |
|
| |
| 4/6/2004 18-55, f.3.5-5.6 Kit Zoom lens problems |
| |
As of yesterday I am encountering problems with
the 18-55 dedicated zoom lens which comes with the 300D as part of
the $999 kit. This is a lens which works only with the 300D and which
cannot be mounted on any other Canon camera.
Specifically the lens makes a whirring noise when the camera is first
turned on. Then, when trying to take a photograph, the camera cannot
focus and the LCD screen displays and "error 99" message.
The lens can be focused in manual mode, by setting the switch on the
lens to manual focus, but no photograph can be taken since the error
message effectively makes the camera inoperative.
The camera and the lens were never dropped so the cause of the problem
is not there. Rather, this appears to be a mechanical malfunction unrelated
to my use of the camera. It may be due to the
unexpensive built quality of the lens.
The 300D does not seem to be the problem since I can take photographs
with other lenses mounted on the camera. The guilty party is the 18-55
zoom lens. I will call Canon and see if I can return the lens for warranty
repairs. I will post my findings about how the warranty will work to
this diary. Hopefully they won't ask me to return both the lens and
the camera. |
| |
|
| |
| 3/29/2004 Which lenses do I use with the Canon 300D? |
| |
I use two lenses with the 300D. My first lens is
the 18-55, f.3.5-5.6 zoom which is dedicated for use with the 300D
(this lens will not work with other Canon cameras). My second lens
is the Canon
75-300,f.4-5.6 zoom. Together with the 300D and a 1gb flash card the
total cost for this system is roughly $1400.
Both are simple, inexpensive lenses. They are also extremely compact
and light, a great advantage when you have to walk around all day as
I did in Paris. I have not compared the images created with these lenses
with images created with more expensive lenses but so far I have been
pleased with their performance. I made print up to 10x15 from photographs
taken with both lenses and I cannot find anything wrong with either
lens. There is no vignetting and no visible distortion in the corners.
Here are 2 photographs, one taken with the 18-55 zoom at a 55mm setting
approximately, the other taken with the 75-300 zoom at a 200mm setting
approximately.
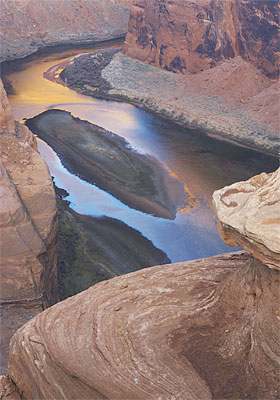
The Horseshoe Bend at sunrise. This is a view of the upstream part
of
the canyon.
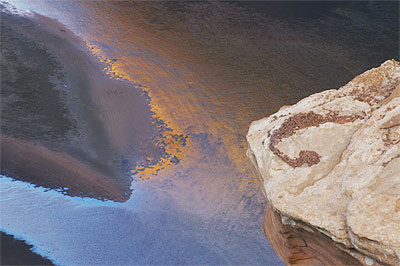
The Horseshoe Bend at Sunrise. This is a close up of the river and
the cliff. I was attracted by the relationship between the shapes of
the river and the cliff.
|
| |
|
| |
| 3/24/2004 |
| |
1- Alain’s Digital Rebel Gallery
I just opened a Canon 300D gallery on my website at:
http://www.beautiful-landscape.com/New work 300D.html
This gallery showcases my favorite 300D photographs from December
2003 until today. I will continue adding photographs to this gallery
each time I create images that I deem worthy of being part of this
portfolio.
I have taken 4300 photographs with the Canon 300D as of today.
2- A note on my previous diary entry on overexposure
I want to add a note in regard to overexposure. Uwe Steinmueller made
the point that you have to be cautious when exposing to the right with
a camera that has only a single channel histogram such as the 300D.
When doing so it is possible you are clipping one of the three color
channels (red, green and blue) inadvertently. You will not be able
to see if you are clipping one of the channels because the single channel
histogram does not show what is going on in each individual channel.
For this reason the only way to expose to the right with 100% accuracy,
and not clip any channel, is to use a camera with a 3 color histogram.
Such a histogram shows each individual Red, green and blue channels.
If you do not have such a histogram and you expose all the way to the
right I recommend you take a second photograph one stop underexposed
from your “exposed to the right” photograph to make sure
you are not clipping any of the individual RGB channels.
If you have been exposing to the right and noticed that some of your
photographs showed lost data (highlights with no details) look no further.
The guilty party is the lack of a 3-color histogram showing you what
is really happening to your image when you are overexposing. |
| |
|
| |
| 3/23/04 Why use the Canon Digital Rebel? |
| |
I very much like the Canon 300D. It is light, easy to use and delivers
high quality images in print sizes up to 9x12 or so. I like it so much
that I use it regularly on workshops and informal photography outings.
Of course I continue to photograph with my Linhof 4x5 but when I want
to work fast, or when I want to explore a subject without having to
set up the 4x5, I use the 300D.
A lot of people have been surprised regarding my extensive use of
the 300D. Apparently, when you use a 4x5 it is believed you can only
use a 4x5. So I wanted to clarify the issue a bit.
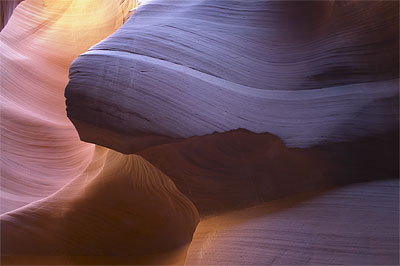
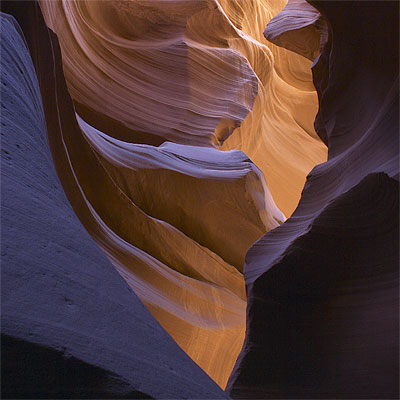
This photograph of Antelope Canyon was taken during a recent workshop
while helping workshop participants with their work.
I am an artist. To me photography isn’t different from painting
and drawing in its purpose and intent. Only the practice is different:
different tools and different technical knowledge regarding how to
get the highest quality with those tools. Otherwise the goal is the
same: creating a pleasing, artistic and overall exciting representation
of nature or cities (in the case of my Paris work).
As an artist trained at the Beaux Arts I created large oil paintings.
I also created sketches, studies, watercolors and miniatures. While
the large paintings were arguably the overall goal, a lot of the fun
of being an artist rested in creating these other types of art. Sketches,
studies, and five minute drawings are far less involved than a large
oil painting. Creating these “lesser types” of art allowed
me to relax, be impulsive and explore new areas with ease and speed.
When doing a large painting weeks, if not months, of work are required.
Pauses during the work are required as well. After getting a start
on the painting, and working on it for several weeks, a pause may be
necessary in order to reflect on how the piece is coming along. On
a large project it is often necessary to step back, turn the painting
around so you don’t see it for several days, work on something
else, and then come back to it with fresh eyes later on. In other words
I rarely, if ever, worked on a single piece at any given time. Instead,
I worked on multiple pieces. Some of these pieces were brought to conclusion
and when completed displayed in galleries. Other pieces never saw completion
and were “abandoned” in one corner of my studio, in a folder
or a flat file. Others were considered “done” after a few
minutes or hours of work. They were studies whose goal was never to
be completed the way a fine painting is completed.
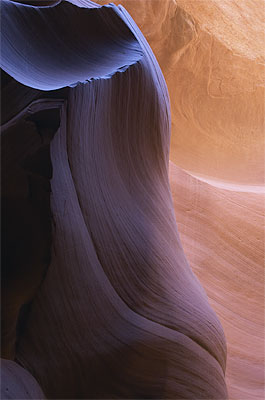
This photograph, as well as the two others in this entry, is a straight
raw conversion in Capture . No adjustment was made to the contrast,
color balance or color saturation of the image. I had never obtained
such colors in Antelope Canyon with film.
In other words different types of artistic endeavors have different
purposes and goals. They also result in a different end product. They
address different audiences and reflect different motives on the part
of the artist. One of these motives is the fun and excitement of working
fast and intuitively as well as the desire to let your creativity express
itself fully in an unrestrained fashion. In some ways the goal of these “lesser” forms
of art is to rejuvenate the artist.
This is exactly what a camera like the 300D allows me to do. I have
no intent on creating a 40x50 piece when I use it. Rather, my motivation
is to create relatively small and unpretentious pieces, miniatures
if you would, which exhibit a greater freedom of approach, and a faster
approach as well, when compared with my 4x5 work. My goal is to rekindle
my passion towards photography by taking chances with my work, explore
subjects that I could not explore with the 4x5 (such as street photography)
and work fast. Yes, work fast! A most elusive goal with 4x5!
My approach is also to “sketch” with the camera and explore
lighting and compositional angles that I would not explore with the
4x5. I am inclined to take chances photographically with the 300D because
there is no penalty to do so, either in time, expense or end result.
If I don’t like my 300D images no big deal. I had fun creating
them, I relaxed and I tried new things anf that is enough. Most likely
I learned something new which I would not have learned with 4x5.
Art must be fun. Artists are artists because they are in love with
their subject and their medium. To limit myself to one camera format
alone would be similar to limiting myself to one subject alone. While
this is sometimes the case –George Mancuso photographed only
the Grand Canyon- it is not the case for me. I see my subject as being
what excites me visually and what makes me want to create a beautiful
reproduction of what I see.
This image was cropped slightly from the original composition. One
of the difference between 4x5 and 35mm is the format ratio of the images:
4x5 is nearly square while 35mm is an elongated rectangle. This image
is perfectly square. |
| |
|
| |
| 3/22/04 Shooting at ISO 100, 50 and 25 with the Canon
300D |
| |
In my last entry I looked at image quality when the camera is pushed
beyond it’s programmed ISO settings (underexposed images). Today
I look at image quality when the camera is used below its programmed
ISO settings (overexposed images).
In effect this approach is similar to “exposing to the right”,
an approach pioneered by Michael Reichmann and one now widely used
by those “in the know”.
The result of overexposure in digital capture is higher quality files.
Why? Because digital cameras capture more levels of information in
areas which receive more exposure. Of course, you have to be careful
not to overexpose too much and clip some of the information off. The
best way to insure this is not the case is to look at your histogram
carefully and make sure that the brightest values are all the way to
the right of the histogram but not beyond the right side of the histogram.
If there is information beyond the extreme right side of the histogram
it will not be recorded and these areas will be pure white and without
any details.
For this test I used the same piece of Indian jewelry I used in my
previous test
Here are the resulting images:
1.
Normal exposure at ISO 100, the lowest ISO setting offered on the Digital Rebel
2.
Overexposed by one stop and corrected in Capture One. Effective ISO 50 setting
3- Overexposed by two stops and corrected in Capture One. Effective
ISO 25 Setting.
This test, predictably, show higher quality images at lower ISO settings
ond higher levels of overexposure. The “over one stop” image
is blurred because it was taken hand held and I moved. The “over
two stops: image shows blown highlights. Two stops overexposure was
too much for this image and resulted in lost data. If I had been shooting
for optimal quality, instead of doing a test, I would not have used
this setting.
At sizes like these, and as jpegs, the gain in quality is not very
visible. But in a high resolution print it would be. At any rate overexposing
images does not hurt the image quality. Instead, it can only help,
provided you keep your images sharp and, unlike I did in this test,
use a tripod when your shutter speeds get low. Also provided you do
not, unlike me again, overexpose your images beyond the extreme right
of your histogram.
Editor: I could not disagree more! I avoid any(!)
overexposure like hell. But of course I respect Alain's opinion. It
all depends what Alain means with the term "overexposure". I always
try to be shy of the right side in the luminance histogram as you never
know whether you may also clip single RGB channels.
This test was not designed to produce printable images. It was only
designed to show you what happens when you overexpose. Incidentally,
it also shows what happens when you induce camera shake because your
shutter speed is too low to shoot hand held and when you overexpose
too much. |
| |
|
| |
| 2/21/2004 Shooting at ISO 1600 to 6400 with the Canon
300D |
| |
Here are the results of the ISO tests I promised in my previous entry.
I took three photographs of a small piece of Indian jewelry.
- The first photograph was exposed at ISO 1600, the highest native
ISO provided by the 300D.
ISO 1600
- The second image was exposed at ISO 1600 and underexposed by one
stop, creating (artificially) an effective ISO 3200 speed.
ISO 1600 (one f-stop underexposed)
- The third and last photograph was exposed at ISO 1600 and underexposed
by two stops creating an effective ISO 6400 speed.
ISO 1600 (two f-stops underexposed)
The results are enlightening although predictable. As the ISO increases
(or the underexposure increases, which is the same in this instance),
noise increases proportionally. The lowest noise level is in the photograph
exposed at ISO 1600. The ISO 3200 photograph shows a significant noise
level. The noise level on the ISO 6400 photograph is quite out of control.
Both underexposed photographs were adjusted in Capture One to match
the properly exposed photograph. No other adjustments were made. All
three images were exposed under tungsten light with the color corrected
for a 5000K setting.
The cropped images show a 100% enlargement at “actual pixels.” The
cropped area is in the center of the jewelry piece. This area includes
shadows, midtones and highlights.
No noise-reduction software of any kind was used to process these
images. What you see is what the 300D created. |
| |
|
| |
| 2/19/2004 Pushing the 300D to ISO 3200 and 6400 |
| |
In my previous diary entry I mentioned how nice it would be to have
ISO 3200 sensitivity on the canon 300D. David Greenberg emailed me
a solution today, one that can be implemented right away without having
to wait for Canon!
Simply set the 300D to ISO 1600 then set the exposure compensation
to -1. This will effectively result in an ISO 3200 sensitivity.
Agreed, the photographs taken with this setting will be underexposed
by one stop. However, as I explained in a previous entry, correcting
for a 1 stop or even 2 stops underexposure during raw conversion is
not only feasible but virtually unnoticeable in the final image. Since
a two stop underexposure can be corrected this means it is possible
to shoot at ISO 1600 -2 stops resulting in an ISO 6400 effective speed.
My previous underexposure example was done with photographs exposed
in normal daylight. I will conduct tests at night using ISO 1600 underexposed
by -1 and -2 stops and publish the resulting images to this diary.
This technique opens some very interesting venues for nigh time or
low-light level photography.
Note that this technique can be used with any digital camera as long
as it offers exposure compensation.
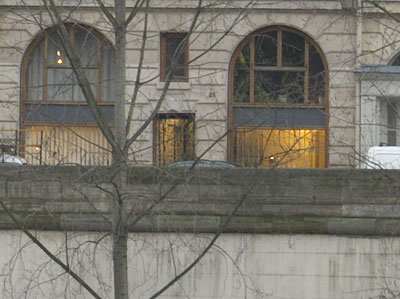
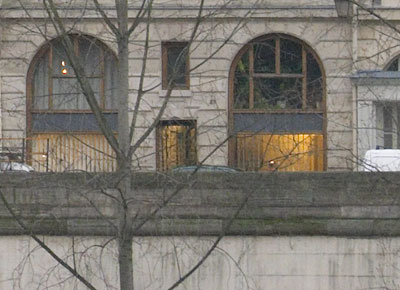
Here is a 300D photograph taken at ISO 1600. The cropping shows the
image at “actual pixels,” or 100% magnification. The cropped
area is the bottom center of the glass panels on the door.
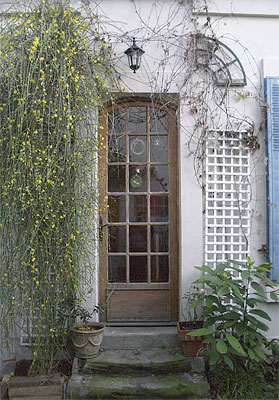

No corrections of any kind were done to reduce noise. What you see
is what the 300D created. There is no doubt that using one of the noise-reductions
utilities will result in a lower noise level. |
| |
|
| |
| 2/18/2004 People |
| |
Photographing people is very different from photographing nature or
cities. In Paris, with the 300D. I found a regained interest for photographing
people.
From 1980 to 1990 (roughly) I photographed people extensively, mostly
in black and white. I actually had a show of my street photography
at the Journees Internationales de la Photographie in Arles in 1984.
I photographed in Paris and throughout Europe and the United States.
I started with an Olympus OM2 then moved on to a Leica CL. I liked
these two cameras, especially the Leica CL, because of their compact
quality and discrete appearance. I went as far as placing black tape
over the white Leica brand on the CL to be even more discrete. With
the Leica CL loaded with Kodak T-Max 3200 black and white film I was
able to photograph hand held at night at 1/60th and f2. I love the
resulting images. I now own a Leica M7 and 35mm Summicron but, as you
will see, I may prefer the 300D for people photography…
The 300D allows me to work in a manner similar to working with either
the Leica CL, Olympus OM2 or even the Leica M7. This is essentially
because of four facts: first, the 300D is a small, compact and lightweight
camera. This makes it easy to use all day long. A heavy camera, such
as the 1Ds, wouldn’t be as easy to use. The weight of the 1Ds
would becomes a burden after a few hours.
Second, the 300D does not have the appearance of a professional camera.
It looks just like the original, film-based Rebel and it is used by
many tourists. Hence, no one pays much attention to it or to what I
am doing with it. I merge with the crowd and become a tourist among
many other tourists. This to me is crucial to creating impromptu photographs
of people. I don’t want my “models” to pay attention
to me. I want them to act as if I wasn’t there, as if I did not
exist.
Third, I can push the sensitivity of the 300D up to ISO1600 if necessary,
and I can do this at any time during a shoot. While noise is a concern
at this speed this option does make the difference between capturing
the photograph or missing the shot. I would like to see the sensitivity
of the 300D (and other digital SLR’s) go up to ISO 3200 since,
with a fast f2 or f1.4 lens, this means you can photograph at night
without the need for a tripod. Again, noise will be a concern at this
setting but it will be nice to have that option.
Fourth, I have instant visualization, via the LCD screen on the 300D,
of the photographs I just took. I can check the composition, the exposure
and the focus while the model is still right there in front of me.
I can adjust all of these elements as I see fit and then take another
photograph if necessary.
Fifth, and unlike any of the M-series Leicas, the 300D has auto-everything.
Auto-focus, auto exposure, auto “film rewinding” which
in this case is fast digital storage. Furthermore, I can take a lot
more than 36 frames on one “roll” in this case a 1 or 4
GB flash card. All this adds up to an unbelievable amount of freedom
from all and any technical considerations, allowing me to focus 100%
on the subject and the photograph.
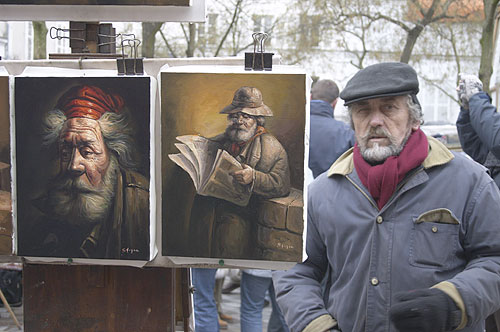
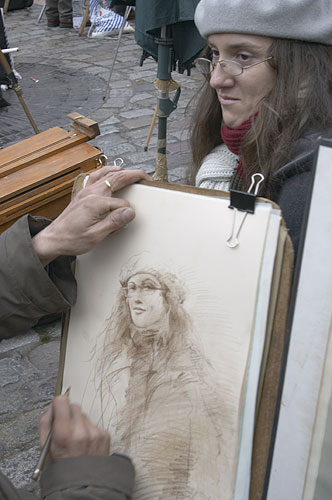
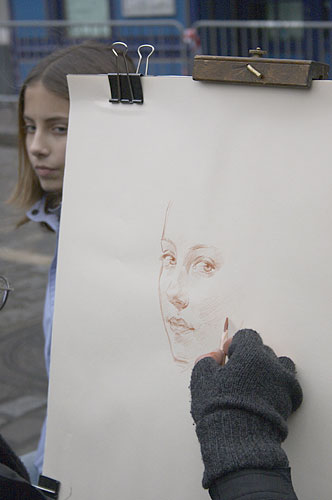
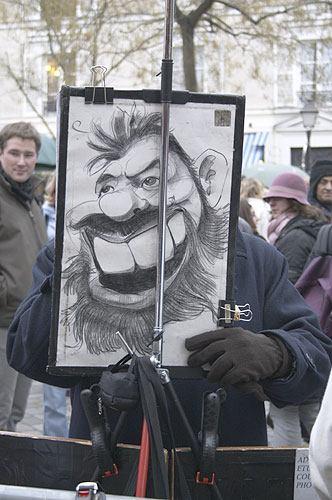
Here are some of photographs of people I created in Paris with the
300D. This particular series was created in Montmartre, on the Place
du Tertre, where artists set up and sell their work year round. There,
many artists offer to sketch your portrait on the spot literally. I
was particularly taken by the relationship between the artists and
their models and between the artists and their work. I enjoyed capturing
the visual aspect of this tension and this intrigue with the 300D.
|
| |
| |
| |
| |
|
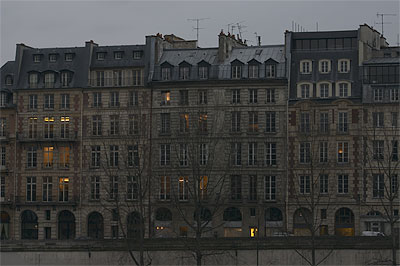
| I have been working steadily on my images files from
Paris. If there has been no entry to this diary for about a week it is
because this process is keeping me very busy. Taking photographs can
be fast. Sorting through them can be a lengthy process.
As I work my way through 2300 digital files and several hundred medium
format and 4x5 transparencies I cannot help but make comparisons between
film and digital. One particular comparison struck me as important
today: how film and digital capture handle underexposure.
Among my 300D files I found a series of photographs which have been
undereposed by 2 stops unintentionally. I had set the exposure compensation
to minus 2 stops, on purpose, to photograph a brightly it white object.
However, I forgot to set it back to normal afterwards and proceeded
to photograph a scene which required no exposure compensation with
a -2 stops compensation.
The result: a greatly underexposed series of photograph. Here is the
last image in this series:
When I realized my mistake, by looking at the preview on the LCD screen,
I immediately placed the exposure correction to 0 (normal) and took
the same photograph. Here is the correctly exposed image:
For comparison purposes I corrected the underexposed image in C1 Pro
to see what I would get and compared it to the properly exposed image
of the same scene. Here is the corrected image, processed in C1. The
only correction made increasing the exposure by 2 stops to match the
brightness of the properly exposed image:
As you can see there is hardly any difference between the properly
exposed and the corrected image. However, I had increased the exposure
by 2 stops in C1 for the second image!
With film, such an exposure increase, either at the scanning stage
or in Photoshop, would result in an image with noticeable problems
such as increased film grain, lack of overall contrast and a "muddy" quality
throughout the image.
In other words, a film-photograph corrected for a 2 stop underexposure
does not look like a properly exposed film photograph. However, a digital
photograph corrected for a 2 stop underexpose looks like a properly
exposed digital photograph!
You may be skeptical so here are two crops from the images above.
Each crop shows the photograph at 100% enlargement or "actual
pixels." These crops are straight out of the images above without
any modifications whatsoever.
and
These two images make the point better than words ever can. To my
eye the only visible difference between the two images is a little
bit of extra magenta in the light areas of the adjusted image.
The ability to correct 300 D files for underexposure of this magnitude
is remarkable. It is truly one of the huge benefits of digital capture.
If I had captured this image on Fuji Velvia or Provia, and forgot to
ask the lab to correct during film development for a 2 stop underexposure,
the transparency would have been useless. With digital, all is takes
is a few seconds of my time. What a difference! |
| |
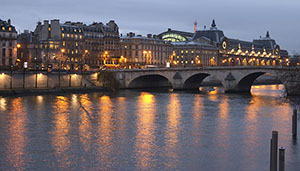
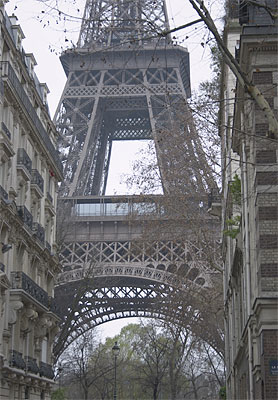
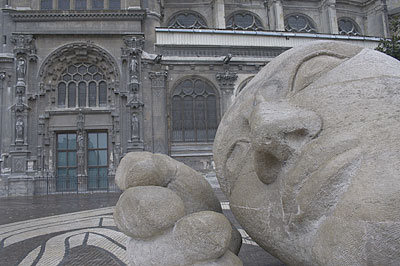
| 1/22/2004 Why I worked with the Canon 300D in Paris |
| |
During the two weeks I spent in paris I took 2300 photographs with
the Canon 300D. In a sense, I did what I thought I would not do: take
a lot of photographs and sort through them later on. Normally, I take
only a few, carefully selected photographs and sort through photographic
possibilities in the field, deciding which photographs I really want
to take and eliminating those I am marginally interested in taking.
The process I followed in Paris is an exact reversal of the one I
follow when photographing the landscape. I followed this reversed process
in Paris for the following reasons:
First, I was not able to spend as much time as I would have needed
to shoot 4x5 exclusively and think carefully about which images I wanted
and which images I did not want.
Second, I had not been to Paris for 12 years (sic.). More on this
later as I am sure you wonder "why so long." The matter is
that I was rediscovering the city from a new perspective and did not
have the benefit of knowing exactly what I wanted to photograph. In
this situation, taking a lot of photos was akin to studying the location
and discovering the possibilities it offered. It was, in a sense, a
sort of "survey" in the sense of the possible images I wanted
to create.
Third, using a digital camera saved me (and continues to save me)
a lot of time in this discovery/research process. Scanning 2300 photographs
would take me months while I am converting my Canon 300D Paris photographs
and printing them as I write this, only a few days after coming back
from France. You can't beat the speed. I estimate that using digital
saved me months of work and, in this specific instance, that it is
the fastest approach to creating the beginning of a Paris collection
in the amount of time I have available.
Fourth, I was very curious to find out how shooting digital for a
large project compares to shooting film, not only in terms of image
quality but also in terms of workflow. There was no better way to find
out than by actually diving-in and using a digital camera for a significant
project at a location that I could not easily go back to. In this sense,
the exact digital camera used is not all that important since it is
only one piece of a larger "puzzle" which comprises all the
elements necessary to follow the workflow to it's natural completion:
a fine print.
Finally, it was time I actually worked digitally myself. Most of my
students, in workshops and in one-on-one consulting, work with digital
cameras. I could no longer postpone not working personally with the
same tools for important projects. |
| |
1/20/2004 Diary started
In December 2003 and January 2004 I travelled to Paris
for a two week photography project in my native city. I took along
with me a Linhof 4x5, a Fuji 645zi medium format, and a just acquired
Canon
300D digital 35mm camera.
In this diary I have four main goals:
First, I want to report my experiences shooting digital 35mm in Paris.
Second, I want to show how the 300D compares to medium and large format
film
cameras in terms of image quality and ease of use. In this analysis
I will also discuss Raw converters such as Photoshop Raw and Capture
One. I will also discuss the digital techniques I used to achieve
the best possible results from my 300D photographs. Examples will
be provided as illustrations.
Third, I want this to be a travel diary. It will be loosely organized
according to the different areas of Paris I visited. I also want to
include information about photographing and travelling in Paris. Although
not directly related to photographing with a digital camera, these
informations are relevant because they shaped my experience and determined,
in a large part, the quality of my results. Too often articles on photographic
equipment are written in such a way that the equipment is presented
in a vacuum, as if the environment in which this equipment is used
does not matter. In my eyes, this environment matters greatly. In fact,
my decision to use a lightweight digital 35mm camera was directly related
to the challenges presented by photographing in a large city during
a relatively short period of time.
Fourth, last but certainly not least, I want this diary to be a showcase
for the photographs I created during my visit. After all, we do what
we do because of our desire to create beautiful photographs. And, when
all is said and done about equipment, travel, location, and raw processing,
what is most important are the photographs we bring back from our journeys.
This diary will be similar to my very popular Epson 9600 Diary. It
will be a user's diary, written by someone who is using the camera
he is writing about (editor: all of our review diaries do that!).
Most important, this diary is for people like yourself, people who
want
to use this
camera
themselves
and want
to
know what to expect before they make a purchase and want to get support
and help after their purchase. There will a lot to learn from it so
bookmark this page now and come back to it often! |
| |
| |
| |
Alain's web site: www.beautiful-landscape.com
Email: alain@beautiful-landscape.com
|
| |
| |
|
|
| |
|
|