| Digital Outback Photo - Photography using Digital SLRs |
|
 |
|  |

|
 |
|
Nikon Capture Experience Report by Uwe Steinmueller (last updated 03/04/2001) |
 |
|
When the D1 was released in October 1999 this camera supported a NEF RAW format. If you buy the camera body in the standard set and find out how to enable the D1 saving in the NEF format (set CMS 28 to 1) you then realize that there is no software in the box to read NEFs. Instead Nikon sells an accessory software called "Nikon Capture" ($500) which can be used to convert NEF files. Many D1 owners (including myself) think that the best quality you can get out of the D1 is by using NEFs. So you can imagine the disappointment that NEFs cannot be used without extra software. As Nikon Capture has this hefty price tag it was enough incentive for third party shareware developers to create other software which could do the trick. The best known and most successful products are Qimage and Bibble. Today Bibble is probably the dominating NEF conversion software. The main reason to review Nikon Capture is to look what it can do in terms of pure image quality. |
|
Nikon Capture has actually two main functions:
For using the D1 in tethered mode Nikon Capture is probably still the standard although Bibble also supports some of the needed functionality. We are outdoor photographers and don't need to run the D1 in tethered mode. This is why this review will only concentrate on the NEF conversion aspect of Nikon Capture (NC). It is also not ment to be a tutorial about NC. We will concentrate on the strength and weaknesses of this software. |
| Version 1.1.3 of NC on Windows 2000 was used. The Mac version might or might not behave in the same way. |
| IMPORTANT NOTE |
|
The custom setting 24 of the D1 has a direct influence how NC works. The different values of tone settings are interpreted by NC before the image gets displayed. Although this flag does not influence the actual image (NEF) data there is no way in NC to overwrite this settings (e.g. for false settings). That is why I have set custom setting 24 to the value 2 (low) all the time as this prevents blown out highlights in case of high contrast (the norm in California). The auto setting of CMS 24 is not safe either as the camera sometimes chooses "high" while there are still smaller parts of white (e.g. birds) in the photo. In that case NC will blow out these whites. This is my main concern about NC and a major design flaw. It would be pretty easy to provide the user with the option to overwrite this behavior. The fault is not that this tone curve is applied (this is actually a good idea) but that you cannot change this behavior after the fact. |
| Color Management |
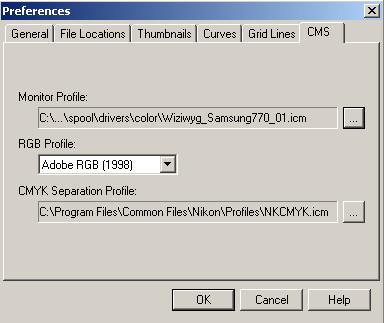 |
| NC allows to chose a RGB color profile which defines the working space for all TIF files created in NC and is then recognized later by Photoshop. NC also supports the use of monitor profiles. Both features are essential for a professional photo editing program. Today also Bibble and Qimage support both features. |
| White Balance |
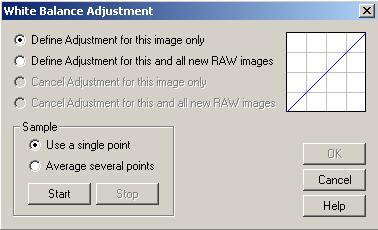 |
| NC has a one click white balance (WB) as found in many photo editing programs. This is not good enough for photos which have no well defined gray value as part of it. Bibble does a much better job as it also allows to change the WB after the fact. If your photos are very much dependent on the right WB you should photograph a gray card with one of the photos. Then the NC white balance allows you to keep the same WB for all the new photos edited by NC. Be careful to reset to setting when you switch to a different series of photographs. |
| Exposure compensation |
| NC unfortunately does not support any exposure compensation tool. NC should add this like in Bibble or the Kodak DCS Photo Desk. |
| Curves |
| The curves tool is clearly a highlight of NC. I like it much more than the Photoshop equivalent. Important to know is also that NC curves and NCs other tools works in full 16 bit mode. |
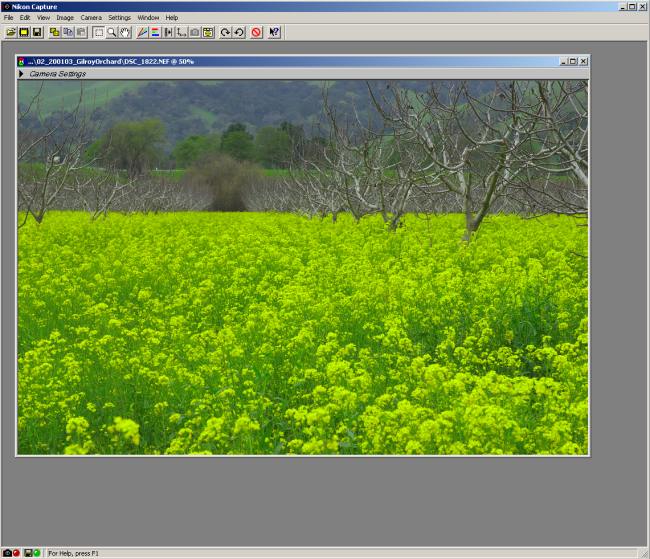
| I will demonstrate the curves tool with an example; How to lighten up your shadows. |
 |
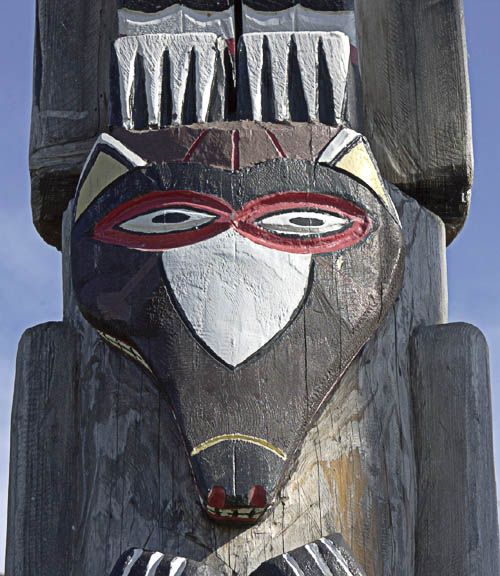
| The above photo is a crop of a NEF file just opened in NC. It shows the following histogram in the curves tool. |
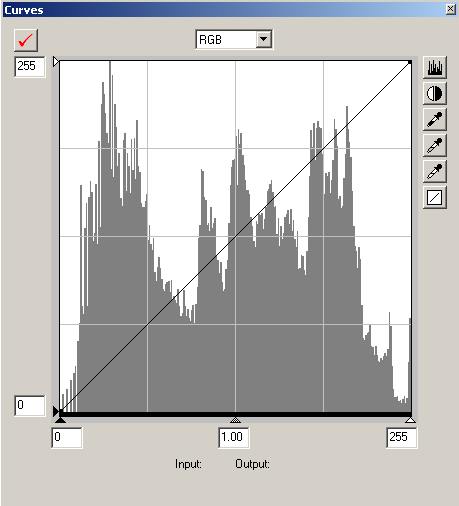 |
| The curves indicate some blown out highlights (see the spikes on the right side). Normally I try to avoid this at any cost. In our case it is not that critical as the photo itself has really some spots of pure white. What we want to have though is some more light in the shadows. |
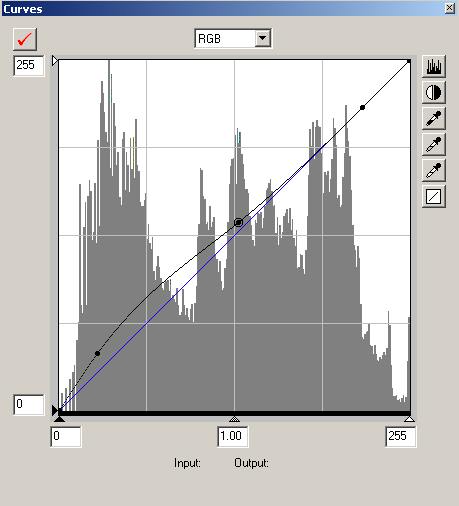 |
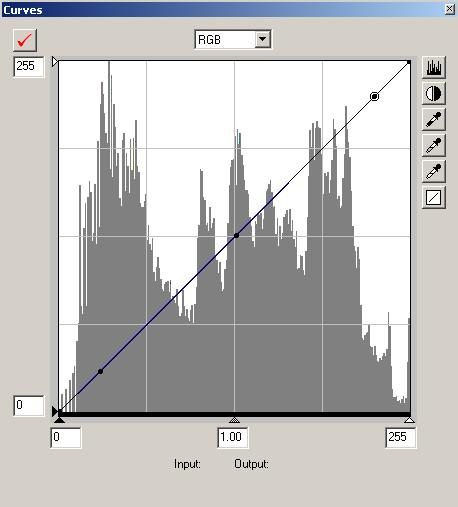
| The above screen shots show how easily this can be done in NC. First you create three points with you cursor on the graph. Then by moving the left point up the shadows get lighter. Finally moving the middle point also a bit up smoothens the curve. The resulting photo is shown below. |
 |
| You can also correct the curves for red, green and blue separately. This is a good way to improve overall color balance. |
| NC is known not to be a very fast program. But on a modern PC (800 MHz) this is not a problem. Bibble is faster in many aspects but does not allow to preview corrections at a large preview size as fast as NC. This is one of the main reasons I like working with NC. I need a preview which is as large as possible. |
| Unsharp Mask |
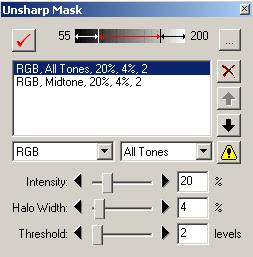 |
|
Sharpening in 16 bit is a second highlight of NC. In theory sharpening should be the last and final step for any photo. This is a problem for me as you can only judge the quality of a photo if is also sharpened to a certain level (and all NEFs need sharpening). So I do some modest sharpening in NC as seen in the above dialog. The 16 bit sharpening in NC rarely amplifies any noise which is so often the case with 8 bit sharpening programs.
|
| Saving from NC |
|
If I understand NC correct it only simulates the effect of curves and USM in the preview window and does no change on the real image data at this point. The real image manipulation is actually performed when you save the final image. That is why saving is pretty slow. But it has the great advantage that image manipulations are only performed once. This prevents unnecessary image degradation by multiple conversions. NC then can launch the saved photo into an other applications (like Photoshop). NC can save as 8/16 bit TIF or JPG at different compression levels. It is best to save as 16 bit TIF if there is any need for further corrections in Photoshop. |
| Miscellaneous |
|
| Conclusions |
| Overall I think that NC does perform very well in NEF conversions and I personally like working with NC. This is mainly due to the large preview, the excellent curves and USM tools. |
| New findings |
| 03/05/2001 Was asked about the color quality and differences to Bibble. Read this report here. |
You
can order the Nikon Capture 2.0 here  |
| For Comments post in our News Group |