Bibble 2.99 Review
by Uwe Steinmueller (06/12/2001)
(c) 2001 Uwe Steinmueller, this review
and/or photos might not be used for commercial purposes without written
permission
Introduction
With Qimage 2001 V1.6 we got a very much improved
sense of color from Nikon
D1 NEF files. Before I used Capture and the latest Qimage version
I was a longtime Bibble user as it fits more into my workflow (especially
the Photoshop plug-in).
Bibble 2.99 builds on the strengths of 2.5 and adds
a lot greater color quality and excellent sharpness..
As usual I will concentrate only on NEF processing although
Bibble also is quite capable in dealing with D1 JPG files.
The input dialog
Why put so much information all in one input dialog?
There are many advantages of this approach:
-
the same settings can be used for Batch, Plug-In
and the normal Bibble open.
-
With some experience a user knows the settings
he wants to apply
-
It allows Bibble to apply the options in the
order which is best to the image quality
-
In the future it will probably be possible to
save settings and reload them if needed (this is on Eric's task list).
Lets have a look at the different sections
Preview Window
The preview is the same as in version 2.5 only the image
quality is much better. Bibble has to balance real time processing, different
monitor sizes (800x600 still is reality) and visual feedback. For me the
preview as it is now is very useful. I easily can see the effect of changing
the WB override.
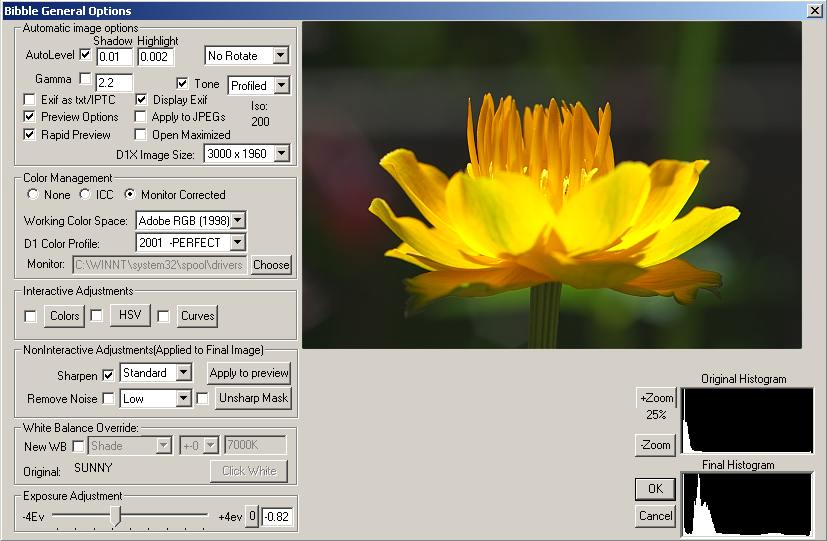
Automatic image options
|
AutoLevel
|
Defines a percentage above (highlights) or below (Shadows). They
represent points in the the points in the histogram that you would
set the highlight and shadow sliders too if you were leveling normally.
The histogram is then streched so that those values become true
black and white and everything in between gets more contras.
|
|
Rotate
|
|
|
Gamma
|
Selects a gamma curve to be applied on the photo (not active if
tone is selected)
|
|
Tone
|
This works like the Tone setting in the D1 (CSM 24). As this is
not applied to the image inside the camera for NEF files
-
Profiled (this option is new and gives very correct color and
preserves the highlights)
-
Camera (use the setting made for CSM 24)
-
low (use for hard contrasts, but also see profiled)
-
normal (the standard)
-
high (use for low contrast photos)
|
|
EXIF as txt/IPTC
|
Writes a text file with the EXIF (camera setting recording) info.
Also controls if exif info is placed in the IPTC fields in photoshop.
|
|
Display EXIF
|
Shows EXIF info
|
|
Preview Options
|
If selected it shows the input dialog. If not selected it applies
the last settings and does not show this dialog. You only have to
deselect for "unattended" batches.
|
|
Apply to JPEGs
|
Allows to use the input dialog also for JPG files and also causes
bibble to load JPGs in photoshop thru the options.
|
|
Rapid Preview
|
Allows the *Initial* preview to come up much faster. Meaning all
the interpolating is done after you say ok.
|
| Iso |
Displays the ISO of the photo. Based
on that information you might select some noise removal. |
| Open Maximized |
Image will be opened in maximized mode |
| D1X Image Size |
2.99 will support the D1X uncompressed
.nefs Fully and will allow the user to load A d1x nef file at the
standard resolution 2kx3k, or at bibbles enhanced 10 Megapixel mode! |
Color Management
Bibble started very early to use color spaces and provide
monitor profile compensation. Monitor calibration allows you to soft proof
photos for printing (if you use proper profiles for your printers). I
believe this is essential for a good capturing process.
|
Color Management
|
-
No (no color management). It leaves the image in the D1's native
color space. This is only useful if you plan to try and do your
own profiling outside of bibble.
-
ICC. You can select an ICC profile. I use Adobe RGB 1998
-
Monitor Corrected (if you use a calibrated monitor profile)
|
|
Working Color Space
|
Select here your preferred working profile
|
|
D1 color Profile
|
- Old CC (mode of very old Bibble version)
- 2000 (mode of version 2.5
- 2001 Latest color version (I only use this, great color!)
|
|
Monitor
|
Select the monitor profile you created during the monitor calibration
process
|
Adjustments
Bibble makes a difference between interactive and non-interactive
adjustments. This is just making the difference between features where
Bibble can display the feedback in reasonable time (depends on the PC)
or where the computation is that intense that it would frustrate the user.
Interactive Adjustments
|
Colors
|
Standard color correction (I do not use it much)
|
|
HSV
|
Hue, Saturation, Value (Sometimes a add a bit saturation)
|
|
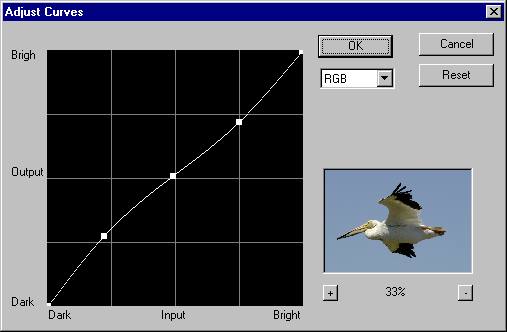
Curves
|
Allows to apply curves to the image. Bibble's curves are quite
useful and well implemented
|
NonInteractive Adjustments
|
Sharpen
|
Allows 4 different levels of sharpening. Standard is the most sophisticated
one as it is very much integrated into the full conversion process
and avoids to amplify noise
|
|
Remove Noise
|
Very powerful noise removal (comes in 4 levels). Consider to use
it for ISO400 photos and above
|
|
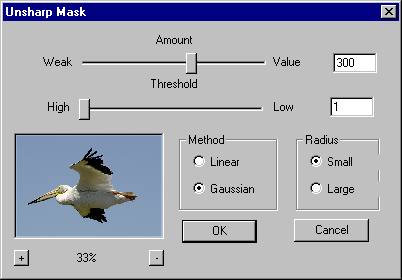
Unsharp Mask
|
Allows USM in 16 bit
|
White Balance Override
The white balance override feature of Bibble is
a class by itself and worth alone to get Bibble.
You can set the WB in the D1 either to fixed values
or auto. In any case Bibble allows you to correct the WB lates. Ever photos
outdoor photos set to fluorescent at the time you shot the photo can be
saved by converting the WB in Bibble
Consult you D1 manual what the different WB settings of
the D1 mean. I mostly tend to compensate a bit on the warm (yellow) side.
|
New WB
|
You can enable the feature and then can set the compensation values
|
|
Original
|
Shows WB of the camera setting
|
|
Click White
|
This allows you to correct the white balance in clicking on a neutral
gray in the photo. Best you include a gray card in one of your photos
and correct with this setting all other photos.
|
Exposure Adjustment
The exposure adjustment feature of Bibble is again a very
great feature (second to WB).
|
Exposure Adjustment
|
Allows corrections from -4 to +4 EV. This is not a replacement
for good exposure in the first place. There is nothing better than
having a well exposed picture. Bibbles EV comp does a wonderful
job of increasing or decreasing exposure as if you had when you
shot the photo. If we photograph flying pelicans we cannot take
some sample shots and repeat with optimal exposure. In these cases
this feature saves your day.
Here are my rules for D1 camera exposure settings (got also convinced
by Rob
Galbraiths rules)
How much you might need to compensate in Bibble depends then on
you images.
Warning: Underexposure will result in more noise as the D1 has
much more noise in the shadow part of the photo than in the midtones
or highlights. With contrasty photos you always have to choose between
higher noise or blown out highlights (mostly never acceptable).
|
Histograms
Histograms show a 256 value distribution of the gray values
of all pixels in a photo. On the left side there are the shadows and on
the right side the highlights. Avoid spikes on both ends because you either
lost shadow details or details in the highlights. More important is to
avoid lost highlights as you lose all detail in light areas.
When Eric told me he planned to have the before and the
after histogram displayed I was not really too much excited. When I then
have seen it the first time in reality I was! This is an other classy
feature in the Bibble input dialog.
|
Original Histogram
|
Histogram of the original NEF picture
|
|
Final Histogram
|
Histogram after applying all active options in the input dialog
|
Now you can analyze the effect of all the options on the
final image. I cannot understand how I could have used Bibble before without
it :-).
Example
Above is a real example with a photo we care of
it shows the settings for this shot. I will only mention the parameters
I regularly change:
- Tone: Profiled is the tone I mostly use but also
low and normal. Tone and exposure (and also curves) are very much related
and have to be treated in combination. Watch the histogram for spikes
at the right side.
- WB: This is a key feature and I like to use "Click
White" if there is some white or neutral tone in the image
- Exposure Adjustment: Also a key feature used on every
photo
- Curves: Sometimes to lighten the shadows.
Curves Dialog
USM Dialog
What else?
This powerful input dialog is impressive enough but there
is more (hard to get in one shot).
-
Can use the input dialog for batch processing
settings
Batches are multithreaded.
Batch process selected files in the browser
(select files and batch process them, great feature).
Multiple renaming options in batch processing.
Thumbnails to Batch Processing dialog.
Ability to batch process more than one folder
at a time (most useful on multiprocessor PC's).
"EXIF Only" type to batch output EXIF image
info to a text file without processing the associated image.
Preservers EXIF shooting data in all files.
Fast browser for viewing thimbs.
Rapid zooming of images (Capture is so slow!)
Firewire shooting and browsing.
Standalong program and photoshop plugin!
Works the same way on both the Mac And PC!
Summary
In my review about version 2.0 I asked"
"Is everything perfect? Of course not. Eric
will fix one or the other bug and add nice features."
Of course this is true again. But I think that Bibble
gets very close to the limits of what the D1 can deliver. And with this
Bibble version this is a lot. Eric I am so pleased that for now Bibble
is my main NEF conversion tool. You reached a level I never thought be
possible.
For more information and download go to www.bibblelabs.com.
|


