Most photographers believe that giant 600mm lenses
are the key to good wildlife photography; buy the biggest toy to get
the best photos. While the Big-Guns of photography are a great tool
(and can be fun to use); the real secret of wildlife photography is
fill flash.
Fill flash is one of the key techniques for easily improving wildlife
images. Electronic flash improves the color balance of the image,
improves color saturation, fills in dark shadows with detail, adds
a catch light
to an animal’s eye, and may help increase sharpness. I use
flash for the vast majority of my nature photographs; for the most
part,
using the automatic features of the flash to provide fill flash.
Many photographers
shy away from using their flash because the typical view of images
made using flash is one of stark, blown out images; or because they
find the
addition of flash to their photography complicates their photography.
I
believe that the key to adding flash to your photographic toolkit
is to let the flash unit work automatically; allow it to do its
own magic
and don’t worry about how it works. This contrast sharply
with the goal that we must all learn to understand and control
exposure
in order to make good images; but while it is important to understand
learn
to manually control exposure, flash units are much ‘smarter’ than
your exposure meter and should be just allows to work automatically.
Good
fill flash for wildlife photography also requires a few key tools;
a TTL flash unit (or an automatic unit) with a setting for
flash exposure
compensation; a flash extender; and an external flash battery.
You
can easily create great wildlife photographs by using a moderate
telephoto lens (like a 400/5.6) combined with good flash tools.

Image 1 - Shooting with and without Fill Flash
Why Fill Flash?
Fill flash is one of the most sophisticated photographic
techniques, but is also one of the easiest to use when using the
right equipment. Essentially, it involved adjusting exposure for
a scene as you
would without a flash unit, and allowing the flash to operate
at a reduced
setting (usually about ? to ¼ of normal power) to
fill in the shadow details in the image. For most flash units,
setting the flash
for fill flash is a quick one step process.
Fill flash provides significant advantages over shooting without flash.
Primarily, fill flash reduces the overall contrast of the image by ‘filling-in’ the
shadows with the low power light from the flash; this makes it easy
to expose for good highlights, and have the flash fill in the shadows.
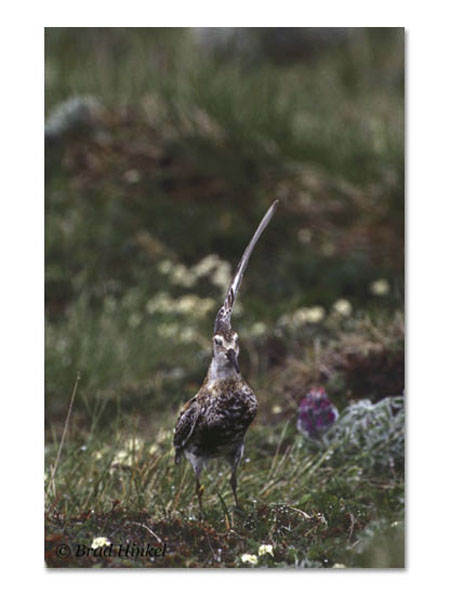
Image 2 - Adding Shadow Detail
Flash also improves the colors in
your image; even though the light from fill flash does not dominate
the light of the image, it can
improve the color balance of your image. The addition of properly
balanced light from the flash improves the apparent color and saturation
within the image. This is most important advantage of using fill-flash – it
makes your colors appear richer and brighter.
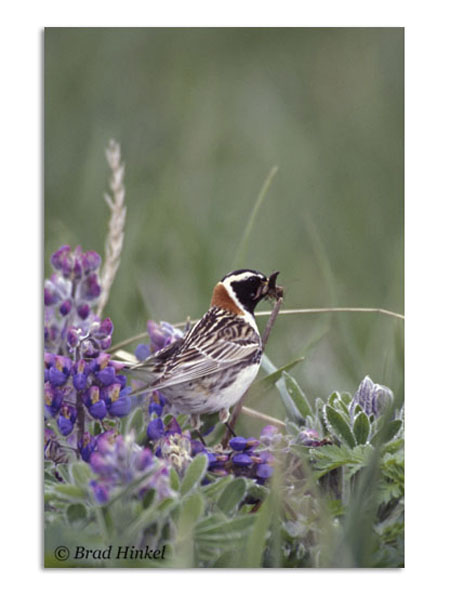
Image 3 - Fill Flash
Improves Color Saturation Especially in Poor Light
Fill-flash also provides light for a catch light in the eye
of animal subjects; this is usually a good advantage, but can
sometime create
a second catch light on days with a strong sun.
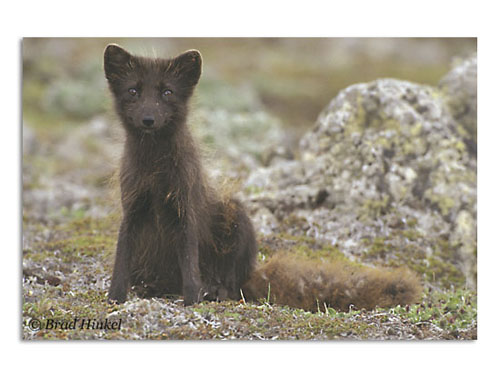
Image 4 - Adding
a Catch Light
Under certain conditions fill flash
can add some detail to an image. Flash always freezes images
of wildlife; the flash is
typically
around 1/1000 sec in duration. Images that would otherwise
have marginal
or poor sharpness due to long exposures will have some detail
restored to the image from the very fast light of the fill
flash. This can
provide some great, dramatic shots of moving animals that otherwise
would appear blurry.
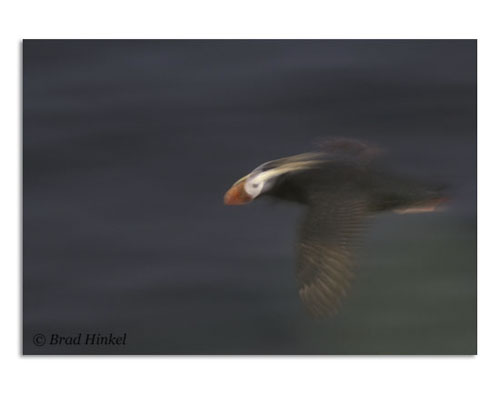
Image 5 - Providing Additional Detail
in Long Exposures
Finally,
fill Flash can dramatically brighten dark fur or feathers in
many subjects, making it easy to expose for the highlights
and let the flash fill in the dark areas of the subject.
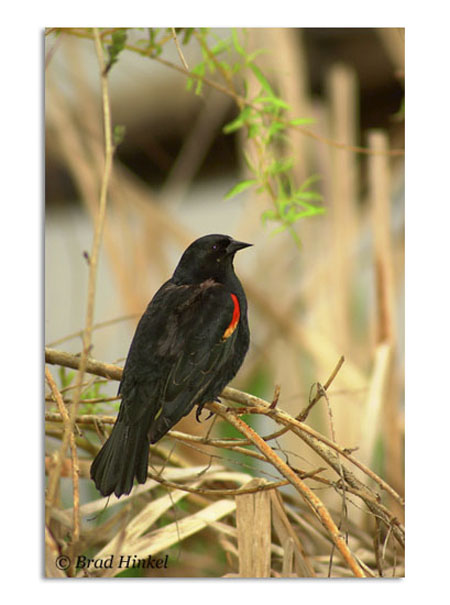
Image
6 - Provide Color and Detail in Black or Dark Subjects.
How to use Fill Flash
There are basically three types of electronic
flash; manual flash, automatic flash, and TTL flash (most TTL flash
units support all
three modes). Manual flash is not worth the effort, don’t
do it; anyone who remembers guide units and calculating manual
flash
knows that it’s basically an unnecessary pain. Just buy a
flash that supports automatic flash, or better still a dedicated
TTL flash
for your camera.
Automatic Flash Many photographers wrongly assume that they need
sophisticated TTL flash units to use fill flash. In many ways,
a good automatic
flash
unit is as effective as any TTL flash unit for fill flash. Automatic
flash units are self contained in their operation; and do not need
to communicate with the camera to set the correct exposure. To
use an automatic flash unit for fill flash, you merely need to trick
it into thinking your film (or sensor) is more sensitive than
it
really
is; set the ISO on the flash unit to be 1?-2 stops faster than
your camera is set; if you are shooting your film at ISO 100, set the
flash to shoot at ISO 320 or ISO 400. The flash wrongly calculates
that the
film is more sensitive, and emits less light for fill flash.
To
shoot using the automatic flash; set the ISO of the flash higher
than the setting on your camera, connect the flash to the camera,
set the exposure on your camera normally, and shoot.
When photographing
wildlife at a distance with an automatic flash, you may wish to set
the flash to a higher setting; shooting at
around 1 stop faster. There are a number of good automatic
flash units available,
but the classic units are the Vivitar 200 series (currently
283 and 285); these are both around $100 to $140 and work with any
camera
that has a flash sync. The Vivitar units are also very bright
flash units
for their size.
TTL Flash TTL flash units are the easiest for using fill flash,
since most of these units have built-in settings for fill flash.
The disadvantage
of these units is they a dedicated part of an electronic camera
system, not all cameras have TTL flash units available, and
they are relatively
expensive. But if you intend to use a flash unit regularly,
get the dedicated TTL flash unit designed for your camera from
your
manufacturer.
You won’t need to remember to reset your flash whenever
you change film or camera settings; the TTL flash does all
the thinking for you.
For Nikon’s electronic cameras, these include SB-27,
SB-28, SB-50 and SB-80 flash units.
For most TTL flash units,
you merely need to set the exposure compensation on the back
of the flash unit to under expose
-1? stops. On the
SB-28, this requires pressing the minus (-) button unit on
the flash unit
until the flash exposure reads -1.7. Then put the flash unit
on your camera, set your exposure normally and shoot. The
camera and
the
flash do the rest.
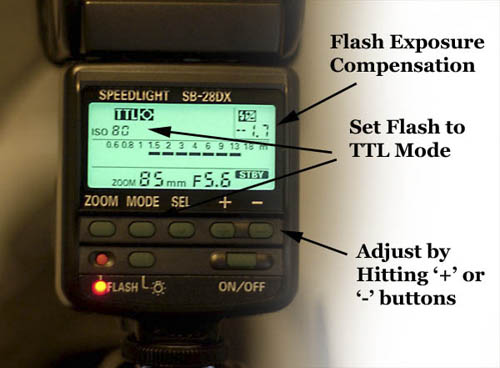
Image 7 - Set the TTL Flash for Fill Flash
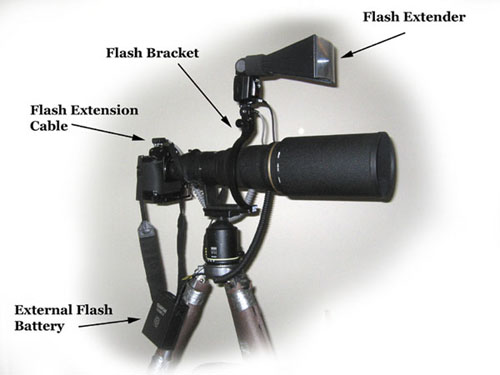
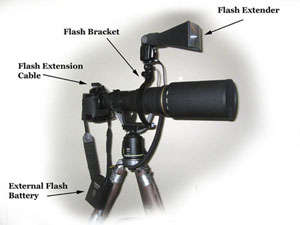
Image 8 – Tools for Fill Flash
Tools for Fill Flash
For Wildlife photography, there are a few essential
tools for using fill flash.
Flash Extender (essential if you shoot
with a 300mm or longer lens)
A flash extender puts a Fresnel lens
in front of the flash to concentrate the light and project it further.
This works well when using
long lenses (more that 300mm). A flash extender is essential for
photographing
wildlife at moderate distances over 40’. The flash extender
also concentrates the light from the flash, making it more
efficient, and
reducing the recycle time of your flash. The unit I recommend
is the Better Beamer (Michael has a review of the Better Beamer)
External
Battery Supply (highly recommended for wildlife photography)
One
problem with electronic flash units is the time it takes the unit
to recharge; many flash units will take 2-5 seconds to recharge.
Additionally, flash units can run through a lot of batteries quickly.
For wildlife photography, you need a quick recycle time to keep
up with the action, and a day of shooting can run through a whole box
of batteries. I recommend using a rechargeable, external battery
for your flash. The unit that I recommend is the Quantum Turbo
Z;
this is about the size of a paperback book, weights about 1½ lbs,
and holds enough charge for a long day of shooting. With this unit
recycle times are usually reduced to less that ¼ second. This
battery can clip onto your belt or onto your tripod and attaches
to the flash unit via an adaptor cord. The Turbo Z cost about $400
with an adaptor cable.
Flash Brackets (useful for 500mm and 600mm lenses)
If you are shooting
with a very long lens, it is likely that you’ve
invested in a dedicated quick release system for your tripod heads,
cameras, and long lenses. A quick release system makes shooting with
a tripod a pleasure rather than a nuisance. The two best quick release
systems are sold by www.reallyrightstuff.com and www.kirkphoto.com.
Both systems offer additional brackets to mount the flash a few inches
above the lens, this helps get the flash slightly out of line with
the axis of the lens to helps prevent redeye and provide more dimension
to the image. If you use a Flash Bracket you will need an extension
cord to connect your flash unit to the camera; for a TTL Flash unit
this is a dedicated TTL sync extension cord.
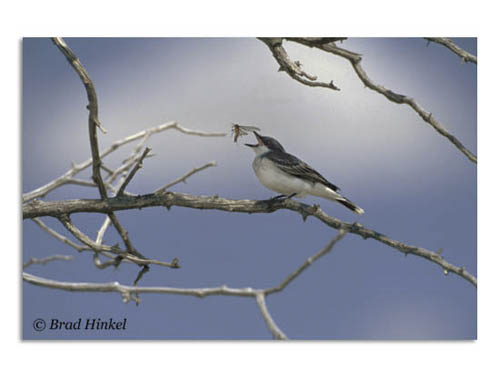
Image 9 – Freezing
Action
Issues
How Far will it Work?
This is the most common question that I get regarding
fill flash for wildlife photography. The simple answer is it works
for most
photographs
of small mammals and birds; distances typically up to maybe
100’.
But in reality, there is no simple answer. The effective range
of the flash depends on the ISO setting of your film(faster
film provides
for longer distance), the aperture of the lens (wider aperture
provides for longer distance), the tonality of the subject
(lighter subjects
can be photographed at longer distances), and the ambient light.
TTL flash units also work better at longer distances since
they are measuring
the light directly through the lens.
Ethical Questions
I am also questioned if wildlife is disturbed by
electronic flash. In my experience, most often the animals appear
to not even notice
the flash, and if they do, they appear not to be startled
by the flash. I suggest that sometime when you are out in the
field with
a friend,
have them make a fill flash photo of you at about 100’ just
to see how bright the flash appears.
In any case, if an
animal appears startled and nervous by any of your actions,
you should relax, stoop or sit
down,
or even
back
away from
the animal to allow it to calm down. There is never any
reason to stress animals for a photograph.
|