| All photographers choose their essential pieces of
equipment. In this review I am going to discuss my top three. My way
of determining this is simple, on each trip I ask myself, how many times
do I touch one of these items? Does it sit in my bag 90% of the time
or do I have it out on every setup? In my daily shooting I find that
I have become very dependent on the three items that I have listed above
and in this report will go into more detail as to why I feel that each
is so important.
Without a doubt, this is my number one tool due to a simple reason;
I use a tripod on almost 95% of my shots. Since most of my shooting
is a long way from my truck, I want to have a tripod that is lightweight,
but still performs like my old Bogen Nature Trekker Tripod. For my
work, motion, even the slightest amount, can ruin an image or a series
of images. So when I setup my tripod, that’s all I want to
have to do. I don’t want to have to make any more time consuming
adjustments but instead be able to focus on the process of capturing
the image.
I feel that one should always make a tripod and tripod head decision
separately. You always want to assure that which ever tripod you pick
will allow you to swap out the head. In my work, I use many different
tripod heads but only one tripod. Also don’t assume that the
manufacturer of the tripod will have the best tripod head, in fact
I have never found this to be the case.
There are several considerations that a person should evaluate when
choosing a Tripod.
1. How many leg sections and what type of locking arrangement for
these legs is provided.
2. Center column adjustment. Is it stable and easy to work with?
3. What types of feet are provided, rubber, spikes or both?
4. What is the total weight of just the tripod?
5. Can you remove the center column?
6. How low will the tripod allow you to go to the ground, i.e. for
macro work?
7. Will it stand up to the rigors of outdoor use over time?
8. Can it work in a wide variety of temperatures?
Basic Tripod Design Points
Before I go on, I wanted to briefly mention some of the basics of
any modern tripod. If the tripod you are looking at doesn’t have
these, then you might want to consider another brand. I consider that
there are two types of tripods designs, outdoor or field use and indoor
studio use. Studio use is beyond the scope of this article. For outdoor
use, I would recommend considering the following issues.
1. How compact is the unit when folded down and how tall it extends
to?
(Most companies have 3 or 4 piece leg sections)
2. What is the overall weight to stiffness ratio of the tripod?
(The ideal situation is a tripod that has light weight but is still
very stiff)
3. How heavy is the camera plus lens combination you will be using
in the field?
4. Does the tripod have ease of use features such as leg locks, rotation,
center column adjustment.
Manfrotto Carbon 1
With these considerations in mind, you can now pick from many brands
and types of tripods, however I am going to focus now on the Manfrotto
Carbon One series.
Without a doubt, the use of Carbon Fiber in tripods has been a major
step forward in design. By its basic nature, Carbon Fiber, offers a
wonderful combination of light weight, but great stiffness. Problems
in the past have been the overall price point of Carbon Fiber tripods
and the ability to have a quick release leg lock. By using the old
style clamps that you find on metal tripods, there is a risk of cracking
the Carbon Fiber and thus ruining it. To get around this most companies
designed a screw-type leg lock, which is cumbersome to use and time
consuming but applies even pressure to the leg. A tripod with 3 sections
per leg, will give you a total of (9) possible adjustments. It is much
more convenient to use a quick release lever instead of having to use
screw type leg locks. Over time, trash will get inside the screw threads
making them hard to use. Manfrotto, with the release of their Carbon
One series brought out a totally new design of Carbon Fiber tripod
leg that allows the user to work with state of the art materials and
stay within a reasonable price point.
The Manfrotto Carbon 1 series comes in two basic styles, the 3444
and 3443.
- The 3444 has 4 segments per leg
- The 3443 has 3 segments per leg.
I am reviewing the 3443. I looked at the 3444 as it’s more
compact when totally folded down, however its peak height is around
5 inches shorter than the 3443. Since I am 6.2 in height, I was satisfied
more by the overall peak height of the 3443.
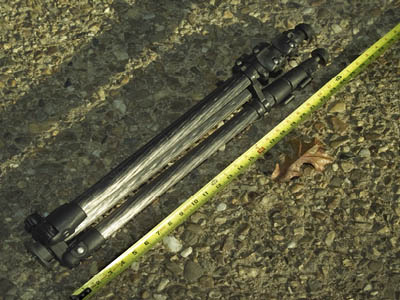
Image number 1 is a shot of the Manfrotto without a head installed
so you can now see that there is a total length of around 25”,
with the feet unscrewed. Note also right above the upper leg lock that
there are plastic leg clamps which will help to keep the legs from
swinging out while you are carrying the tripod. The top of the center
column will accept any type of head that is threaded to 3/8 inches.
In this shot you can also see the parts of the tripod that are carbon
fiber, the legs and center column. The tripod top is made from magnesium
construction which helps to keep the overall weight down.
The leg locks are of a “quick release” type and are designed
so that all you have to do is pull up once on the lever and you can
release the pressure on the leg. The individual legs are made from
a unique channel design. This helps with the sliding and adds additional
strength to the tripod. I should note here that I believe that this
is the only Carbon Fiber tripod that has a channel leg design as most
other designs tend to have a round tube leg.
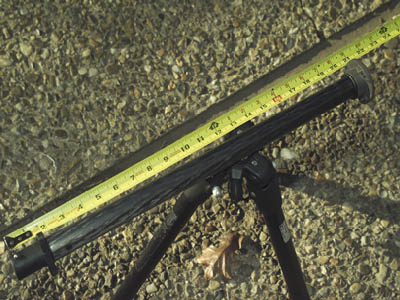
In image number 2 you have a shot that gives a view of the center column of
the 3443. You receive a great amount of extension which is approximately 25
inches of useable length. In my experience this center column is quite stable
even when it has been extended past 20 inches.
One interesting design point is the short column shaft which can be
seen in the lower left corner of image number 2. This will unscrew
from the center column and then actually replaces the center column.
It will allow you to lower the tripod to around 12” from the
ground, and accepts any 3/8 inch threaded tripod head. This is not
as good as many specialty units out there; however it’s still
a good starting point for macro work. After that, final camera height
is determined by which tripod head/camera combo you use.
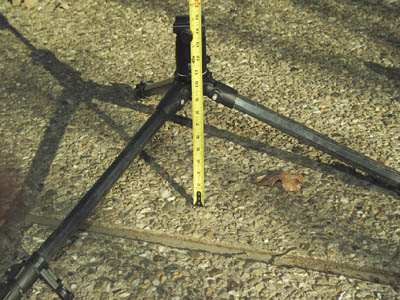
With Image number 3 you get a view which shows how the short column extension
works. In most cases, I will just carry a light weight Manfrotto one piece
head for my macro work. It is very simple to just screw it on to the short
column and then setup for your shot. In the lower left corner of image number
3 you get a better view of the tripod leg clamps that keep the legs from moving
while the tripod is being transported. They are designed to stay with the tripod
at all times, a feature I like since its one less thing to have to keep up
with.
To extend the legs out from the normal position, you depress the silver
lock button. This button is located where the carbon fiber leg is attached
to the top assembly. By pushing in the button, you can adjust the individual
legs outward and as you do this, you will hear an audible click. You
can set the legs at any of three angles 25, 45 or 65 degrees or any
combination of these. Often in my shooting I find that only one leg
needs to be adjusted. This ability for individual leg adjustment is
a nice feature.
Manfrotto also has a set of spiked feet that you can purchase and I
feel that these are essential to the use of this tripod. To use them
all you have to do is add them over the stock foot of the tripod
and tighten one screw. These spiked feet allow you to have the spikes
out, or retracted. When the spikes are retracted, you get a solid
rubber foot, and when you want the spike, simply screw the rubber
foot down around the spike.
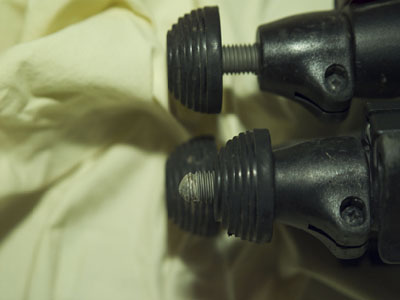
Image number 4 shows the optional spike foot kit, with the spike extended
on the lower leg and in the background you can see the rubber foot
extended. This is an excellent setup as many times, I find that I
may need one of the spikes out and the other two legs, need the rubber
foot.
The last area of concern for me in my daily shooting is the overall
maximum height that I can achieve with my tripod. You have to be careful
with most tripods when you start to raise up the center column much
past 5 inches. You will find that in some tripods the bushing that
holds the center column will allow for play and in others, the higher
you raise the center column, the more unstable the tripod will become.
With the 3443, I have had the center column up to within two inches
of its maximum extension and I have never had any issues with play
or instability. You have a very nice locking screw in the center
of the leg housing that applies an even amount of pressure to the
center column. This is very important as you don’t want to
run the risk of cracking the center column.
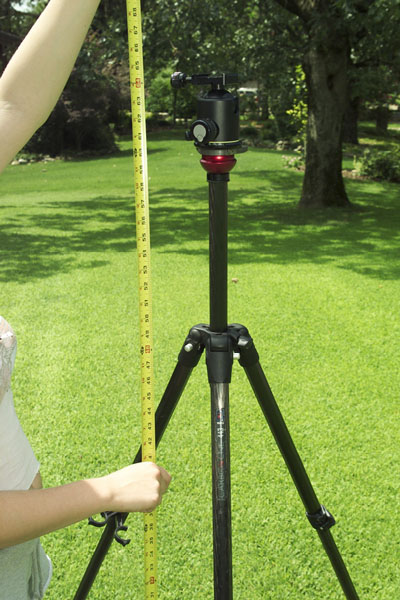
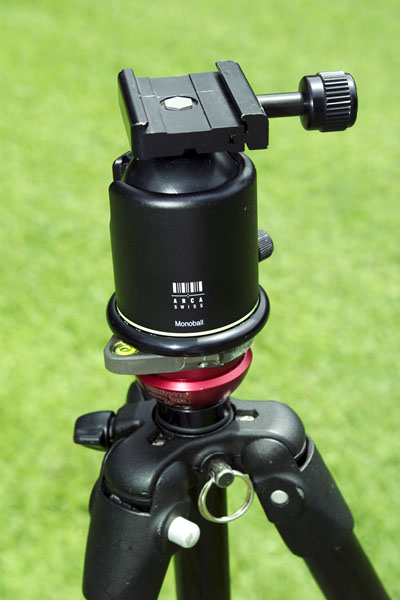
In Image number 5, you can see that I have the tripod at a total height
of 60 inches and then the Acra B1 Pro head has added another 5 inches
so you have a total useable height of almost 65 inches. By the time
you add the camera, you are approaching 70 inches. I have used my
Canon 1Ds with many different lenses from this height in countless
shooting situations with no problems.
Also note that in this shot, I have substituted the Manfrotto leveling
center column and it is a good 5 inches shorter than the standard center
column that ships with the 3443. With the standard center column, you
would be able to extend upwards at least another 5 inches.
Overall, this is a hard tripod to beat for field work. With the Arca
B1 Pro head, the total weight comes to around 6 pounds. You have a
very solid platform from which to work and you have an unlimited range
of positions to work with.
The 3443 and 3444 also have drain holes in the lower leg sections
to allow water to easily exit the tripod. This might not seem important,
however if you work around water it will be. In around 50% of my shots
in the field, at least 1 leg of my tripod will be in the water so it’s
nice to not have to pick it up and hold it upside down to drain the
water each time I move to a new shooting setup.
I have owned the tripod shown in this article now for almost 2 years
and it has been in constant use. So far, I have had no problems with
it.
QUICK SPECS MANFROTTO CARBON 1 3443
- Max Load 13.3 lbs, but I strongly feel this can easily go to 20lbs
- Materials Carbon Fiber legs, center column, Magnesium for leg housing
- Weight without head 3.5 lbs
- Head Mount 3/8” threaded
- Retractable Spiked Feet Optional,
Part number 3451
- Approximate cost $412.00
- For More information www.bogenphoto.com
Really Right Stuff, L Bracket for Canon 1Ds

This is one of those tools that once you own it and use it, you find
yourself asking “how did I ever work without this?” How
many times do you shoot in the vertical (portrait) orientation? If
your answer is “a lot” and you don’t have this accessory,
then you are forced to go through a series of steps each time you switch
your camera from the horizontal to vertical mode.
All DSLR/SLR’s have a ¼ 20 threaded slot that will accept
a mounting plate for a tripod head. However, this slot is on the bottom
of the camera and is intended to allow you to mount the camera on the
tripod head in the horizontal (landscape) plane. If you use a quick
release plate, you still are tied to a horizontal position when the
camera is mounted to the tripod head. So if you want to move the camera,
to the vertical position, you have to utilize the cutout on your tripod
head. This is never an easy task. For example let’s review the
steps required to do this with an Arca B1 Pro head.
1. Unlock the ball and rotate the head until the cutout is lined up
2. Drop the camera down
3. Re-level the camera (not easy in this position)
4. Readjust the height of the camera as you have dropped the total
height almost 4 inches or more
5. Make sure the tripod is still balanced as you have moved the camera
off the center of gravity
This entire process has to be repeated each time you want to shoot
in the vertical mode and it’s a time consuming and cumbersome
process.
With the Really Right Stuff (RRS) brand L bracket attached to the
camera, all you have to do is the following.
1. Release the camera
2. Slide it out of the Acra Mount
3. Move the camera to the vertical
4. Relock the camera.
Note, you did nothing to the tripod or the tripod head and the whole
process took only about 5 seconds. Your subject is still in the same
position and your eye piece has also not changed.
The only pre-requisite for the RRS L bracket is that your tripod head
accept an “Arca” style mounting plate. I strongly recommend
this style as it’s a tongue and grove design that offers a superior
grip of the camera to the tripod head. RRS designs their L brackets
to specific camera bodies. You need to check their website at www.reallyrightstuff.com
to make sure your camera is supported. As of my last check, RRS had
brackets available for all the current digital and film bodies from
Canon, Nikon and Fuji. You can still access every opening on the camera
and swap out the battery without having to remove the L bracket. As
you can see from the images below, once the plate is mounted to the
camera, you have no loss of access points.
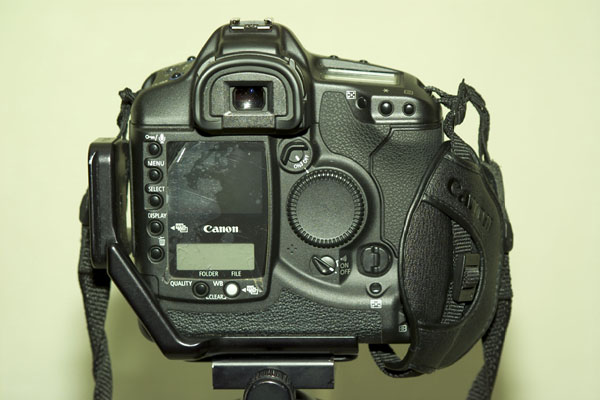
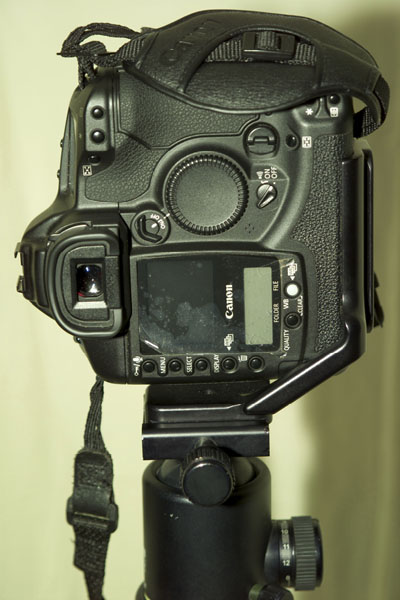
In image 7 & 8 you get a quick idea of how the RRS L bracket will
fit to your camera. This is a 1Ds however the look is pretty much the
same with all camera bodies. The tolerances, fit and finish are excellent.
You will find that you don’t even notice it on the camera after
a few uses. It also actually adds some protection to the body as I
like to call it my brush guard. You can remove it anytime with a single
hex screw and RRS sends you the correct hex head to make the adjustments.
Quick Specs on the RRS L Bracket
- Company Really Right Stuff, www.reallyrightstuff.com
- Part number B57L
- Weight/Construction 6 oz Aluminum one piece design
- Cost $179.00
(U.S.)
- Warranty Lifetime
- Quality Excellent
- Catalog Yes, and it’s worth the effort
to get their catalog as it’s an excellent source of information
Arca B1 Pro Ball Head
What is the correct tripod head to use? That’s a question you hear a
lot, and it’s a good question as the answer really depends on what you
are shooting. For me the answer can be simplified as I want the following needs
to be met by my tripod head.
1. A Ball Head Design
2. An Arca style mount with a quick release
3. Full 360 degree pan capability with a separate lock
4. Solid design
5. Alloy material for weight reduction
6. Overall Capacity for at least 40 lbs of weight
7. Easy to use including cold weather adjustments
8. Smooth action of the ball head
9. Solid lockup of the ball head.
10. 3/8 inch threading.
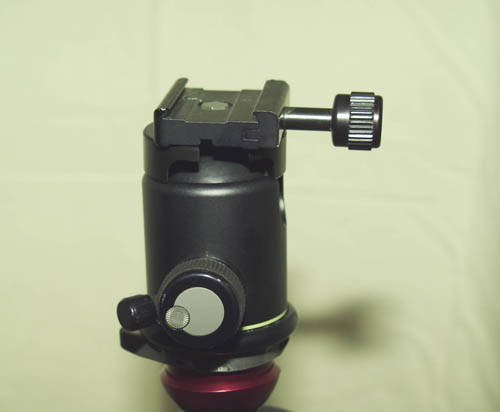
Why a ball head? It’s my preference because it gives you a wonderful
range of motion with your camera. However if you are an action shooter,
a trigger release style would probably work better for you. In the
view from Image no 8, I have folded the quick release plate back to
show the relative size of the ball. The Arca B1 Pro has an oversized
ball, which makes it very easy to adjust and lock down. There are many
ball head designs out there and the Acra has been around for a long
time. It’s full name is Swiss Arca B1 Pro with Quick Release
Clamp. Make sure you buy it with the Quick Release Clamp, as if you
don’t you won’t get the Arca Style Release Clamp on top.
Many stores will stock the Arca B1 head without the Quick Release Clamp
option as some photographers choose to pick out another style. I found
that for my work, the Quick Release Clamp that Arca supplies is fine.
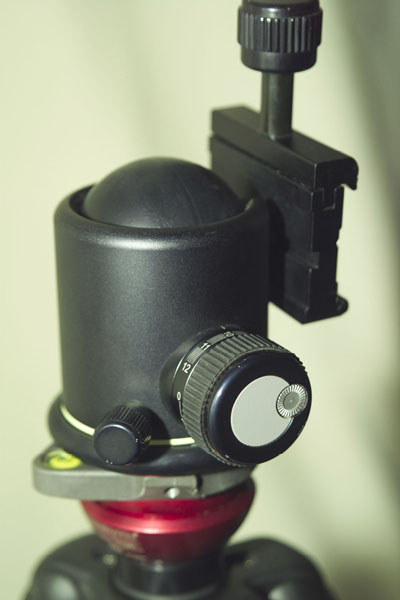
One of the key design points of the Acra B1 Pro is the way you adjust the friction
on the ball. In image number 9 you can see a very good view of the main control
knob. Note the smaller silver colored indexed screw inside the main surface.
This small screw is a friction limit set screw. To use this put your camera/lens
combination on the Arca B1 Pro. On the larger knob, note the white numbers
close to the main body of the tripod head. As you turn the knob clockwise you
are increasing the total pressure on the ball, to lock it. As you turn the
knob counter clockwise, (towards the smaller numbers) you release the pressure
on the ball.
When you get to the point where the ball moves smoothly but is not
totally loose, (with your camera installed on it), screw down the smaller
silver screw. This sets the what I like to call the “light end” of
the friction. The point where your camera moves on the ball freely,
but you still have control of it, instead of it just flopping around
loose. By setting the set screw, the knob won’t turn past this
spot so in field useage, you don’t have to do anything but turn
the knob to this point. You can do this without taking your eyes off
your subject. With other ball heads that don’t have this feature,
you will have to turn your main pressure knob and refind the “light
end” each time you are changing the camera’s position.
You will also have to take your eyes off your subject and focus your
attention on the knob. This one feature is a huge time saver for what
otherwise becomes a time consuming repetitive function.
As shown in image number 10, the Quick Release Clamp with the Acra
B1 is a standard Arca style. This is tongue and grove/dovetail design
that applies strong and even pressure to the entire plate that is mounted
to the camera. If you choose this type of tripod mounting plate, you
will need to purchase an Arca type camera mount. This will not be sold
with the tripod head, but you can pick out one of many styles from
companies like Really Right Stuff, or Kirk Enterprises.
Overall this is a top performing ball head. If a ball head design
meets your needs I would strongly recommend the Arca B1 Pro.
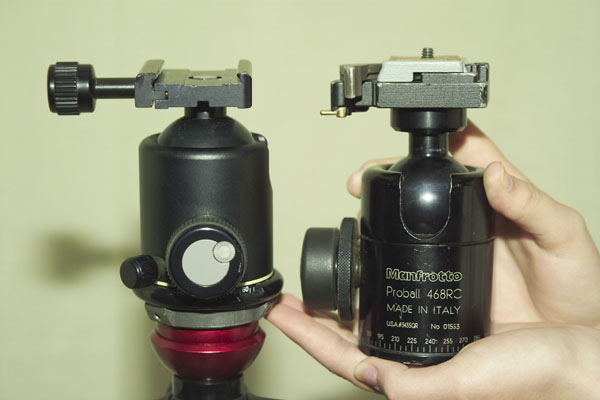
Image number 11 shows a comparison of the Arca B1 Pro and a Manfrotto 468RC
Ball head. You can see that the Bogen head is equiped with the Bogen style
quick release plate system.
Overall the Arca head is ½ the weight, has a larger ball, and
has a better control knob system. The Arca B1 Pro is rated to support
over 90 lbs, which is much more than I would ever attempt to support
on it.
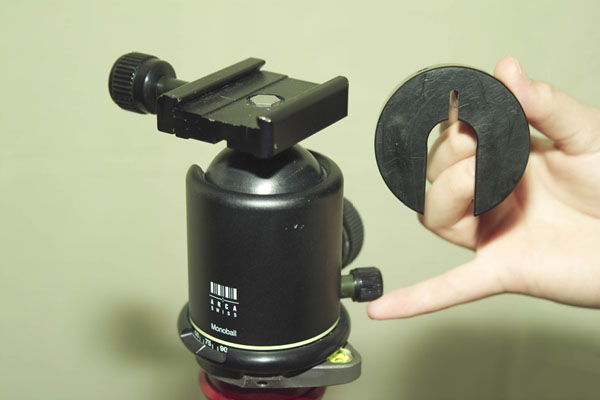
One last item I wanted to mention, is a plate sold by Kirk Enterprises
that locks any movement of your quick release plate while you are transporting
your Arca B1 Pro head. In Image number 12 you can see the design of
the plate and in Image number 13, you can see the plate in use. All
you have to do to use it is just slide it into place around the stem
of the quick release clamp.
By using this, you can release the pressure on the ball. This is important
as in some instances, Arca B1 Pro ballheads have been known to lock-up.
The lock up freezes the ball in place. This lock-up sometimes can be
fixed in the field, but some people who have reported, it have been
forced to send their Arca ball head back to Arca for a fix.
Its also not a good idea to store the Arca ballhead or any other ball
head with tension on the ball, so this simple tool from Kirk enterprises,
is a nice idea. It’s predrilled to allow you to attache a string
to it so you can hang it from the tripod head while you are not using
it.
Image number 12 also shows the pan locking release and the indexing
on the front of the Arca B1 Pro. The pan locking release knob is slightly
lower and behind the main control knob.
QUICK SPECS ON THE ARCA B1 PRO
- Company Arca-Swiss
- Versions (3) B1E (no panning base) B1 (reviewed) & B1G (giant-2x
size and weight of B1)
- Price for Arca B1 Pro w/quick release $400.00
U.S is average.
- Weight 1.7 pound
- Supports Up to 90 pounds
- Panning Yes, 360 degrees with lock
- Materials Believe it to
be all Aluminum or Alloy
In conclusion, I would only add that the opinions in the article come
only after many hundreds of hours of field use of each of these products.
I am a believer in attempting to save costs in my camera gear purchases
and I realize that all of these items are expensive. However let
me point out that in the last three years, I have been through at
least 3 other ball heads and each failed in my opinion to hold up
to the daily stress that my type of field work can produce. I am
all for saving money especially in today’s economy, however
I have come to find that if you can afford to pay for one of these
items, then you won’t be disappointed in the long term. The
last thing you want is to buy a 400.00 tripod or tripod head, and
then find out 2 months later that it is not going to work for you
or that it’s not made with good quality.
Another issue is support after the purchase. I have found the Really
Right Stuff, has by far the best customer service of any specialty
vendor I have ever worked with. They are responsive to your needs,
and will work with you to find out which of their products will best
fit your needs. Arca-Swiss on the other hand is one of the big mysteries
as far as support. They don’t have a website and I have never
been able to find anything that is really published by them in regards
to their products. You can find their tripod heads for sale at all
major camera resellers.
Its my understanding that the Manfrotto company is now owned by Bogen
Corporation. Together they are one of the largest tripod/tripod head
manufacturers. They have excellent customer support and I have used
it a couple of times with other Bogen Tripods. I have also used their
repair center and found that their rates are reasonable.
I do hope that you have found this article informative and if you
have any questions, feel free to contact me at the following email
address: pcaldwe@us.ibm.com
|


