|
 |
|  |

|
 |
Workflow Technique #010"Got Noise? Get Neat!"
review by
Paul Caldwell
|
||||||||||||||||||||
| As I have progressed through my digital career over
the last 4 years, I have always looked closely at any software tool that
works to reduce noise. I have tried many, and most times have been disappointed.
Either the tool takes out too much detail and does not allow you to fine
tune it or the tool takes out the noise, but leaves digital “weirdness”
behind. This “weirdness” will leave strange artifacts that
are left over after the noise is pulled from the image. If you sharpen
this, many times you will get an image that looks worse than before.
Noise, it seems to be everywhere, no matter what ISO you pick, and how good your camera, noise can and will appear. In most cases, it will detract from your image. With Digital Cameras, in relation to noise, major improvements have been made over the last few years and continue to be made. Some of these improvements may make the issue of noise mute in certain cameras; however these improvements tend to be in the higher priced cameras. It also takes longer for improvements to filter down to the more moderate systems. In some cases, no matter how good the camera, you are still going to get noise. Examples are: 1. Shadow noise When working within the dynamic range of a digital image, often times it’s possible to lighten up the areas of shade or shadow of that image. Most times when this is done you will get an increase in the amount of noise in the areas that have been lightened. The noise was there to begin with, but until you lightened the image, you did not see it. This is by far one of the most common reasons of increased noise. 2. Solid or Non Detailed Areas Sky or clouds will very often pick up more noise than is ideal. This happens for many reasons, the most common being you must underexpose the sky to get the correct exposure for the rest of the image. Since these portions of an image often lack other details to break up the area, the noise present will be more noticeable. 3. Higher ISO Due to the available lighting at the location or a required shutter speed, a higher ISO has to be used. A common rule of thumb is that with most Digital Cameras, the higher the ISO you pick, the more noise you can expect.
Sharpening and Noise Anytime you sharpen an image with noise in it, the noise that’s in the image becomes much worse. This issue becomes more apparent in large open portions of images, like sky or water. It will show up to a point where it starts to really detract from the image. This is one of the many reasons I only shoot “raw” with all my cameras. I don’t want the camera to sharpen and then save the file as a jpg or tif. Any noise that has been processed in the camera will be very hard to get out later especially if in camera sharpening was also used. It’s much better to get all the noise out of the image in one process before continuing with your workflow of the image. Sharpening tools like the standard USM tool of Photoshop will wreak havoc on a noisy image. USM sharpens an image the same 100% unless you use masks or layers to block the areas that you don’t want the USM tool to sharpen. There are also selective sharpening tools available and in some instances they work by not sharpening the noise instead they focus only on edges of subjects. Thus large open areas where noise will be more visible should not be selected for sharpening. Printing Noise Last, but by no means least; the average inkjet printer seems to make noise look worse. I feel that all the Epson’s I have used, (1200, 1270, 1280, and 2000) seem to have problems with noise. It’s as if the Data Stream gets confused and outputs blotchy areas where the noise is or in some cases the noise being printed is exacerbated to an extent that the print is not useable. Neatimage Pro After reading some forum entries on new noise tools, one name kept coming up, Neatimage. I finally got interested enough to try the tool after reviewing some ISO 800 shots that had been posted. The results were most impressive. I started with Neatimage Demo, which the company still allows you to get as shareware, and after a couple of uses, I quickly sent them my check for the Home version of the tool. The results I was getting were excellent. Since I pulled down my first version, Neatimage has gone through many revisions and version changes. At the time of this writing, they offer two versions, Neatimage Home and Neatimage Pro both versions 2.1.x. For the subject of this review I will be using referencing Neatimage Pro. The main differences between the Pro & Home versions are that the Pro version will support 16 bit files. The Neatimage software family is a standalone set of programs that were written for Windows. There is currently no Mac support. I have used it in Win98 & W2K and assume it works with XP. If you are a XP user you should either contract Absoft via email (parent company) or try the demo version first.
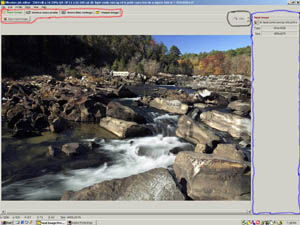
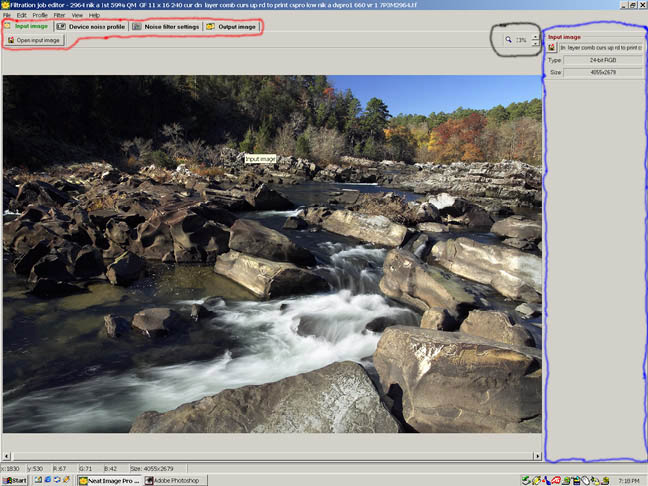
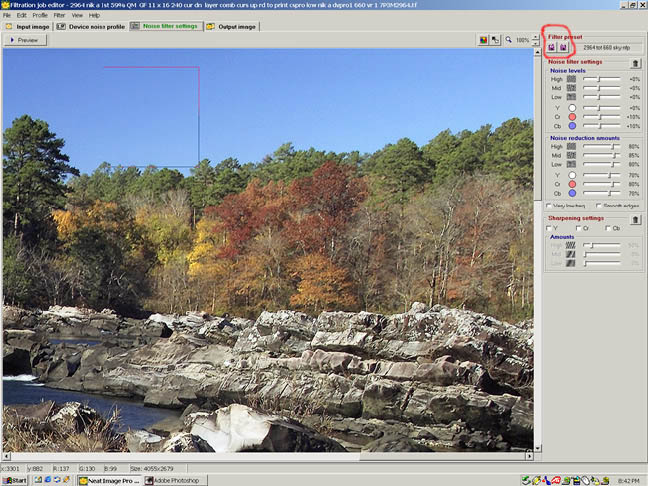
In the screen shot above you can see the basic layout of the tool. For the purpose of this review, I picked a random image that I took during one of my fall shoots. Neatimage has two main working areas. The first one is across the top with the 5 selection tabs (circled in red) and the other is down the right-hand side of the screen (circled in blue) where you will see image information and filter information. This right-hand side area is the main information portion of the tool. The selection tabs are from left to right: Input Image, Device Noise Profile, Noise Filter Settings, Output Image and Open input image. In this screen shot, I have already clicked on the Open input image—tab, and selected the image I wanted to work. The first thing you want to do is pick a working color space. You set this by going to the very top box in the right-hand column. You can pick one of the following: YCrCb JPEG (ITU 601 coefficients)--Recommended by Neatimage for most color photos since it allows the tool to break the image into the luminance and brightness channels. YCrCb Symmetric--Recommended by Neatimage for B&W images RGB—Standard RGB color space, but not recommended You will note that for the purpose of this screen shot, I have the image view set so that you can see the whole image. If you wish to zoom in on the areas that have noise, then you simply go to the magnification tool right next to the right-hand column (circled in Black) and then select the up arrow. In this image, I want to clean up the blue sky in the upper right hand portion of the image. To start this process I will zoom up the image till I have the sky at 100% view.
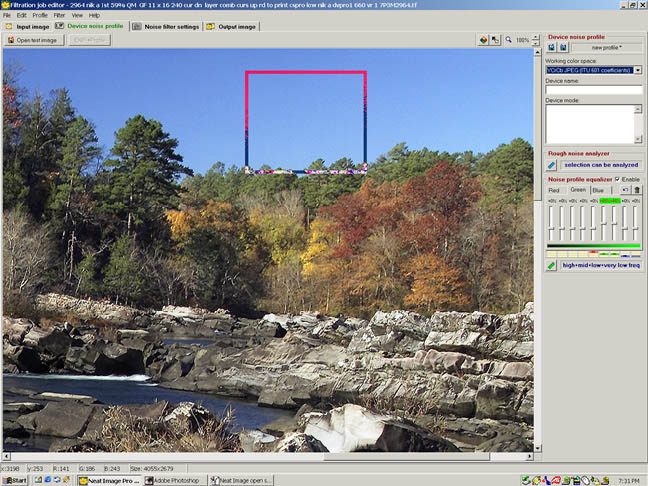
In this view I have zoomed up to a 100% view of the image. The next step is to click on the 2nd tab, “Device Noise Profile”. After this selection has been made, you will pick a point in the image where there is noise that you want Neatimage to sample, click with the left mouse button and draw a box. After you have drawn the box, move your cursor to the right hand column and click on the “rough noise analyzer”. Neatimage will process this portion of the image and give you some immediate feedback on the noise content. This will be shown in the “Noise Profile Equalizer”. In the screen shot above, look at the equalizer and you can see that there are separate tabs for the red, green and blue channel. With this equalizer you have the ability to “tweak” the setting and then run the “Fine-tuning analyzer”. In my workflow with Neatimage, I prefer to skip this and move on to the “Noise Filter settings” tab. To do this, after you have selected the “rough noise analyzer” and let it run, simply click on the “noise filter settings” tab. You can read more about the usage of the “fine-tuning analyzer” in the user manual.
The use of the “noise filter setting” tab is one of the real strengths of Neatimage. This is because you can really fine tune the amount of cleaning of noise in the overall image. Remember even though Neatimage is sampling only the portion of the image in your box, when you apply the filter settings you have selected, they will be applied to the entire image. I have yet to find an image from which Neatimage can’t remove 100% of the noise and not leave any artifacts. The problem is that the stronger the settings you pick the more detail will be lost in the rest of the image. This is why I love to use the “Noise filter settings” as you can really fine tune the tool and get immediate visual feedback on your results. Once you have selected the “noise filter settings”, you can view all of the filter settings. These will appear on the right hand column and are broken into three groups:
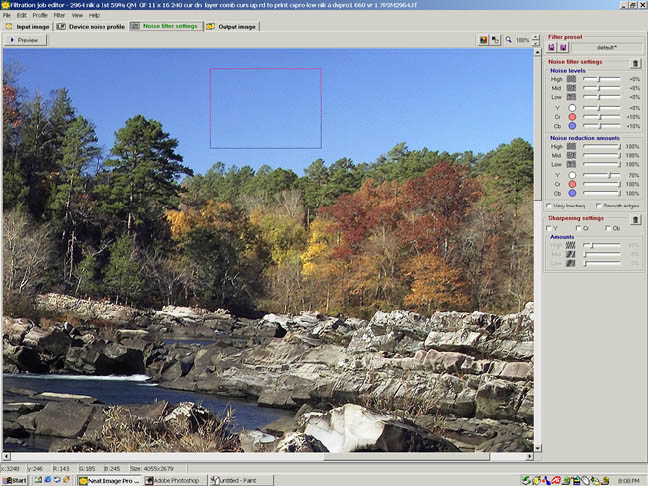
When you first click open this tab, you will see what the tool first picked for the “best” noise reduction. To test these settings, all you have to do is again draw a box, by clicking on a portion of the image you want to test with the left mouse button. Once you have completed the box, the tool will run quickly through the settings. The results of the filtering will be in the box. This is a great feature as you can easily compare the original noise to the filtered results side by side. If you like the results, then save the settings, if you don’t like it, just “tweak” the various filters until you find something that you like. I strongly recommend moving around the image to parts where there is not any noise and drawing test boxes here also. This will show you immediately just how much detail will be lost in other parts of the image. To be honest, this portion of the tool gets a little bit confusing to me as you have controls for both “noise filter settings” and “noise reduction amounts” Using these controls, I have come up with two methods for working with Neatimage. The first, is to fine tune these sets of controls until you find a reduction amount that gets as much noise as possible without taking out too much detail. The second, is to work the controls to get maximum noise reduction within reason, apply the filter and then later in Photoshop combine the two images (before and after Neatimage) with a layer mask. I prefer the 2nd option for my work. Note, as you change the settings of the various controls Neatimage will recalculate the preview box based on the new settings. From the very top menu, under view—options—filtration, you can tell the tool to automatically recalculate each time you make a change to one of the controls, or manually hit the preview button yourself. I prefer to do the manual preview as I tend to make changes to more that one control at a time. In the automatic mode, Neatimage reruns the preview each time you move one control and to me that gets rather busy.
In the screen shot shown above, you can see the preview box in the portion of the image I want to test and notice that some of the control settings have been “tweaked” from their defaults. There are a couple of other controls in the right hand column that you might want to experiment with. These are the “Sharpening settings”, along with two check boxes. One box is for “very low freq” and the other for “smooth edges”. I prefer to not allow Neatimage to do any sharpening for my work. Many times I find that presets from one image will work fine on another image and this saves time. To save, just click on the diskette icon at the very top of the right hand column (circled in red) and follow the prompts. These various “noise filter settings” will be stored in the presets folder in the Neatimage program folder. They will have an nfp file extension. (Neat image filter preset). NOTE—If for some reason you have to remove this tool, make sure you get any presets and save them to another location as all will be lost if you remove the program. The last step in the process is to click on the “output image” tab, and then the “apply tab”. Now sit back and relax, as this takes a while. You will get a small progress tab that appears directly next to the “apply tab”. The actual run time of Neatimage is one of its only faults as it will take at least 8 to 10 minutes to process a 16 bit 6mp image from one of my cameras. When the tool has finished, then the image will be displayed with the noise reduction processed. All you need to do is save the image. Neatimage will also add a tag to your image showing you that this image has been processed. The workflow I have described to you in this review really won’t work for an event type shooter. I tend to take many images and then pick a few to print up. If you are an event shooter and have a large number of images to work, consider the batch options that come with Neatimage. This is new to the 2.1.x version. Conclusions Here is a quick analysis for readers. I rate Neatimage as a key tool for my image processing and only hope that a Mac version comes out soon.
Website, www.neatimage.com (Note you can download the shareware version of the demo version for no cost, but it has some limitations make sure you check out the main website of Neatimage to see which version works for you) http://neatimage.com/featuremap.html Within same site, you will find full users manual for both versions in downloadable pdf formats. This article was written by Paul Caldwell, comments or questions are
welcome at |
||||||||||||||||||||
| For Comments post in our News Group |