|
 |
|  |

|
 |
Workflow Technique #017"Mid-Tone Sharpening "
article by
by Roberto Casavecchia (edited
by Uwe Steinmueller
|
| Every image (either scanned or shot with a digital camera)
needs post-processing. Scanned images need less enhancement than images
shot with digital cameras due to minor contrast and stable light conditions. Those images we shoot with digital cameras no matter with simple point&shoot or with sophisticated digital reflex cameras need much more accurate processing. I have developed a complex but easy to use action for Adobe Photoshop, the most popular and professional tool for digital imaging. You can download this action action for free at the end of this article. I can tell you, I dislike these over sharpened images where halos and artifacts fights with each other being the most dominant part of the image. If you compare any image shot with an analogue camera to one achieved with a digital camera you will note the following differences: Analogue image: more noise (film grain), less detail in the shadows, more micro details, crisp digital image: smooth, more detail in the shadows, less micro details, flat Get the most of your digital SLR
Digital images appears often a little blurred. This is the result of
keeping down the noise level. The best thing is leaving all settings which concern sharpening and
contrast to a low level, leaving camera in-processing as less as possible.
Even better to use the raw file format and control all processing later
on your PC.
To get the best „digital negative“ you should shoot with the following settings: • RAW-Modus 16 bit I have seen a lot of methods how to sharpen images, but some lack in
edge sharpening and the other produce a lot of noise without sharpening
any details. The better way to go A correct processed image should look very natural, a wide range of tonality, accurate shadows and highlights and what’s most important: well sharpened mid-tones! The most visible difference between an analogue and digital image is the amount of micro detail in the mid-tones which determines the sharpness of an image. And it’s exactly there where my action will work. Well perhaps all pro photographer will remember how they achieved beautiful Cibachrome prints from those terrible crisp kodachrome slides where the big problem was to handle heavy contrasts, dark shadows and blown-up highlights. A real pro lab had to use several masks (pos. & neg.) to succeed in printing. Now I am using a similar technique not to manage contrast, but to enhance
sharpening in the mid-tones. As I mentioned at the beginning the mid-tones
will determine how sharp and crisp an image is. Micro detail like a
structure in a piece of wood or the texture of a cloth have to appear
clearly visible and well defined. Sharpening using a positive and negative mask
That is my solution. Using a tweaked positive and negative mask, intersect both selections and you will sharpen only those parts and details that needs to be sharpened, without producing any halos around edges and no additional noise. While working only in 16bit-Modus you will get smooth curves without any gaps. Of course there has to be done some tweaking and adjusting to the levels, contrast and color balance, but it’s all included in the action-action. Try and enjoy a new way of processing digital images. Roberto's action can be downloaded here.
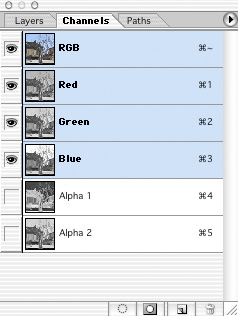
How the Action works This action works best when we use RAW-images in 16-bit mode. 1) Open image in 16-bit mode 2) Enhance contrast with a moderate „s-curve“ 2) Apply usual tweaking in levels, color balance and saturation still in 16-bit 3) Convert to 8-bit mode and select Lab color, select Lab luminance
channel and 4) Go back 2 steps in the history to RGB, do not convert! 5) Add two alpha channels and paste the Lab channel into them 6) Inverse the first alpha-channel. Now we have two masking channels: 7) The dark areas of the negative channel will be tweaked using Levels
to output value 20, 8) First select the neg. channel and then by intersecting the pos.
Channel - Note: You will get a Photoshop warning that the selection cannot be displayed. Do not worry about this. 9) Now we switch back to 16-bit mode to apply the masked USM sharpening
with the values 10) This way we get more sharpened micro textures without producing
artifacts and halos around the edges. The picture looks more natural
and even more crisp. About Roberto Casavecchia
|
| Note by the Editor |
First of all we find this method very interesting and like the results. We also experimented with some stronger sharpening radius settings (0.8-1.2) and found them useful too. Roberto, thank you very much for your excellent contribution. |


| For Comments post in our News Group |