There are several tools on the market to create
panoramic images. The granddaddy of them all is of course the free
Pano Tools (created by Helmut Dersch), usually complemented by any
one of a slew of (shareware) front-end interfaces. Adobe Photoshop
CS also includes its own Photomerge tool. I find these tools difficult
to use, often producing results that are far from perfect, and limited
to 8-bit images. Interested in finding a good, easy-to-use, pano tool
I came across Panorama Factory (available for Windows®) and find
it very easy to use, capable of producing automatically excellent results.
The program's interface is straightforward and is supported by a well-written
Help file. In addition, Panorama Factory offers a wizard mode, which
I recommend for the first time user.
In the following, I describe how to make a panoramic image using the
program's wizard mode, using my preferred settings. I started by shooting
a series of images on a tripod and keeping some overlap (about 20%)
from image to image. All images were shot in manual mode with the same
exposure, and the RAW conversions were set with identical conversion
parameters for all images in the set.
The Panorama Factory wizard is straightforward to use:
Step 1 - Import your images - Click the "Import" button
and select the set of images.

Step 2 - Describe your camera - select camera/model (many popular
cameras are supported). Choose also automatic focal length detection
and check "Correct barrel distortion" and "Correct brightness
falloff."

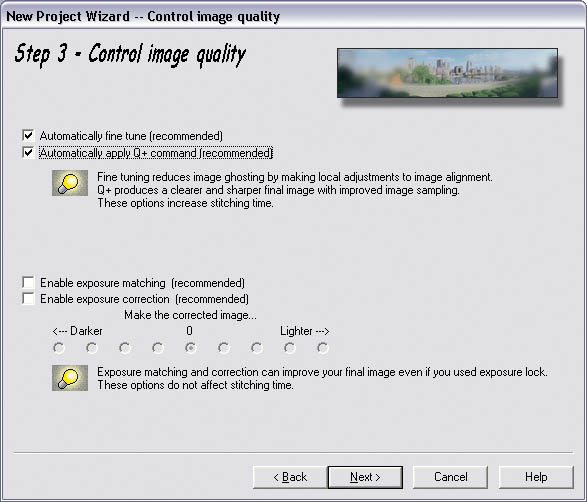
Step 3 - Control Image Quality - check the fine tuning boxes but do
not check exposure adjustments (this should be left off for images
shot with the same exposure settings).
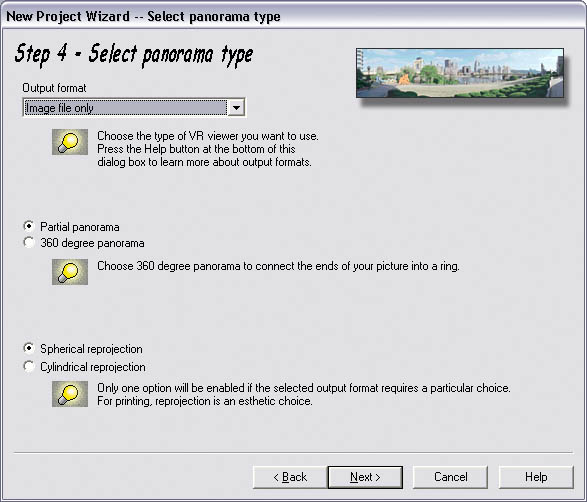
Step 4 - Select panorama type - Set Partial panorama and Spherical
reprojection
Step 5 - Create your panorama - Check Prepare image for printing and
Default resolution
Click Next and the Panorama will be built. If image overlaps are less
than optimum (minimum 20%) you may see a warning message regarding
focal length refinement.
Step 6 - Save & print your panorama - Click Save final image (you
can choose a variety of image formats - see Note1 below).
Once you open the pano in Photoshop it appears that the image RGB
space is stripped. Assign whatever RGB space was attached to the original
component images.
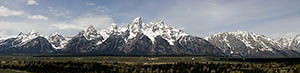
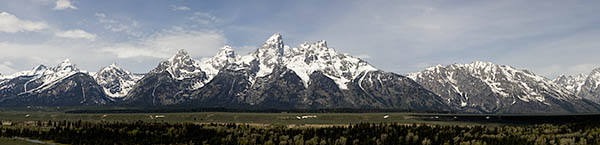 Resulting
panorama of 3 individual landscape images Resulting
panorama of 3 individual landscape images
Click here for a large panorama of 6 stitched landscape shots.
Beyond the workflow presented here, the program offers a series of
additional adjustments, including exposure compensation (if needed),
color adjustments and batch processing.
I have created panoramas with Panorama Factory from sequences of images
shot handheld. The program had no problem in creating seamless unions,
where other image stitchers failed.
Panorama Factory V.3.3 (Standard Edition) is available for the Windows
OS at a license cost of $59.95. A trial version is available from the
vendor's
website.
Note 1 - Windows TIFF bug
Windows users may have problems with large TIFF files as there is
a bug in Windows Explorer. This is not a Panorama Factory bug.
Instead
of using TIFF files, panos created as 16-bit PNG files had no problems.
Note 2 - 64-bit Edition
The vendor will soon release a 64-Bit Edition, making it possible
to create much larger images when running in 64-bit CPUs. As the
resolution
of digital cameras increases, this version becomes more interesting.
Some users with 12 and 14 megapixel cameras are already starting
to have the dreaded "out of memory" problem when they try to
stitch a larger number of images. The 64-Bit Edition resolves these
memory limitations. See more details here - http://www.panoramafactory.com/pfactory64.html
The Standard Edition and the 64-Bit Edition are functionally identical
- except that the 64-Bit Edition cannot import or export QuickTime
movies (see here).
|