| One of the skills that separates novice photographers
from the more experienced is an awareness and control over “Depth
of Field” (commonly referred to by its abbreviation “DOF”).
Sometimes, to get the shot, we need to use a very small aperture. When
we do, not only is the subject in sharp focus, but features in the background
and/or foreground can compete for attention. This tutorial will walk
you through the steps in using a new feature in Adobe Photoshop CS: the
Lens Blur filter.
If you take an image where the subject is at a distance, everything
in the image at that same distance will be equally sharp. Features
in front or behind the subject will have less sharpness. The further
they are from the subject, the less sharp. DOF is the zone of acceptable
sharpness that extends in front of and behind a sharply focused subject.
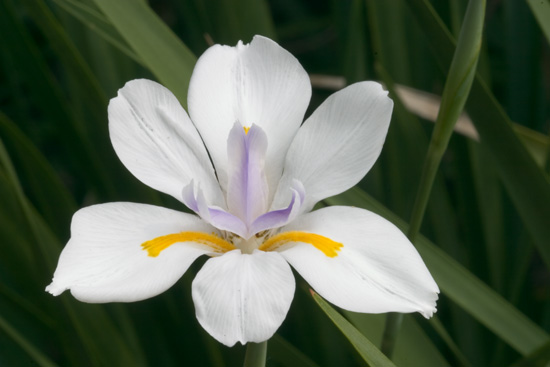
Figure 1. Too much DOF allows leaves and stems to compete for attention
with this
White Iris bloom.
There are three basic facts to DOF. Holding everything else equal:
• DOF increases as a lens is stopped down (i.e., the f/number
is increased);
•
DOF increases as focal length decreases;
•
DOF increases with subject distance.
Experienced photographers attempt to manipulate these factors in order
to control how much of the background and foreground blurs and how
strong the blur will be. There are images that should be sharply focused
throughout. Landscapes are usually shot with tiny apertures like f/11
and f/18 to have everything in focus from a few feet in front of the
photographer all the way to the horizon. At other times, a blurred
background or foreground is preferred. When you take a macro or near-macro
shot, the DOF can be as small as a fraction of an inch. Make a mistake
and either the front or the back of your subject will show evidence
of being out of focus.
The image in Figure 1 is one of those situations where DOF works against
you, where a sharply focused subject means competing features in the
background or foreground will also be brought into relative sharpness
and detract from the subject.
I had to choose. Did I want a blurry background in order to keep the
eye on the flower bloom? Did I want every feature on that flower bloom
to be in relatively sharp focus? The physics of the situation – 180mm
macro lens, Canon 10D, the size of the bloom, my distance from the
bloom (1.5 meters) – all required that I use a small aperture
in order to get the iris blossom in sharp focus. I used f/32 at 1/10
of a second on a sunny day.
f/32? What about diffraction? Fortunately, I was using a Canon 180mm “L” macro
lens. If you have never used one, the quality of the optics will astonish.
Even at minimum aperture, this lens delivers sharp, crisp images.
I would have preferred to back off to something like f/22, but my
DOF would have narrowed so much that features of the iris blossom would
lose sharpness. Even at f/32, the DOF extended a scant 2 inches. At
f/22, DOF would extend less than 1 ½ inches. Not enough. I stood
back at 1.5 meters, rather than allowing the blossom to fill the viewfinder
in order to extend the DOF a bit.
When I am out in the field, I do not calculate DOF with such precision.
I instead use the DOF preview button and run my eye over the subject.
Especially the petal edges in this case. The problem you confront with
the DOF preview is viewfinder brightness. The viewfinder is very dim
at f/32, even on a bright, sunny day. I bracket for DOF in that circumstance.
For this shot, I bracketed f/22, f/25, and f/32.
I knew from the DOF preview that the background was going to be a
challenge. The iris blossom was in the middle of a bunch of leaves
and stems. Some were the same distance from the lens as the subject.
They were not going to blur sufficiently. The solution was to rely
on isolating and blurring the background in Photoshop.
Using the Lens Blur Filter
Photoshop CS added the Lens Blur to the Filter | Blur menu items.
In prior version of Photoshop, you would instead use Gaussian Blur
to
give the appearance of a narrower DOF to an image. The Lens Blur
filter adds a more realistic blur. It is also a more complicated
filter to master.
To use the Lens Blur filter, you need to be comfortable making selections
and converting selections to masks. The Lens Blur effect relies on
a Depth Map to control which features get blurred and how much blur
is applied to them relative to other image features.
Figure 2 is the same White Iris in Figure 1. The image was cropped
from a 2:3 aspect ratio to a 4:5 aspect ratio. Cropping removed some
of the leaves and stalks, enhancing the white blossom.
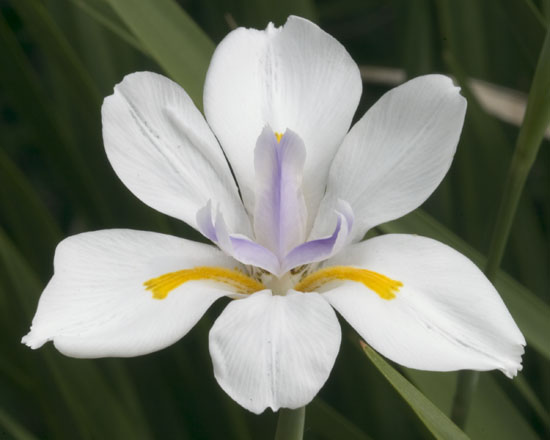
Figure 2. Effective cropping enhances the subject.
The background in Figure 2 is still distracting -- especially the
leaf at 5 o’clock pointing straight at the blossom. The first
step in using the Lens Blur filter is to create a Depth Map. A Depth
Map is just a grayscale image. Typically, an alpha channel. If you
recall that white reveals and black conceals with a mask, then black
protects features from blurring (i.e., black conceals features from
the Lens Blur effect), white permits the full effect of the blur, and
shades of gray progressively allow more/less of the blur effect.
I started by duplicating the Blue channel. There was already a lot
of contrast between the flower and the background.
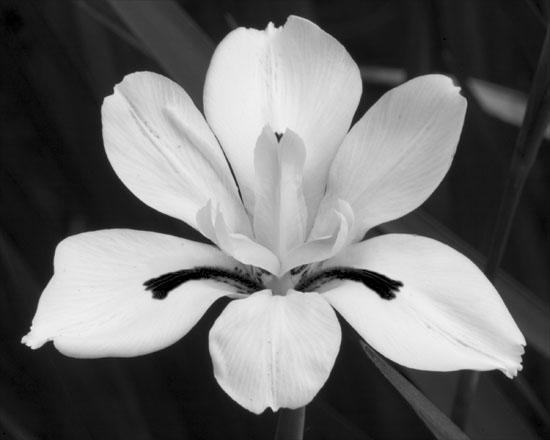
Figure 3. The Blue channel was a good place to begin crafting a Depth
Map.
I used the Magic Wand to select the background, making sure the Contiguous
box was checked on the Option Bar. This kept the selection away from
the darker details on the flower itself. Using a Tolerance of 30, it
took all of a half-dozen clicks of my Wacom tablet pen to select the
entire background. I then converted the selection into an alpha channel
by selecting the “Save selection as channel” icon at the
bottom of the Channel Palette.
To soften the edge of the selection, I applied a 1 pixel Gaussian
Blur to the new mask. This left me with a well-defined mask for the
flower. I had my Depth Map.
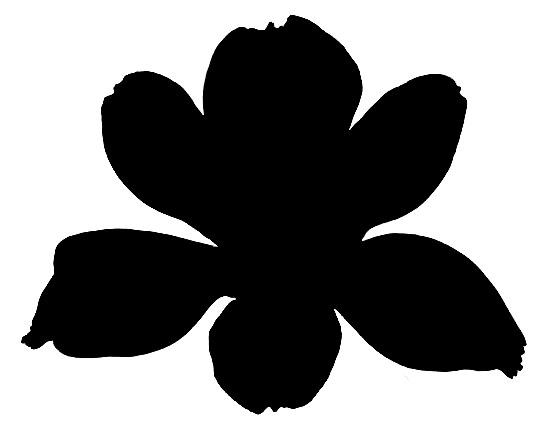
Figure 4. Mask of the flower to be used as a Depth Map for the Lens
Blur effect.
To repeat, where the mask is black, there will be no blur applied.
Where the mask is white, the image will receive the full blur effect.
Shades of gray would receive a corresponding amount, with brighter
tones receiving more blur than darker tones.
I used the Magic Wand for this example. You can use other selection
tools, too. Gradients can be very helpful for reducing DOF in a way
that adds a dream-like or romantic aura to an image.
Once you have your mask ready, select Filter | Blur | Lens Blur. A
dialog window will open. You can toggle the preview on and off by selecting
and unselecting the Preview checkbox.
Be warned! The Lens Blur filter is performing lots of very complex
calculations. It can take a minute or two on even the fastest workstation,
especially if you select the More Accurate option for the preview.

Figure 5. Settings for blurring the background with the Lens Blur
filter.
The setting for Blur Focal Distance determines the depth at which
pixels are completely in focus. I left it at 0, which provides the
behavior mentioned earlier: black areas in the Depth Mask are completely
in focus, white areas are completely blurred. This is ideal for an
image, like the White Iris, where there are no foreground features
to blur.
When you have both foreground and background to blur, you could instead
set Blur Focal Distance to something like 128. A setting of 128 is
convenient because in that case, 50% gray pixels would be completely
in focus and pixels lighter or darker that 50% gray would receive progressively
more blur as they vary from 50% gray. This is very helpful when using
gradients as a Depth Mask. If you prefer, you can click on the preview
and the Blur Focal Distance slider will match the location you clicked,
setting that depth as in-focus.
The appearance of the blur depends on the settings you choose for the
Iris parameters. This is what distinguishes the Lens Blur filter effect
from the Gaussian Blur effect. Radius for the Lens Blur filter corresponds
to the Radius setting for Gaussian Blur. It determines how pronounced
the blur effect will be. Choosing a different shape for the iris, a
different number of blades, and the curvature of the blades will result
in a different blur pattern.
Macro photographers refer to the blur of a lens for features outside
the DOF as “bokah.” Lenses with a pleasant background blur
are highly prized. The Lens Blur filter lets you dial in a desired
bokah.
Another distinguishing characteristic of the Lens Blur filter is the
settings for specular highlights. This gives added reality to the blur
effect. Out-of-focus specular highlights do not blur in the same way
as less pronounced features. The shape of the iris has an especially
strong impact on how specular highlights blur.
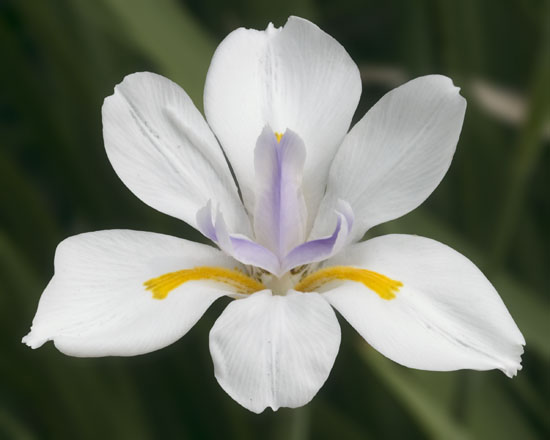
Figure 6. The same image after the Lens Blur filter.
Blurring an image will smooth the effects of luminosity noise. Those
are the grainy, splotchy effects from digital cameras that are especially
noticeable in the shadows and areas with color gradients, like large
areas of blue sky. The image will look more realistic if you add back
some random noise. If you experience chromatic noise as well, you can
select the Monochromatic checkbox to prevent the noise from affecting
the color of your image.
Figure 6 shows the result of the settings in Figure 5. The background
now recedes. Attention focuses squarely on the White Iris. The bokah
is pleasant and realistic. All that remains is to sharpen a bit and
finish with a frame effect.
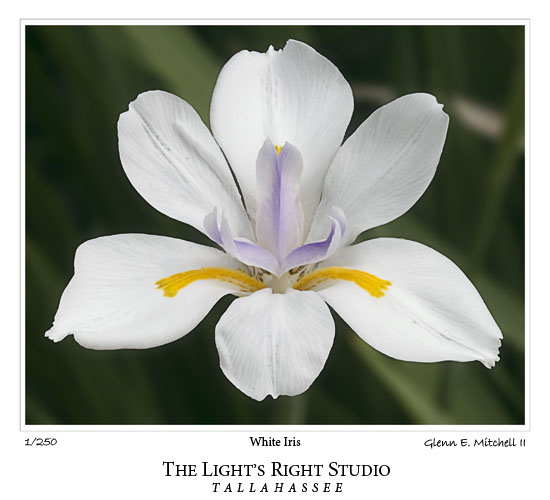
Figure 7. Pretty as a picture after a touch of Highpass Filter sharpening
and a gallery
frame edge effect.
Figure 7 is the result of Highpass Filter sharpening with a Radius
setting of 6.5 and a gallery frame effect I learned from Scott Kelby,
President of the National Association of Photoshop Professionals (NAPP).
Concluding Comments
I do a lot of botanical and nature photography, so I constantly wrestle
with getting just enough DOF to blur the background without losing
sharpness at the tips of flower petals or on stamens projecting
out towards the camera on long antlers. Sometimes I get the shot.
Sometimes
I wind up with less DOF that I would have preferred. I usually
hedge my bet by bracketing my shots.
The Lens Blur filter changes all that. I can shoot for wider DOF to
make sure I get all of the flower details in focus and then narrow
the DOF once I get the image loaded into Photoshop CS.
Narrowing the DOF in a realistic way begins with the careful creation
of a Depth Map. Once you have struggled to get your subject totally
in focus, you do not want to lose any of it. You want to limit where
the effect is applied. You also want to the focus to change as your
eye approaches or recedes from the subject. So, you need to be comfortable
with selections and channels to make effective use of the Lens Blur
filter.
You can create background and foreground blurs with the Gaussian Blur
filter. The real power of the Lens Blur filter is the way in which
it mimics the changes an image undergoes as the lens barrel twists
from sharp focus to out-of-focus.
You have a lot of control over the blur effect. Different choices
for the iris shape, number of blades, and curvature of those blades
allows you to affect the bokah in subtle (or not so subtle) ways. You
can especially tell the difference in how specular highlights are treated
compared with using a Gaussian Blur.
To keep the effect realistic, keep in mind that DOF does not typically
extend equally in front and behind the subject. Macro and near-macro
shots come close to 50:50. For most photographic subjects, the zone
of acceptable sharpness will typically extend twice as far behind the
subject as it will in front of the subject.
|


