| It used to be I’d matte, mount and frame a print
for sale and then authenticate the print by signing the matte in pencil.
If I was selling the print unframed, I would simply sign the lower right-hand
border with a Sharpie permanent marker. Now in the digital age, we have
a few more creative options…
My current preferred method is to add my signature digitally in Photoshop.
To do this is relatively simple and I can control the size, color and
effect tailoring the result specifically to the print I am placing
it on and from the responses I’ve received, my clients like it
too!
The first step is to create a “Signature” brush is PS.
You can scan in a handwritten signature or use a font you like. Here
is how to do it:
1. Open PS and create a new file about 500x500 pixels. Make sure
the background is set to “transparent” and while not critical,
I use sRGB color space and 8-bit mode.
2. Select the “Type” tool and drag a box onto the transparent
background. Select a type style you like and type your signature in
black as you want it
to appear on your images.
3. NOTE: I add the copyright symbol and the year below my name. To
get the copyright symbol in windows, hold the “alt” key
and type “0169” then
release the alt key.
4. Once you have the signature the way you want it, merge the layers.
5. Now using the rectangular marquis, outline the signature area.
6. With the selection active, go to Edit/Define Brush Preset and
give your brush a name you will recognize like “My Signature” and
click “okay”.
Your brush is now saved and is the very last brush in the brush palette dropdown
list, but it is likely not the best size for your uses.
7. To correct the size you can now adjust it like any other brush.
I find 250 pixels to be a good standard size. Simply size your brush
to the new standard
size you want a re-save it so you wont have to redo this step each time you
use it.
8. For an actual signature replica, in lieu of step 2 above scan
a copy of your signature, preferably black ink on white paper since
you
will be selecting
the signature only for use as your brush. Select the signature with the magic
wand tool and paste it into the transparent background. Proceed with steps
3 through 6.
Now that the brush is made, you can simply stamp it on an image, but
with layers we can be far more creative. For example, I like to first
select a complimentary color from my image for the signature itself.
Then I like to place it on a layer above the final image that is slightly
transparent with a drop-shadow – this gives the effect of the
signature being done in a colored bead of water over the image. Attached
is a free layer watermark action that will make this layer automatically
or you can make one of your own that better suits your needs.
Here is an example, showing my signature made with the type tool:
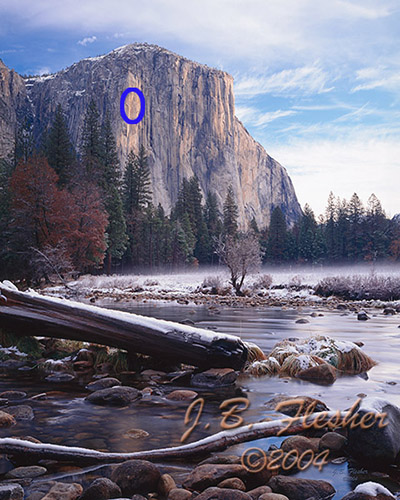
1. Select an image, for example this one:
2.

El Capitain before
3. Run the “Signature Layer” action
(download from here)
4. Using the dropper tool, select a complimentary color from the
image,
5. Switch to the brush tool, select your signature brush, size it
appropriately and click it where you want it to appear. The area I
selected the color from
is outlined in blue and of course my signature is overly large since this
image is an example of how to use the brush.
6. Note: the blue marker shows the area where I
selected the brush color.
Of course you can alter the layer for many different effects, but
the idea is the same regardless. Enjoy! |


