I sometimes sound like I obsess about color balance;
in many ways, color balance is one of the first steps to creating a
great image; good balance makes the colors pop, makes the color contrasts
stronger,
and makes the image more pleasing. Color balance can be very challenging
to get right; it can be hard to see what the color cast of a scene
or image is, much less to know exactly how to balance it. Good color
balance
takes lots of experience to see and I am still improving my ‘vision’ of
color both in the real world and on the screen.
In the real world, the
lighting conditions are usually less than idea for color correction;
outdoor or indoor lighting is seldom close to
the photographic ideal color temperatures for ‘daylight’ or ‘tungsten’.
This can be resolved fairly easily by capturing a photo of a gray card
in the same lighting conditions and correcting to the gray.
The basic steps
Setup and shoot your first exposure normally; I typically just set
my digital camera to use its auto white balance setting as this
will not
change between shoots. The auto white balance for most cameras
does an ok job, but it only gets the color balance close and usually
does
not
create a great color balance. If you are shooting hand held and
are worried about small changes in the auto white balance, just set
the
white balance
to its nearest manual setting (here I would use the ‘Shade’ white
balance setting). If shooting film, I just shoot with daylight
balanced film.
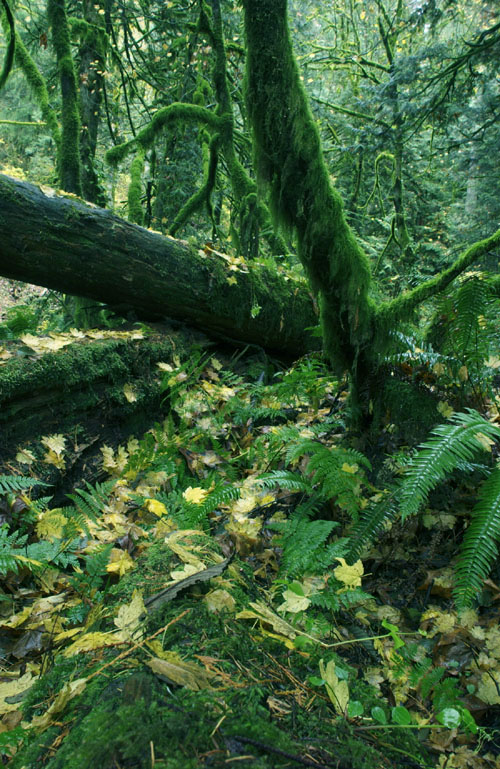
My Original Image showing the Color Cast
of the Scene
(Download this image to follow these steps)
Next, place a gray card into the scene into the questionable
light (this could be the overall light of the scene, or perhaps just
the shadows).
I suggest the official Kodak gray card, as these are designed
to be neutrally balance in a wide range of lighting conditions. Make
a second
exposure.
These two shots don’t need to be identical (ie. Shot on
a tripod), but they do need to be as close to one another as
practical. Read more about possible gray cards here.
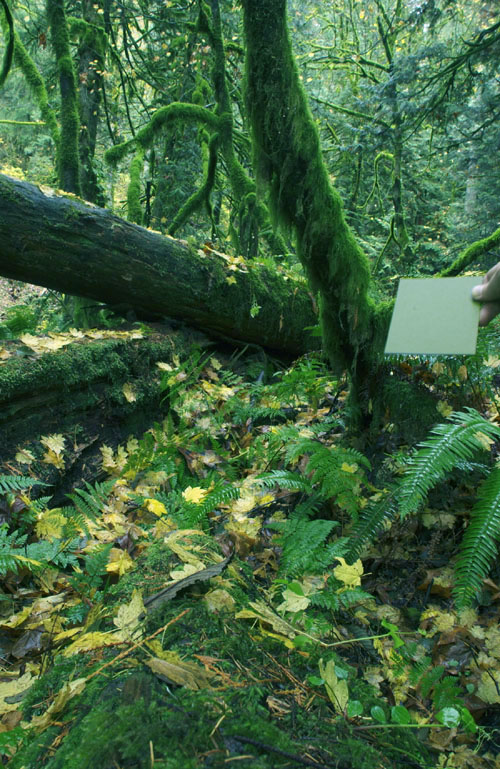
The Same Scene with a Gray Card Added
(Download this image as well)
Process your images normally, just
make sure that the original image and the gray card image are
both processed identically.
In Photoshop, open the image with
the gray card. Select the color sampler tool (it is hidden under
the eyedropper tool); this tool
places sample
points onto the image that allow you to see the precise values
for each point; click on the gray card with the color sampler
tool, this
places
a sample point on the gray card, the color values for this
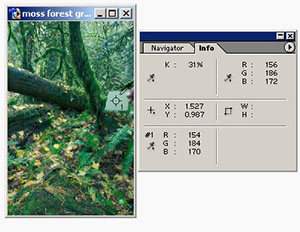
point are shown in the info palette.
Notice that the R, G, & B values of the gray card are not
equal; the card is not gray in this image.
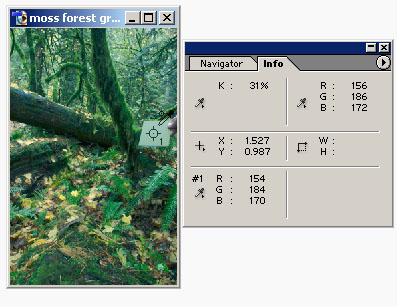
A Color Sample Point
on the Gray Card
To get the color balanced, we now need to adjust
the color of the image so that the three color values for the gray
card are returned
to neutral. I typically pick the middle value for the three color
points (RGB) and adjust the other values to match it. This produces
a neutral
gray without changing the density much.
To adjust the gray values,
create a new Levels adjustment layer (called ‘correct
gray card’). Within the levels adjustment layer, we can edit
the midtone values (or the gamma) for the three individual channels
to obtain a neutral value for the gray card. Once I have a neutral
gray card, accept the Levels adjustment.
In this case, I adjusted
the Red and Green channels to match the blue channel. The image
now appears to have better color balance.
I typically
select the middle value (here: Blue 170) as the target value
for the other two channels; this ensures that each channel is changed
as little
as possible.
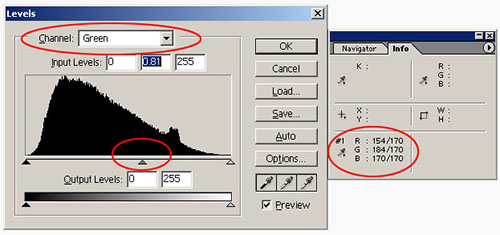
Adjusting Levels to Get the Gray Card Gray Again
This should create
a correctly color balanced image, but there are many times that we
want the image color corrected, but wish to maintain
some of the color cast of the ambient light. This helps make the
image retain some of the environmental color. For example, we often
wish
to remove the Blue/Cyan color cast from shadows, but not remove it
completely; otherwise the image might appear unrealistic. The easiest
way to reduce the color correction is to reduce the opacity of the
Levels adjustment layer; often a fairly small amount helps, perhaps
reducing the opacity to 80% or 90%.
To finish, we just need to move the Levels adjustment layer that contains
the correct color balance over to the image without the gray card.
Open the image without the gray card in Photoshop, return to the gray
card image, select the Levels adjustment layer(‘correct gray
card’) and duplicated it use the Layer/Duplicate Layer. In the
Duplicate Layer Dialog, chance the document to target the image without
the gray card; this will duplicate the Levels adjustment layer onto
the new image.
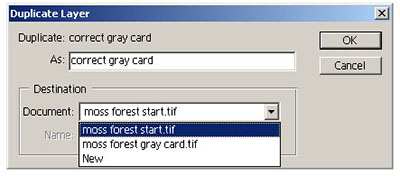
Copying the Adjustment Layer over to the Original Image
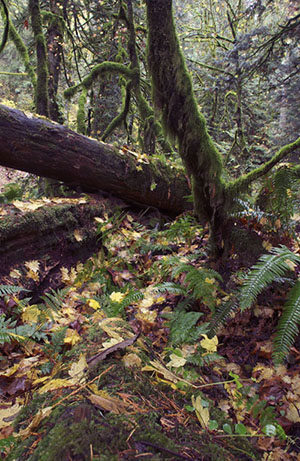
The Final Image
What about the Camera’s Custom White
Balance
Many digital cameras include a custom white balance setting
that does essentially the same adjustment as I do by shooting a gray
card, so why not just use the cameras settings. If your camera
does have
this setting and you are comfortable with it, go ahead and keep
using it. I still prefer to use shoot a gray card for a few reasons:
First,
the gray card works with any camera, film or digital. Second,
if I don’t adjust the custom white balance, I don’t run
the risk of shooting in a different light but forgetting to change
the custom white balance; shooting with auto white balance gives
me ok color balance most of the time. Third, shooting a gray card
allows me to color correct for one part of the image with mixed
lighting, for example, I can correct the shadows of an image by
making an image
with the gray card in the shadows and then correcting only the
shadows in Photoshop. Finally, shooting with a gray card allows
me to have
the original image with the original color cast found in the real
scene, the gray card allows me to correct for this color cast,
but I have the option to only correct it most of the way towards
neutral
and retain some of the original color cast. For many images this
retains the best overall look.
Advanced Technique (for Digital SLR Images)
I have been informed that
the gamma correction used in the basic levels adjustment will
product inaccurate color correction
in the highlights for images captured with most digital SLR cameras.
This
is due to the non-linear response of the sensors in these
cameras. The advantage to using the color correction using curves rather
than levels is subtle but still noticeable.
The following
steps use a more accurate curve adjustment instead of the levels
gamma adjustment.
To adjust the gray values, create a new Curves adjustment
layer (called ‘correct
gray card’). Within the Curves adjustment layer,
we can add a midtone adjustment point for two of the three
individual channels
to obtain a neutral value for the gray card. Select the
first channel to edit, add a midtone adjustment point and
move it up or down to
match the value of the midtone for this channel to the
target value.
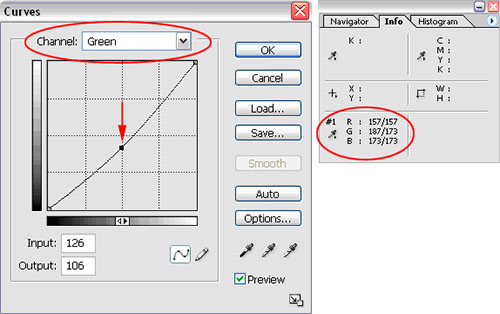
Gamma Correction in Curves
to Correct Midtones
To
get a good overall color balance, the highlights will need
to be shifted as well. Bring the highlight point down
(or up/left)
slightly so that the upper part of the curve is parallel
to the center line
of the curve; you may need to adjust the midtone adjustment
slightly to keep the target value correct.
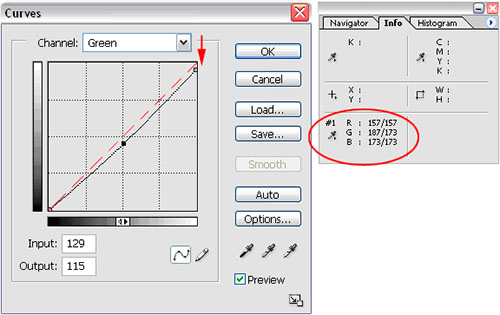
Highlight
Correction in Curves
Change to the second
channel that you wish to adjust and repeat. Once all of the channels
have the same value at the target point then the
gray card will be neutral. Hit OK to accept the Curves adjustment
layer. Now the image appears to be more neutral overall.
(Thanks to Steve White at Microsoft for pointing out the problem with
gamma corrections and digital cameras).
|