As you now know sharpening is needed for digital
images and there are many good ones to choose from. In 2004 we introduced
our first own sharpening tool EasyS that many people love for high
resolution nature photographs.
The EasyS Sharpening Toolkit is based on the same technology used
in EasyS but uses a very flexible toolkit approach.
EasyS Sharpening Toolkit now improves on EasyS in the following areas:
• File size only limited by Photoshop
• More easily scriptable
• Fast operation
• Flexible tuning
Sharpening by the numbers
The EasyS Sharpening Toolkit does not support an interactive user
interface with sharpening preview. This sounds limiting, right? But
actually we work for a very long time with sharpening actions and create
sharpened layers that we then tweak via opacity changes. Also if you
use additional techniques like edge masking and/or halo tweaking then
what you see in the (sometimes even small) sharpening window is not
what you will get.
EasyS Sharpening Toolkit
EasyS Sharpening Toolkit consists of two parts:
• EasyS Sharpening Engine (a Photoshop automation plugin)
• EasyS Sharpening actions (intended to be tweaked for your own optimal
results)
The EasyS Sharpening Engine
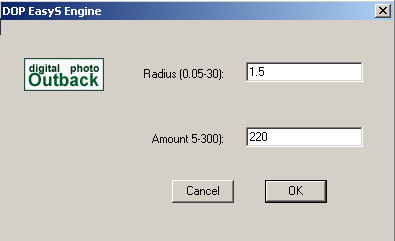
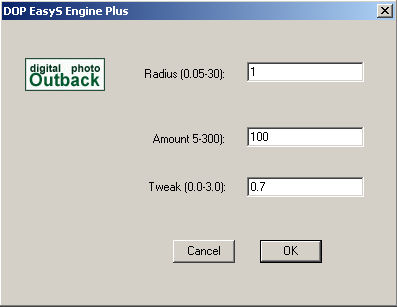
With the EasyS Engine you can actually only choose two parameters:
• Radius (0.05-3.0)
•
Amount (5-300)
But the EasyS Engine is not just using plain USM:
Here is a sample:

USM 220,1.5,0

EasyS Engine 220/1.5
Don’t expect huge differences but looking at fine detail will
show that our engine works smoother and still captures the finest details
available. We also mange to produce very low halo levels. Best you
use a demo version and try on your own images (how to get a demo version
see below).
EasyS Sharpening Actions
Note: Do not rename the action set!
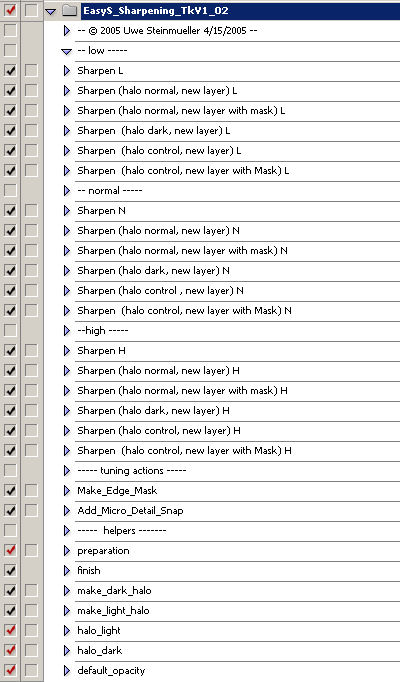
EasyS Sharpening Actions
The actions come in 4 sections:
• User actions with levels L(ow), N(ormal) and H(igh)
• Helper actions
These levels are thought to be tweaked by the user and we will show
how later. You also can copy the actions and create your own combinations.
That is why we have called it a toolkit.
Each level consists of 6 actions:
- (1) Sharpen (L,N.H) which defines the base sharpening
for the level and sharpens on the currently selected layer
- (2)
Sharpen (halo normal, new layer) (L,N.H) creates a new layer with
the content of all visible layers and then uses the sharpening
defined in (1)
- (3) Sharpen (halo normal, new layer with Mask) (L,N.H) creates
a new layer with the content of all visible layers and
then uses the sharpening
defined in (2) and adds an edge mask
- (4) Sharpen (halo dark, new layer) is
like (2) but only shows dark halos
- (5) Sharpen (halo control, new
layer) is like (2) but and then tweaks the dark/light halos which
are the result of
the sharpening process (see below in more detail).
- (6) Sharpen (halo control, new layer with Mask) (L,N.H) creates
a new layer with the content of all visible layers and then uses
the sharpening defined in (5) and adds an edge mask
Tweaking the actions
Setting the sharpening strength
You just need to double click on the filter entry in the base sharpening
actions (1)
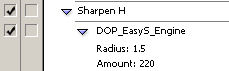
and this will open the EasyS Engine dialog:
There you change the value to the ones you prefer and the EasyS Engine
will be executed. After that the new settings will be recorded in the
action and used by all other actions of the same level.
Note: If you make specialized versions for different camera settings
then it is best to roll you own actions from a copy of the standard
actions.
Changing the light/dark halo levels
What does sharpening actually do? It adds the impression of more sharpness
by increasing the contrast at edges. This means some of the pixel will
get lighter and some darker.
Note on sharpening and halos: We actually follow
the philosophy that artifacts that don't show up at 100% cannot be
visible in print. We know you can sharper stronger than that for most
inkjet printers. But does it look natural? Try to avoid over sharpening
and concentrate on the content message. Halos you see on screen may
show up on print and best you try to minimize them at nearly any cost.
We allow you to control how strong you want to have the lighter pixels
and the darker. We always find the lighter pixels more an issue than
the darker ones.
There are two actions that help you to control this behavior:
• halo_light
• halo_dark
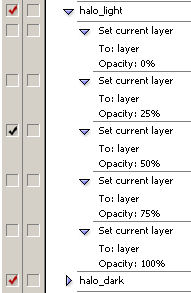
Halo settings
Both actions have 5 predefined settings: 0, 25, 50, 75, 100%. Only
one setting should be active as otherwise the last on in the action
will be chosen. We use 100% for halo_dark and 25,50,75 for halo_light.
For some images you may want to use only the hard halos and set the
halo_light to 0%. A more efficient way it to turn the generation of
the light halo off entirely:

Turning off light halo generation
Default opacity
We most of the time use slightly too strong sharpening then control
the real sharpening by tuning the opacity of the layer. Our “opacity
default” action allows you to set a default value for your own
standard opacity settings.
You can even popup a dialog and tweak opacity when the actions are
executed:
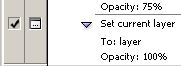
Activate the little dialog icon
Tuning actions
There are 2 tuning action provided:
• Make_Edge_Mask (adds an edge mask that suppresses
some sharpening of noise). You can add the mask later after the sharpening.
•
Add_Micro_Detail_Snap adds some USM to get even more micro detail snap.
Run this action as an optional step at the end of your sharpening.
Sample
Sessions
Sample 1
Full image (Canon 1D Mk. II)
Not sharpened from the raw converter
Result from action (2) H
The bright part of the sharpening is a bit on the aggressive side
for our personal taste.
Results from action (3) H with halo_white at 25%
The Noise gets a bit amplified (would hardly show in print though).

Results from action (4) H with halo_white at 25%
Sample 2
Full image (Grasshopper Point in Sedona, Canon 1Ds Mk. II))
Not sharpened from the raw converter
Action (2) H
Action (3) H
The differences are subtle but show that the last version is less
aggressive.
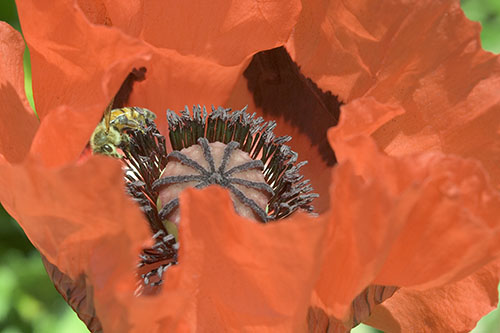
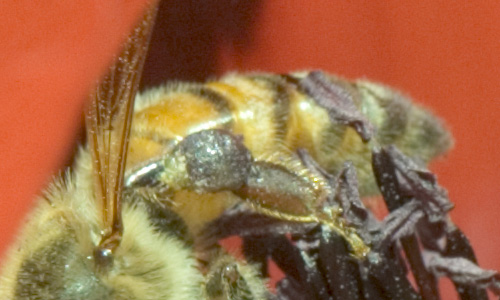
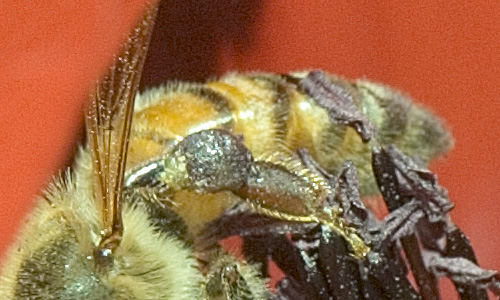
Sample 3
Crop from an original file (San Juan Bautista, H1 + Phase One P25)
Not sharpened

Action (3) N with 25% halo_white

Action (3) N with 75% halo_white
You probably can see that EasyS Sharpening Toolkit can resolve wonderful
details in the fine foliage.
Summary
With EasyS Sharpening Toolkit we provide a sharpening solution that
is very flexible and for the demanding photographer.
Best you try yourself on your own images. We provide a full working
demo version that is only limited by the image size of 2000x2000 pixels.
Try before you buy.
Demo version
We have a demo version of the full set available.
The demo version is full functioning but limited to 2000x2000 pixels.
To experience
the toolkit just crop or downsize your test images.
How to Order
You can order the full version at $29.95 from
here.
Note: Current EasyS users get the new solution for the upgrade price
of $14.95.
News
4/16/2005 Actions now in version 1.02
We improved the integration of the edge mask with
the sharpening filter by adding 6 new actions. The actions that use
the edge mask have a low tendency to sharpen noise. Our actions
have
now
version
numbers (right now 1.02).
This
means
your old action set and the new actions can be used both at the same
time, you do not lose your old settings.
All current users can get the new action set by downloading
the latest demo version and just replace the current
action set. The new actions are described in the manual. Read the full
article.
1/26/2005 Now also for Mac
The latest version is now also working for the Mac.
Our delivery includes both versions.
1/15/2005 New action set
We fine tuned our actions. All current users
can get the new action set by downloading
the latest demo version and just replace the current action
set. The new actions are described above and in the manual.
1/8/2005 Minor Tweak
My friends Jim and Jack inspired me to add a tuning
action that can get some more slight snap to fine details (micro local
contrast).
We added it to our EasyS Sharpening Toolkit actions. All current users
can get the new action set by downloading
the latest demo version and just
replace the current action set.
11/5/2005 EasyS Plus
We just released a new product EasyS Plus
Sharpening Toolkit that even improves on EasyS.
Please check it out. EasyS Plus includes
the functionality of EasyS.
|


