Background & Testing Methodology
When taking
macro photos at or near 1:1 magnification, attaining sufficient depth
of field
is a significant problem. Depth of field at these distances
is usually measured in millimeters, even when the lens is stopped
down to f16 or f19. To circumvent this problem, I have been creating
digital
composites from photos taken with a Canon 10D. Until recently I
used labor intensive manual methods to resize, align and blend the
images
in Photoshop. However, several months ago I discovered two programs
(both Windows only, sorry) which save a lot of work and
produce equal or better results:
- Helicon Focus 3.0, a shareware program which was
released in February, 2005
- CombineZ5,
a free program (covered by GNU Public License) which was released
in April, 2005
For my testing, I chose two of my images which I thought the programs
would have difficulty with:
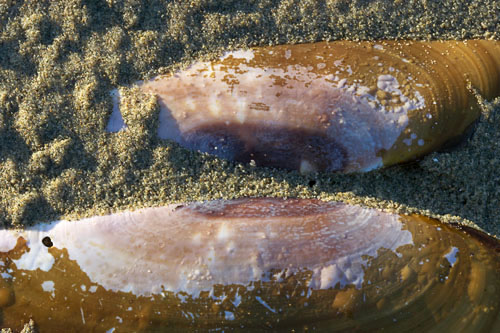
"Oregon Coast Seashell" has many specular highlights in
the grains of sand and a lot of micro detail. Misalignment of images
or problems in resizing would be especially evident. The out of focus
specular highlights should pose a real challenge to the programs.
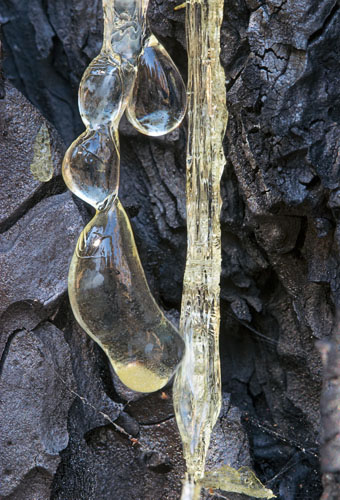
"Tree Sap in Burned Forest" had (relatively) quite a bit
of distance between the sap and the tree. Thus when the tree was in
focus the sap was strongly de-focused and likely to create difficulties
for the programs. In addition, there were some changes in the reflections
in the sap between some of the frames.
I also tested several sets of images from Rik Littlefield's web page "Extended
Depth of Field Using Panorama Tools." Two
of the sets were from images contained in demo projects on his site: "Columbine
Flower" and "Beaded Deer".
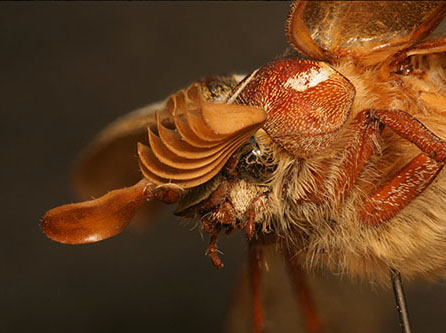
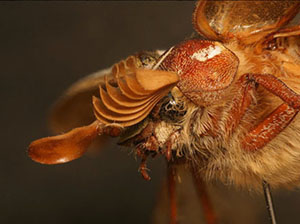
The third image, "June Beetle", was created from 18 original
source images taken by Rik, who kindly granted permission for their
use in this article. Note that he used an older version of Helicon
Lite (2.03) and CombineZ (version 4) in his testing.
Technique - Planning
and Taking the Shots
Photos are best if taken with the
camera on a sturdy tripod using mirror lockup. If you are using
an auto focus lens, set the focusing
to manual. Aperture and shutter speed should be set
manually, since you want all the exposures to be identical. It is
a good idea to bracket the shots to have an excellent exposure available
for making the composite. One quirk about macro photos taken at magnification ratios near 1:1
is that the degree of
magnification varies with the distance at which the lens is focused.
The closer the point of focus is to the camera, the greater the magnification.
At these small working distances this is
significant enough to affect framing. Since including a feature in
the composite may require (true for Helicon Focus) that each feature
is present in every frame, the shot should be framed with the lens
focused on the part of the subject which results in the narrowest field
of view (FOV). Subsequent pictures will have a wider FOV, which will
be accomplished in one of two ways depending on the setup:
1) Locking the camera and subject position, and focusing the lens
farther from the camera (typical for magnification less than 1:1)
2) Locking the lens focus and focusing by moving the lens+camera farther
from the subject (commonly done for work at magnification greater than
1:1 using a macro focusing rail)
Take the photos by systematically moving the point of sharpest focus,
making sure that each significant feature is in sharp focus in at least
one shot. It isn't necessary to use the depth of field preview button.
For most images, I usually set the f-stop to f16 and take at least
4 shots. The optimum number of shots can be much higher if the distance
between nearest and furthest focus is large and the distance of the
subject from the lens is small. Be sure to take the shots fairly quickly
to minimize any change in lighting. If there is a mirror-like surface
in the photo (water, ice, tree sap), watch out for changing reflections
between frames (e.g., photo companions moving about near the subject).
Technique
- RAW Conversion of the Photos
If you shoot RAW files (recommended),
be sure that all of the shots you use for the composite were taken
at the same f-stop and shutter
speed. Also, if you use exposure compensation in the RAW converter
it should be the same amount for each image. Determine the white
balance you want to use and make sure that it is applied to all the
images
which will make up the composite.
While the programs will try to compensate for differences in brightness
(if this option is selected), it is better if you start with images
which are as similar as possible except for point of focus. Difficulties
with getting a good composite can often be traced to forgetting one
of these steps. Compositing - The Lazy Man's Solution - Helicon Focus 3.00
Helicon Focus is a shareware program designed primarily for combining
photos from
microscope slides, but it can also be used to combine macro photographs.
The version reviewed here is the "Lite" Version. There is
also a more expensive Pro version (still under development) that allows
export to Photoshop of individual frames with masks so you can fine
tune the
composite in Photoshop. Basic features include:
-- automatically resizes images and adjusts image position
-- processes unlimited number of images in the stack
-- has no limitation on image resolutions (need at least 512M RAM to
work with 8Mp+ images)
-- automatically adjusts brightness of the adjacent images
--reads RAW files
--reads and writes 8bit and 16bit TIFFs, JPEG, JPEG 2000, BMP
The design and layout of the program from a usability standpoint is
close to perfect. You can literally use the program without looking
at the directions. The only steps required to create a composite are
to load several source images (area outlined in green Figure 1), press
the "Run" button (outlined in blue in figure 1), and save
the result. It really is that simple.
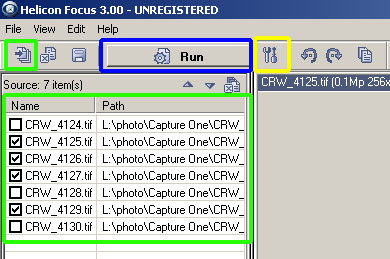
The
only settings that affect the quality of the composite image are: 1) Resample Method (found in File -> Preferences). I set it to
best quality.
2) Settings on the Options panel (toolbar icon outlined in yellow figure
1):
General Tab (Figure 2):
Radius - how large an area around each pixel
the program uses to pick the frame
containing the best focused point.
Smoothing - determines how focused parts of images are combined;
a lower value
provides more detail, but may produce more artifacts
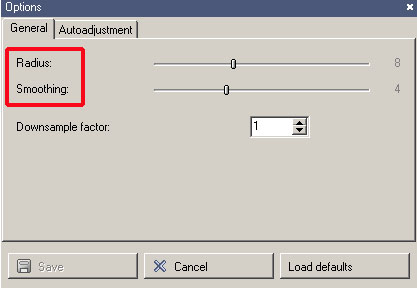
Autoadjustment Tab (Figure 3) - The maximum amount of horizontal
and vertical
shifting and magnification which the program will search through while
resizing the source images and aligning them, and whether it will adjust
the brightness of the images. The defaults worked fine in my testing. 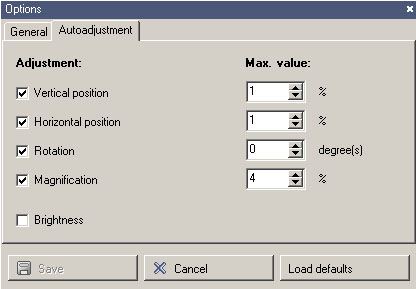
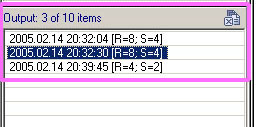
After some experimentation, I found that the default settings for
Radius and Smoothing (R=8 S=4) worked well for some images (e.g., Tree
Sap), but that for finely detailed images where there weren't changing
reflections between frames R=4 S=1 worked better. One of the best things about the program is that you can change the
Radius, Smoothing and even which of the loaded source images are included
in the composite and then "Run" the
program again. Each composite created is stored in a list with its
Radius and Smoothing
settings as part of its name (Figure 4). You can zoom to 100% or more
and compare one
composite to another, compare a source image to a composite to see
if artifacts were introduced in that particular section of the image,
etc. This can save a huge amount of time, since you don't have to leave
the program to do these visual comparisons. Including more source images
is not always better, since de-focused detail may spread out to an
adjacent area with little detail on a better focused frame. This can
lead to "false detail" showing up in the composite. In addition,
errors in resizing and alignment can create artifacts which degrade
the quality of the composite. In "Tree Sap", I got the best
results with the default Radius (8) and Smoothing (4), but only including
the 4 checked source images and not the remaining images. In this case
the problem was due to both changing light filtering through the trees,
and movement of two of my brothers who are reflected in the sap bubble
at top.
Pros
- Polished, intuitive interface
- Top-notch image quality
- 30 day fully functioning demo
- Default settings for Radius and Smoothing
often produce very good composite
- Selectable interpolation method
- Input & Output in several common
formats
- Simple to learn (15 minutes)
- Program is color managed so image colors
look accurate
- 16 bit output included in Lite version
- Very easy to compare composites
made from different parameters and different combinations of source
images
- Very fast (16 seconds to process 4 images on P4
3.0 GHz)
Cons
- Cost $115
- Includes only areas of the scene that are present in all
images, so frames with widest FOV are cropped slightly. Important
details may be lost if you didn't plan the framing correctly
as described above.
- Resized images with masks for Photoshop touch-up are
only available in the much more
expensive Pro version
- Slight softening/artifacts in specular highlights
on some images
Appeared to add a small amount of sharpening (roughly USM 300,0.4),
because the compositewas sharper than any of the original source
images. Sharpening the
composite from CombineZ5 improved the result, but the same amount
of sharpening
(300,0.4) on the Helicon Focus composite created an over-sharpened
image. The
fairest comparison appeared to be adding this slight sharpening to
the CombineZ5
composite only. However, all crops shown in this article and all
ratings were made
without added sharpening.
Compositing - The Tinkerer's Solution -
CombineZ5
CombineZ5 is a fascinating and powerful, but complex
program for compositing photos taken at different focal distances.
For best results the individual
steps in creating the composite must be selected manually and fine-tuned
for each set of images. I will give a brief description of the design
of the program and user interface: Each picture that you see in CombineZ5 is called a Frame, which can
be any of the following:
- One of the source images used in the composite
- The DepthMap,
which describes the "depth" from which each
pixel in the composite comes - note that these values do not have
to be integers, e.g., a value of 1.5 would mean that the final
pixel at
this position would be half way between the pixel values for source
image 1 and source image 2. The DepthMap is computed during the
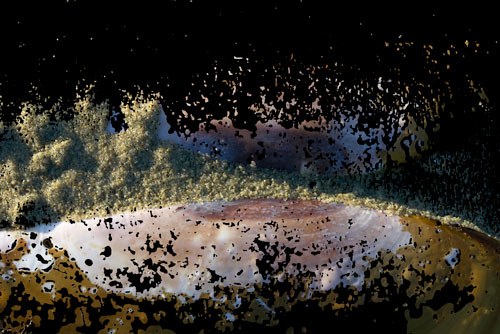
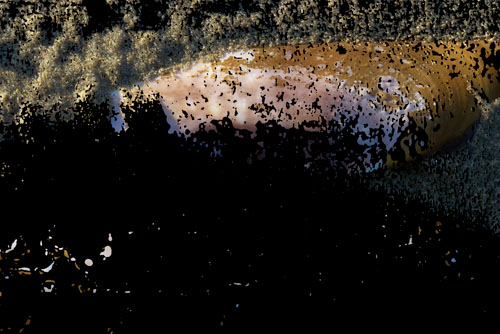
process of creating the composite. See Figure 5 for the DepthMap
of Tree Sap.
- Picture, which is created by selecting each
pixel from one of the source images (i.e., the values in the
DepthMap are rounded to integers) (note that Picture will often
have a
lot of artifacts, since each pixel has to come from
one of the source frames without any interpolation to intermediate
values)
- Out, which is used to hold the output of a filter (usually
temporarily, e.g., until filtered DepthMap is copied over the
DepthMap) or to hold an interpolated version of
Picture (using the real number values in the DepthMap) if one
is created.
- A New Frame created from any visible frame (meaning
you can see it on the
screen
right now). For example, you could create a fully interpolated composite
with certain parameters (which will be stored in Out until you create
a composite with different parameters) and make a new frame
to save the result. Then,
create a composite with different parameters, make another new frame
from it, and easily compare the two composites.
Note that New frames created in this way are marked as inactive
by default so that they
won't be used when another composite is created.
Navigating in CombineZ5
The group of frames made up of the Source Images is called the Stack.
You can navigate the Stack using the Up and Down arrow keys. The frame
in the stack which is visible while you navigate is called the Active
Frame. It is indicated in the menu bar at the top of the screen as
A1. There are several other important keys used to get around (See
View
Menu
in Figure 6):
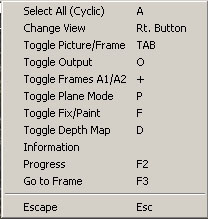
Tab - Toggles between viewing Picture and the
Active Frame. You can Tab to the Active Frame, use the arrow keys
to change to a different active frame, then Tab back to Picture to
compare a source image to Picture. Of limited use since Picture is
the uninterpolated version of the composite, and generally interpolation
is needed to avoid edge artifacts. o - Toggles between viewing Out and the Active Frame. Much more useful
since after the
command "Interpolated Output", Out is where the interpolated version
of the composite
will be stored.
d - Toggles between the DepthMap and the Active Frame (you can see
where the detail is)
p - Toggles between the a full view (of either DepthMap or Picture)
and a view split up into
Planes; a Plane can be thought of as all of the pixels on the DepthMap between
two
integer values, e.g., a Plane would be all values from 1 - 1.9999999..., 2-2.999999...,
etc.
Planes are a very powerful way to visualize where the pixels in the
composite are coming from. For example, once you have created a composite,
select one of the Source Image frames, then press "p". Now
you see just the pixels which come from that frame. Use the Up and
Down arrows to look at what pixels come from other source images. Press "p" again
to go back to normal view. If you press "d" while in "Plane" view
you will see the DepthMap split into planes, which can again be viewed
using the Up and Down arrow keys. See figure 7a and 7b for two plane
views of Sea Shell.
Filtering the DepthMap There are several filters available in CombineZ5. The only one I have
found useful is the Lowpass Filter run on the DepthMap. This is VERY
helpful to help smooth the transitions between source images. You will
need directions since the method is not intuitive:
1) Choose Filter -> Input -> DepthMap. The DepthMap will turn
blue during this operation.
2) Choose Filter -> Create/Edit Filter -> Lowpass. A visual representation
of the filter in the
form of a black box with white representing the filter will appear.
3) Press "v" to set the value of the filter. Generally 100-150 will
be a good value. You
will need to experiment to find what works for you.
4) Press the "Enter" key to perform the filtration. Press the "Enter" key
a second time after
it is done.
5) Choose Filter -> Immediate -> Last Output to Depth
6) Usually you will want to run Stack -> Interpolate Output after filtering
the DepthMap
Note: Filtering the DepthMap from a macro is a simpler, two step process. For
example:
Create a Lowpass Filter (150,0)
Filter and Replace DepthMap
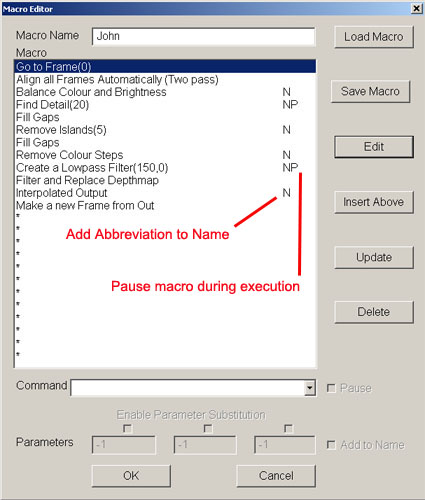
Editable macros
Once you find a set of parameters that work well for the types of
images you usually work on, you can create a macro to perform the steps
for you automatically. Choose Macro -> Edit Macros. You will be
presented with a list of 10 macros whose title and steps can be changed.
Any macro command that can also be designated with "Pause" while
you are creating or editing the macro (identified with a "P" in
the editor, See Figure 8). That way you can run the same macro with
different values for steps such as Find Detail or Remove Islands, or
you can skip a step when the macro pauses (e.g., for Remove Color Steps).
Furthermore, macros can be nested and called with parameters which
can be incremented so that you end up with multiple versions created
automatically. Then you can compare them to see which produced the
best composite. If you check "Add to Name" in the Macro editor
an abbreviation of that command, including the parameter, will be included
in the name of a new frame created after the macro is finished (identified
with an "N" in the editor). This makes it easier to compare
output using different parameters. Macros can be saved and loaded in
Macro Sets. The whole set of macros can be switched between the interactive "Pause" mode
and uninterrupted execution using Macro -> Pause.
Processing a Stack of Images to Create a Composite 1) Load a series of source images (the Stack) using File -> New.
When the "Open" dialog appears, hold down the Control key
and click on each image you want to include, then click on the "Open" button
in the dialog box. Frames need to be loaded in order of focus distance,
either near to far (usually) or far to near. The order the frames are
loaded is important, since the program will look at the bottom of the
stack to fill in around the edges for areas which do not have coverage
from all frames (the FOV will vary slightly between photos). If needed
you can use Stack -> Reverse Order to get the frame with the widest
FOV at the bottom of the Stack.
Tip: once the source images are loaded, choose Undo -> Save Work.
Then anytime you want
to start over with the original (not resized) source images, all you
have to do is choose File -> Resume Work and load the appropriate
work.czd file.
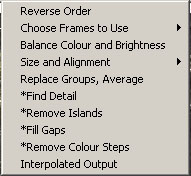
2) Most commands needed to process the stack are on the "Stack" menu
(see Figure 9).
After
quite a bit of experimentation I found a sequence of steps that generally
works well (macro version of commands listed):
- Go to Frame (0)
- Align All Frames Automatically (two pass)
- Balance Color and Brightness
- Find Detail (20)
- Fill Gaps
- Remove Islands (5)
- Fill Gaps
- Remove Color Steps
- Create a Lowpass Filter (150,0)
- Filter and Replace DepthMap
- Interpolated Output
Notes:
1) Size and Alignment (one or two pass) will adjust all of the frames
to the FOV of the active frame. Therefore, selecting the frame
with the widest FOV before adjusting size and alignment will include
more
detail (but may have more artifacts around the border).
2) For Find
Detail, a range of 10 - 30 is generally best, but may be up to
75 depending on images. A small number finds more detail, but
may create more artifacts.
3) Fill Gaps interpolates between
the detail found to create values for the DepthMap for the rest
of the image.
4) Remove islands gets rid of small areas from one
frame completely surrounded by areas from other frames; theses
are presumed
to be artifacts. Islands made up of less pixels than specified
in
the parameter are
removed. Thus, for Remove Islands (5), islands with 4 pixels
or less will be removed.
5) Best values for Filter DepthMap
usually range from 100-200.
6) Remove Color Steps can be helpful
in removing de-focused detail from specular highlights, but sometimes
creates
more artifacts,
so try with and without it.
3) Use the "A" key to select a rectangle for output. The
rectangle will cycle by pressing "A" several times between
the following:
a) The whole frame
b) A "clean" rectangle that includes everything within the image
with the widest FOV
May contain some artifacts at the edge (which will need cleanup in Photoshop).
c) A "clean" rectangle that includes detail which is common to all
source images
(corresponds to frame with narrowest FOV)
[Note: CombineZ5 includes a "reflected image" around the border (placed
there on purpose
to allow processing of pixels near the edge using the same algorithm).]
4) Use File -> Save Rectangle As to save the composite (if you
don't select a rectangle, use
File -> Save Frame/Picture As to save the composite).
Pros
- Free
- Top-notch image quality
- Very flexible and powerful, can customize
operations to produce best result
- Composite can include all edge
detail from the frame with the widest FOV
- Can easily see which portions
of the composite are coming from which image using planes
- Resized
original images can be saved and used for touch-up of the composite
in Photoshop
Cons
- Complex program, much more difficult to learn
- Interface not intuitive
- Harder to process and compare using different
parameters
- Output 8 bit only
- Program is not color managed, so on-screen color
is equivalent to opening image in Photoshop and assigning (not
converting to) SRGB profile; you must assign the correct profile
later in Photoshop
- Slower (47 seconds to process 4 images on P4 3.0
GHz)
- Composite with widest FOV may have artifacts near edge
of the image requiring touch up
(of course, the option to produce this composite with
widest FOV isn't available in
Helicon Focus)
Compositing - The Perfectionist's Solution - Automated Composite +
Manual Touch Up
If you want to achieve the very best image quality on your composite,
manual touch up will be necessary in Photoshop. With Helicon Focus,
this will require the Pro version ($250) to be able to save the resized
images with masks. For CombineZ5 I created a Photoshop Action Set plus
a short Javascript (Note: only works in Photoshop CS) to do most of
the setup work. The two Photoshop Actions create a file with the Composite
as the bottom layer and the resized source images on layers above the
composite, with each layer marked with the name of the source file
it came from and masked to hide all.
Instead of saving the composite as described above, choose File -> Export
Rectangles to save all the resized frames in a subdirectory named Rectangle.
Give a short name for the file when prompted, since actual filenames
will be appended. Then open File Browser in Photoshop, select the file
you want to use as the final composite (named filename_out if from
interpolated output), and run the "Open CombineZ5 Composite" Action.
Next, select the whole group of resized source images (created with
Export Rectangles) in the File Browser and run the action "Add
CombineZ5 Resized Images". Now select a soft brush with white
as Foreground Color and paint on the mask of a source frame which has
sharper focus/fewer artifacts than the composite. You can navigate
the stack in CombineZ5 to quickly identify which frame is in sharpest
focus for a particular area.
Using this method, I was able to fine tune composites in about five
minutes, to achieve results significantly better than the composites
created by either program alone. The Action Set and Javascript with
brief instructions can be downloaded here.
Image Quality Ratings
Sea Shell: 9.5 for both programs. CombineZ5 did better with specular
highlights in the sand in the top half of the photo, but Helicon Focus
had sharper focus and few artifacts on the portion of the Sea Shell
in the lower part of the photo.
Tree Sap: Helicon Focus - 9 CombineZ5 - 8
CombineZ5 produced excessive softening at the edges of the left string
of sap. When the parameters were changed the softening was replaced
by significant artifacts. No amount of tweaking produced a result
as good as Helicon Focus on this critical area of the image.
However, CombineZ5 with 5 minutes of manual touch up in Photoshop produced
image quality 10.
Columbine Flower: Helicon Focus - 9 CombineZ5 - 9
CombineZ5 had a bit of softening in the fine hairs on the edges of
the petals and one out of focus area which didn't look quite right,
but the version produced by Helicon Focus looked a bit oversharpened.
[Note: These images have been aligned and resized in Panorama Tools
by Rik Littlefield. If testing them for yourself, turn off all the
options on the Autoadjustment tab of Helicon Focus, and do not run
Size and Alignment in CombineZ5.]
Beaded Deer: Helicon Focus - 8 CombineZ5 - 9
Helicon Focus was downgraded because no matter what the Radius and
Smoothing
settings, the composite had artifacts on the specular highlights on
the beads
June Beetle: Helicon Focus - 9 CombineZ5 - 9
Helicon Focus did a better job bringing out detail in the legs at the
bottom, but had some
blurring and loss of detail in one foreground/background transition.
Both did an amazing job combining the 18 images used to make the composite.
Photograph Copyright Rik Littlefield, used with permission.
Conclusion
These programs both produce excellent results. I judged overall image
quality to be equal. For a given image one may be slightly better than
the other. In choosing between these programs, you should be guided
by your wallet, time and patience.
Helicon Focus is extremely simple to use, fast, and
works with 16 bit images. However, the lack of resized images (in the
Lite version)
to touch up the final composite is an obstacle to achieving the best
image quality. The program produced modest artifacts in the specular
highlights of two of the test images.
CombineZ5 has a lot of power and flexibility, but the cost of that
flexibility is a steep learning curve. With fine tuning it produced
excellent image quality, but it required quite a bit more time learning
how to achieve these results. CombineZ5 had difficulty with sharp foreground
edges in one image, which may be a limitation of the algorithm used.
Two key advantages of CombineZ5 are the availability of resized images
for touch up in Photoshop, and the ability to include all the image
detail from the image with the widest field of view.
Disclosure: While testing the programs I got so
interested in CombineZ5 that I made many suggestions for improvements
in the user interface
and worked closely with the author finding bugs and evaluating the
changes. I have no other connections with the authors of either program.
Update 6/13/2005
1) Version 3.1 claims a 1.5X speed improvement
2) More significant, the license model has been modified so you can
pay year by year for 4 years (free after that). This allows you to
get the Lite version for $30 for one year and the pro version for
$70 for one year
|