|
|
|
"REALISTIC, FILM-LIKE B&W IN PHOTOSHOP" <c> by DigiDaan (last updated 04/07/2001) |
|||||||||||
| Editor: We recently published a review about B&W printing. So this article by DigiDaan is just what we needed. | |||||||||||
|
Converting your color images to black & white can be easily done by selecting the grayscale mode in Photoshop. But the results just don't look as if they were shot on real black & white film... So here is where the DigiDaan Channel Mixtures for Adobe Photoshop come in. There are three mixtures to choose from:
|
|||||||||||
|
|||||||||||
| As you can see, the standard Photoshop grayscale conversion gives a somewhat, dull, unsatisfying result. The DigiDaan normal contrast gives a better, 'crispier' image, but for this picture the DigiDaan high contrast -because of skin tones does transform the colors into a more pleasing luminosity/contrast-impression. | |||||||||||
| The DigiDaan orange filter shows its true power in the next example: | |||||||||||
|
|||||||||||
| COLOR SPECTRUM ANALYSIS | |||||||||||
|
|||||||||||
| The standard Photoshop grayscale conversion washes out the yellows and bright greens. But black & white film is quite insensitive for yellows and greens, that's why the DigiDaan Channel Mixtures also have a notch in that tonal range. To give that film-like impression. Well, you can try it out for yourself! | |||||||||||
| HOW IT WORKS | |||||||||||
| 1. Download the DigiDaan Channel Mixtures, store them on your hard drive | |||||||||||
| 2. Open the to be converted document in Photoshop. | |||||||||||
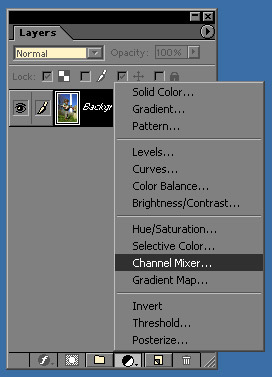
| 3. Create a Channel Mixer-adjustment layer. | |||||||||||
 |
|||||||||||
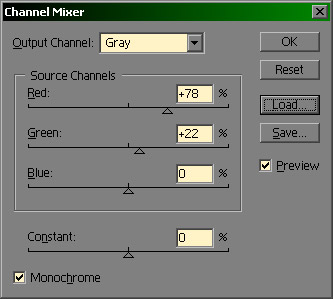
| 4. Load one of the above mentioned channel mixer files | |||||||||||
| 5. OPTIONAL: drag the RGB-sliders for fine-tuning | |||||||||||
 |
|||||||||||
| 6. Keep in mind that the document stays RGB! Flatten the layers before choosing 'mode' > 'grayscale' finally! | |||||||||||
|
|
| For Comments post in our News Group |