There is much discussion concerning Apple’s new Aperture.
The application is Apple’s new ‘professional photographic
workflow application’. What is so special about Aperture?
In fact, you will find only a few really new features in Aperture.
What is new , however, is the way Apple looks at typical tasks – nowadays
called workflow – how a photographer handles his digital
images. With Aperture, Apple combines the features of an image
downloader, a RAW converter, an image editor, a light table, a
printing application and an asset management system (image browsing,
administration, retrieval and backup). While there are many applications
that do part or even most of this interacting with other applications – e.
g. Photoshop in conjunction with Camera Raw and Bridge – Aperture
does all this in one integrated application, and does it in a way
a photographer typically works – or, at least, Apple thinks
he or she does. There is much praise and a lot of bashing about
Aperture 1.0 on the Internet.
Aperture has been on the market since
early December 2005 and sells for about 500 $ US (or Euro). Already
street prices are dropping
below $400. It demands a lot of resources – memory wise,
CPU-wise and graphic-card-wise. A fast G4 or G5 processor is
stated as a prerequisite, at least 1 GB of main memory, 2 GB
recommended
(which I recommend for Photoshop, as well). As it makes use of
your graphic-card processor, you must have one of the newer graphic
cards (see [1]) – Aperture won’t run without one
of these. A test utility [5] is provided to verify that your
system
is Aperture-compatible. To work comfortably with Aperture, a
highres monitor is highly recommended – two monitors are
even better.
As
of now, only an English version is available (more language versions
should come out in Q1/2006).
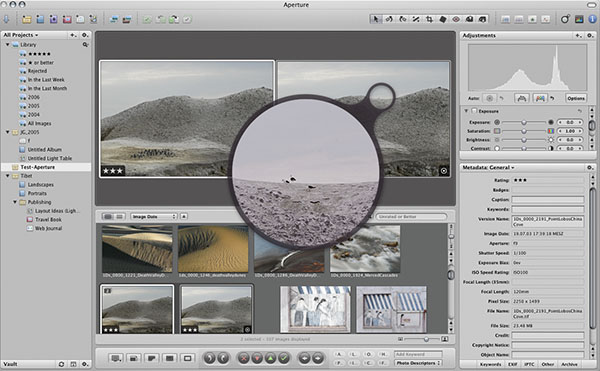
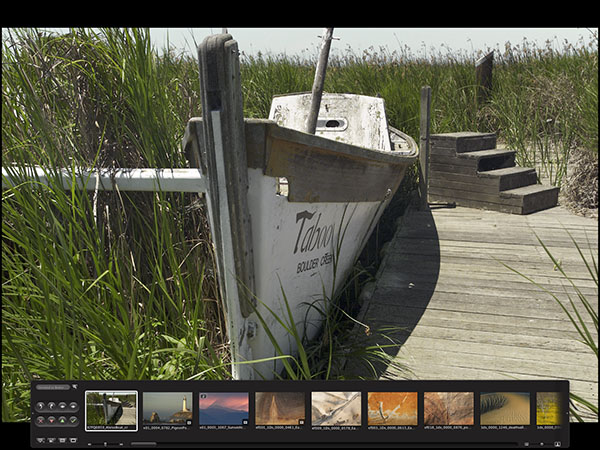
Aperture’s basic window showing
the project browser (left), image icons in filmstrip mode (bottom
window), two images side
by side for comparison (top windows), the loupe for close detail
inspection and the adjustment and metadata GUDs (right)
As most
applications coming from Apple, the graphic user interface (GUI)
is well designed, intuitive and incorporates some new ideas.
You must take time to learn to efficiently handle Aperture, as
a great many functions and features are integrated into this
one application. It would be nice, however, if you could increase
the font size of menus and dialog boxes. Additionally, it would
be helpful, if Aperture would display file name extensions.
This
would allow one to easily differentiate RAWs, TIFF and JPEGs
using the same basic name.
Reading the minimal requirements to
run Aperture, you may be concerned that Aperture runs slow. This
is not the case – at least
not to a serious extent. Some things it does surprisingly fast – e.g.
file browsing. I must be cautious in my remarks, as my system
is a very fast one (a Quad-G5 with 2.5 GB of memory). You must
observe
carefully what it really is doing. Sometimes it does less than
other applications (or, perhaps, does it more intelligently).
File
formats
Aperture works with JPEG, JPEG200, TIFF (some restrictions),
PSD, GIF, PNG and RAW files (what it actually was designed for).
The
spectrum of RAW formats is somewhat restricted (see [1]). It
can handle all images RAW, iPhoto and Apple’s Preview can
handle – RAW
format decoding is actually done inside Mac OS X. To support
more formats, Apple will have to provide a Mac OS X update. On
reading
Aperture specs and seeing that Canon CR2 is supported, I was
disappointed that my Canon 350D CR2 format was not (you must
read the iPhoto
spec to discover this). So, I tested Aperture with D70 and D100
RAW files and some RAW files obtained from Uwe Steinmueller.
Though Aperture claims to support DNG, it did not open my 350D-based
DNG
files.
Now, I am waiting for Mac OS 10.4.4 update (said
to come out before Christmas 2005) and hoping this release will
support
my
Canon EOS
350D files.
In the Aperture discussion group ([3]), I discovered
a way to patch a particular Mac file. Applying the patch (plus
some patches
for
the patch), my 350D RAW files were now supported (why couldn’t
Apple do the patch in its almost weekly minor OS up-dates?).
Aperture cannot properly handle CMYK files. You
may import them, but as soon as you do a modification in Aperture,
the file is
converted to RGB. I launched Photoshop from Aperture with an
RGB image and
converted it to CMYK in PS. The saved image in Aperture was totally
off – or, at least, the preview image was!
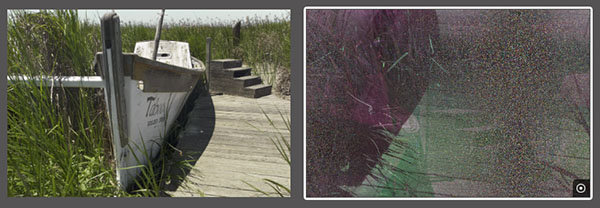
RGB image (left)
and display of image (right) when converted to CMYK in Photoshop
So, if you require CMYK images for a press
print, these must be done outside Aperture. It would be helpful
if I could reasonably
administrate those images within Aperture. Images in Lab mode
will show up as ‘Unsupported Image Format’. Hopefully,
both issues will be changed soon.
New concepts First of all – and it is definitely welcome – Apple
introduced a few new container types for images. They offer features
which you probably have already tried to implement by using a
strict naming discipline, via folders and symbolic links and
other helpful
conventions– and you most certainly failed from time
to time. If you never had such problems, you probably don’t
handle a lot of images.
Aperture uses Projects, Folders (different
from OS folders), Al-bums, Stacks and Vaults to organize photos.
Additionally,
there are Stacks
and Libraries, Master files and Versions.
Projects
A Project is
a new type of container for images. You must import a photo into
a ‘project’ in order to
use it with Aperture. The imported files are considered as Master
files
and will not be modified, but kept as originals (until you explicitly
delete them). You may import (download) images directly from
a digital camera or card reader or from a normal folder. You
may
also import the content of an iPhoto library. When you apply modifications
to an image using Aperture controls or filters, those modifications
are stored as a modification
set – usually
very small (4-15 kB) compared to a master file. The result is
a new Version of the file (a Version, thus, is the link to the
master
and modification set). If you pass an image to an external application
for editing (e.g. to Photoshop), Aperture passes on a copy (TIFF
or PSD) of your master. The result (saved image) will be stored
as a new version of the image – it, however, is a new
master (related to the original one), as well as, a new version.
Folders
A Folder may be used to further structure the content
of your projects. A folder may also contain images from other
projects
and other (sub-) folders.
Albums
An Album is a logical collection
of image versions – e.g.
in order to group some pictures for presentation. There are three
types of albums – Normal (static) Albums and Smart Albums,
the latter the result of a search with specific search criteria.
Additionally, there is a light table album type. This is an album
in which you can freely place your pictures on a virtual light
table. This light table may be larger than your screen (Aperture
will scroll) and you may freely resize and stack images. Vaults
A Vault is a copy of an Aperture Library for backup
purposes. You may have several vaults. Aperture is able to update/synchronize
your vaults (which may have been offline previously) with the
original Library (a Library holds all your projects). A vault
has to reside
on a disk (or other kind of random access memory). You may burn
it from there to DVD, yet this must be accomplished outside of
Aperture. From a vault you can restore a library.
Stacks
A Stack
is a collection of (in most cases, similar) photos. It may be
used to stack several photos of the same scene or person
from a shooting. You will probably use only one (the best) of
these later on, but it may be helpful in a total inspection of
a shoot
to heap those images in one stack.
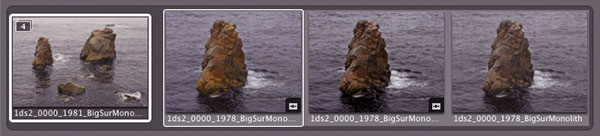
Open Stack. When you close the stack, only the left-most icon
is visible, indicating that the stack has 4 images.
You may select
one of the images as the top image (it’s
called the Pick). The icon of this Pick is used as the top icon
of the
stack when the stack is closed.
The stack has an internal order.
When unfolded/opened, the images are placed from left to right
corresponding to top-to-bottom
order. You may demote and promote images in this stack order
via buttons
or keyboard shortcuts. If you have several versions of an image,
those versions also form a stack. By default, the latest image
becomes the Pick of the stack. You may add images to a stack
and extract images from a stack.
Non-destructive editing Aperture
does not modify master files but stores all modifications as
a separate parameter set. Thus,
you
may have several versions of an image (master file). This is
not new in RAW converters (e. g. RawShooter offers snapshots
for this
task), but Apple extends this concept from RAW files to JPEGs
and TIFFs, as well – it’s primarily intended to be
used for files from your digital camera or scanner, but may be
used
for other files, as well.
This, however, leads to some restrictions
to image editing. There are no layers and very few selective
corrections. For this reason,
you may call up another image editor, like Photoshop, and a copy
of your image will be passed along. The result will be taken
back by Aperture and is handled as a new version of the image.
Library
Everything (projects, folders, albums, …) is kept
in a Library. The Library is the database and container for
Aperture objects – it’s the Aperture universe. From
the view of the standard Mac OS finder, an Aperture library is
a huge file
(actually as a package). Individual objects (images, folders,
albums) are accessible easily only via Aperture – you must
export these objects to make them accessible to the finder or
other applications.
Note: The Aperture library is
actually a package that can be used by using “Show Package
Contents”.
You then can browse the library like normal folders.
Workflow
The workflow using Aperture is optimized for photographers.
You create a new project (or open an existing one) and import
new
images either selectively or all from a memory card or camera.
Importing
implies that files are copied into the Aperture Library. You
may import directly from the camera, a card reader, a disk folder
or
import an iPhoto library.
You may next create a Vault on an external
disk as a backup before deleting the photos from the camera
or memory card. At this point,
you will probably want to inspect your new images (heaping up
similar images using Stacks makes room in your filmstrip window),
assign
priorities (1 to 5 stars plus Reject) to your images and start
to sort out images not good enough (most of these features are
offered by other RAW converters, as well, (e.g. Bridge/ACR, Capture
One or RawShooter).
There are buttons to increase and decrease
your ratings. You may add keywords and other metadata – to
a single image or to several images via a simple batch. You may
also attach a classification
to images (like People, Wedding – you edit these terms
and add your own terms). This classification may be used for
sorting
and searching. You may Lift metadata and Stamp it onto other
images.
Now, you begin to optimize single images. Every
good RAW converter can do this. The Loupe (flexible magnification
glass)
and the
possibility of viewing several images side-by-side is a nice
feature other
RAW converters might copy. Versions – several variations
of the same master file – is convenient (in RawShooter
implemented via Snapshots). For web galleries, Aperture editing
will be sufficient
in most cases. For a perfect print, you must frequently move
to Photoshop for those optimizations Aperture cannot offer – e.g.
selective color, tonal and contrast enhancements using layers
and layer masks. Photoshop will return the edited image, and
Aperture
will store it as a new master version, related to the original
master.
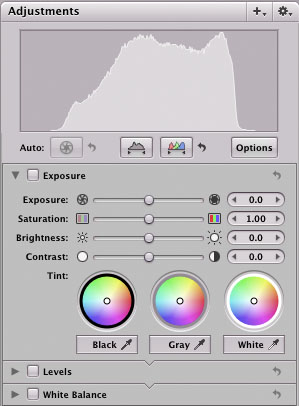
You may also edit an image using Aperture. It offers
most controls and operations other RAW converters offer – though
Aperture allows performing them on TIFFs and JPEGs, as well , in a non-destructive
way. There is White Balance (color Temperature and Tint), Exposure compensation,
Saturation Brightness and Contrast. You will find Levels and can set the Black
point, the White point and your Gray point. Curves is missing!
The histogram
displays either luminance or color channels, selectable from
the Adjustments Action popup menu. What I missed is a RGB readout, showing
the RGB
values below the eye dropper. There is a also overexposure warning:
View>Highlight
Hot Areas (Alt/Option-Shift-H).
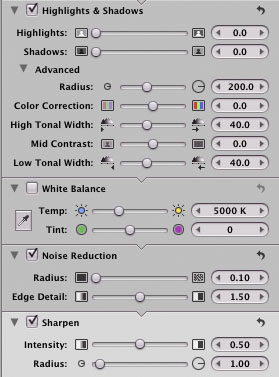
As with most
modern RAW converters, there is also a tool for Noise Reduction
and also one for Sharpening. Both provide basic functions but are not up-to-date
with the more advanced filters available today – e.g. no threshold slider
in the sharpening filter and you may not do noise reduction on individual color
channels.
Being in the trend, you also find a Highlight and
Shadows tool.
What is absent are corrections for chromatic aberrations,
vignetting and lens distortions.
Aperture provides a Cropping and a Straighten Tool. It even allows
Red Eye Removal and has a Spot and Patch Tool – both also
for RAW files, not yet found in many other RAW converters. The
latter tools however, are not as
sophisticated
as those in Photoshop.
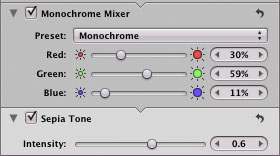
There is also a Monochrome Mixer providing several
color filters in its drop-down menu. There is an additional control
for sepia toning.
To keep the Adjustments palette at bay – Aperture
calls these palettes HUDs (Heads-up Displays) – you may
add/activate and deactivate/hide most of these adjustment sliders
as part of the Adjustment HUD.
The Lift tool lets you ‘lift’ settings
from one image and apply them to other images. Having done several
corrections, however, you cannot
lift individual
corrections but only all. There is an Undo operation for most corrections
and modifications.
Apart from Projects, there are many more ways to
further structure your image sets – inside a project and
across projects. You may use folders and albums. Both may have
elements
from several projects (e.g. a album may hold
all the best
shots of a year or all images of a customer or just the final selection for
a presentation). Using Folders for special collections is yet another way.
In the
project browser window of Aperture, the different types of containers use different
colored icons. This helps in following an overview.
When you duplicate a master,
edit an image using Photoshop or another editor, open or close
a stack, you normally do it from the icon list (or filmstrip).
It is most annoying that after this operation the position in the list jumps
and you must scroll down once again to your working area.
With some images,
we saw a severe color difference between the icon in the film
strip and the image preview in the adjustment window – the
latter, sometimes, much to dark. This occurred using TIFFs with
a deactivated alpha channel. When
these images were opened in Photoshop, the copy passed to Photoshop was too
dark, as well – obviously a real bug (Aperture does not
recognize that the alpha channel has been deactivated).
 Aperture
in ‘Full Screen’ mode Aperture
in ‘Full Screen’ mode
Workspace adaptations

The workspace (your Aperture screen) is very
adaptable. There are five basic modes (from left to right: Viewer
mode (Pull-down
menu with several variations),
Zoom Viewer, Show Master Image, Full Screen, Toggle Primary only). You may
further hide or display single parts of the basic window. As with Bridge and
most modern
RAW browsers, you may control the size of your preview icons.
You may select
images and create a Web Gallery, a Web Journal or a Slide Show
or call up Mail and attach selected (scaled down and converted to JPEG) images.
For the Web Gallery, Web Journal and Slide show, there are more parameters
and styles to set than you would expect from a first version of a software
application.
A Web Journal is a kind of Web Gallery that is more flexible for free place-met
of images and additional text blocks.
You may also order prints (Apple has affiliations
with some photo services) or produce a Book (which will also
be printed by a service provider). For both
of
these, you will need an Apple account. These are functions, consumer electronic
albums (e. g. Adobe Album, Adobe Photoshop Elements or Apple’s iPhoto)
offer nowadays.
More important may be the option to export a Master
or Version, as this is a handy way to export from Aperture.
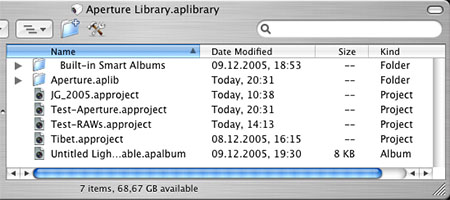
Not
described in the Aperture manual, you may also navigate inside
an Aperture Library using the Finder. By default, you will find
the Library under ~/.Pictures/Aperture
Library.aplibrary (~ is your user home directory). Select the library, right-click
your mouse and select Show package content from the drop down menu. This
will open the Library like a folder. Here, you may use the procedure for
objects
like projects or albums.
Naturally, you may make a print. Aperture offers
most settings important for printing – e. g. selecting
the correct profile for printer + ink + paper + driver settings
with color management handled by Aperture (actually it is
done by ColorSync).
What is missing, however, is the rendering intent
setting – at
least, I could not find it, and which I deem unprofessional. You may either
print
images
to a contact sheet (lots of options for this) or print single images. And
you may save your settings.
For most often-used operations, there are keyboard
shortcuts, to speed up your work considerably.
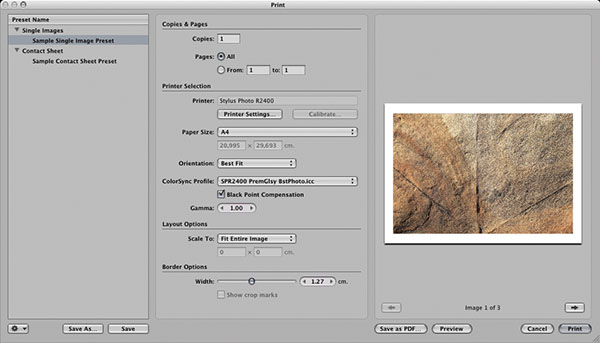 Aperture’s
print dialog Aperture’s
print dialog
Conclusion
Though my experience with Aperture is
still quite limited, I ’d like to
summarize my conclusions. What is missing in this introduction is a statement
on the quality of RAW conversion. I just didn’t convert enough RAW
images to give a meaningful statement on this. This will be done by Uwe
Steinmueller
in another report.
As of this writing, Aperture is very new (hardly
a month out). It offers some new functionality. Every maker of
a RAW converter,
image browser,
asset management
system or image editor for photography should take a very close look.
It is extremely resource hungry (actually designed for the next generation
of
PCs.
Something Steve Jobs has done before).
Aperture retains some severe deficiencies,
e.g. speed when applying several corrections/filters in RAW
conversion quality or when stamping
lifted metadata
or settings to several images. Noise in dark areas (RAW images) seem
to be much stronger than we Adobe Camera Raw, RawShooter or Capture One.
It
will definitely take Apple some time to rectify all shortcomings.
Some of their design decisions may not be the best ones (e.g. embedding
basic
RAW conversion
into the operating system – though Microsoft may do this soon,
as well). Aperture will not replace Photoshop in the near future, and
Apple may be well
advised not to try this for some time.
You are well advised to test Aperture
thoroughly before embedding your images into the (rather) closed Aperture
environment. Maintaining some
projects
inside and others outside of Aperture may be a good idea for some time.
Aperture’s
RAW converter is likely not the best there is, though some users
claim to be quite satisfied. Conversion quality may vary from
camera
type to
camera type and probably from image type to image type (actually,
there is no single RAW converter to satisfy all users). A weakness
seems
to lay in dark
areas,
where you tend to find stronger noise than with some other good RAW
converters. Also gradients seem to be less smooth. Professional photographers
deem image
quality as extremely import. For the prosumer market, Apple will
have to broaden the spectrum of supported cameras and file formats
and may
have to reduce the
price.
What I really miss, is a way to make a vault of
an individual project – vaults
currently are backups of the whole Aperture Library. You may do your
own project backup, using the finder as described above. You
will be very careful not invalidate
Aperture’s database when you restore a project this way – Aperture
will not be able to do synchronization this way!
I consider the closed
aspect of Aperture is a real serious problem. When starting to
use Aperture, I would wish to bring all my images
into the
program. I can’t
do this with my older RAW images (their format is not supported);
I can’t
adequately handle my CMYK images in Aperture (I need them for press
printing), I can’t handle my LAB mode images. My image work
space grows from a single disk, and you must trick Aperture to
handle this – an Aperture library
is one large file. The same is true for backup vaults. As of version
1.0, Aperture can’t handle offline media – you cannot
off-load the images in a project to an offline media, delete the
images and still keep the administration
(preview icons and metadata) in your Aperture database.
Apple will
be well advised to improve integration with Bridge and Photoshop.
In the Apple Aperture forum [3], there is a hot discussion
going on
as to whether using Aperture in conjunction with Adobe Camera
Raw makes sense
or
not.
It may be asking too much from the first version
of Aperture. But Apple is entering a maturing market with much
competition.
It did
a lot of
integration into one
application. Still, it really should quickly improve several
functions and
also open up the Aperture universe to other applications and
parties. There is no
plug-in architecture as far as I know. Such a thing might help
increase productivity using third-party filters and other plug-ins
and give
Apple more time to
improve its critical tools.
If this summary sound mainly skeptical,
this would not really give my feelings about Aperture. There
are many very nice features
I
found – e.g. that you
may use the loupe not only on the preview image but also on the
thumbnails. I liked very much that you can structure your photos
using projects, folders and
albums. I like the light table albums, the clear and appealing
GUI, the many keyboard shortcut there are and much more. I saw
really few applications having
the same maturity as Aperture in version 1 (one may be RawShooter).
So, let’s
hope Apple will listen to the critics carefully and react soon.
Apple may not have much time until Microsoft comes out with a
similar application and I am
very interested what Adobe’s answer to Aperture will be.
Links
[1] Apple: Aperture specs www.apple.com/support/aperture/
[2] Apple: Aperture support. Here, you will find some FAQs for
Aperture www.apple.com/support/aperture/
[3] Aperture discussion group: http://discussions.apple.com/category.jspa?categoryID=184
[4] Patch to enable Aperture’s support for Canon 350D:
www.macosxhints.com/article.php?story=20051101035330228&lsrc=osxh
[5] Aperture Compatibility Checker: www.apple.com/aperture/binary/Aperture_checker.dmg
|