| |
|
| |
Digital Outback Photo Contest #006
Raw Challenge #1
|
| |
|
| |
Over the last months we had a couple of contests
here at Digital Outback Photo where readers shared their ideas how to
interpret certain photos. |
| |
|
| |
What is the "Raw Challenge #1"? |
| |
|
| |
This time we invited a few Photoshop experts and
skilled raw conversion users and show their results now at the same
time. Here are our experts:
First we want to thank our experts that they joined this challenge
and spent the time to educate all of us.
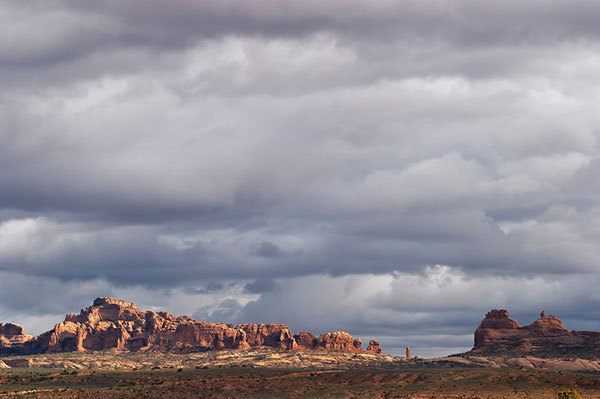
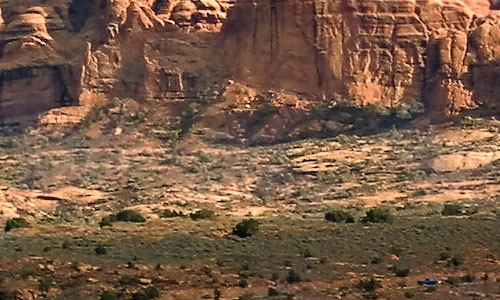
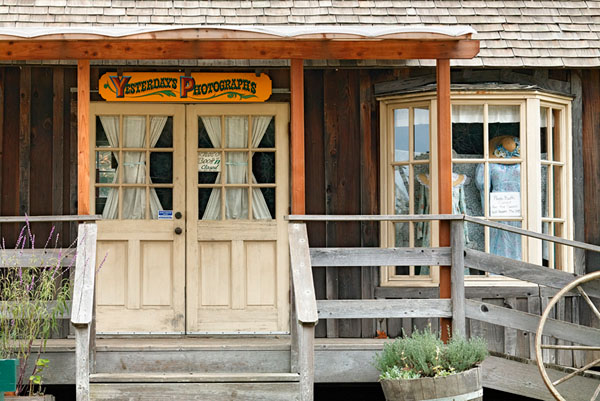
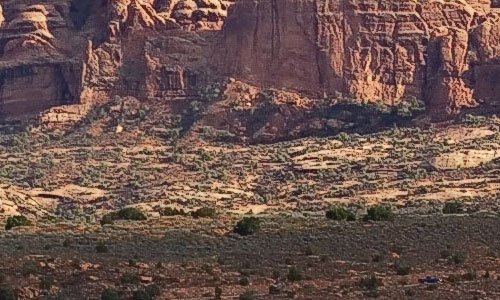
All got the same to photos (one Canon EOS 1Ds and one Canon EOS 10D
photo) and followed these simple rules:
- Final image will be shown not cropped. You can send a second smaller
cropped version and I would publish also your crop.
- All preparation should be done for a normal inkjet print (e.g. 2200)
and not for web presentation
- Color Space Adobe RGB
- Image stays copyright Bettina & Uwe Steinmueller
- You send me the final file as a JPG 9 in Photoshop
- Do not forget to include the full instructions
We need be able to perform all steps ourselves following your instructions
The down sampled overview shot was created with Fred Miranda's web
presenter action and then only for the web used converted to sRGB. The
cropped images are left in Adobe RGB and only serve the purpose to analyze
detail, sharpness and artifacts.
The main purpose of this challenge is the presentation of different
techniques to interpret an image. The only winners are hopefully our
readers by learning new techniques and tools. |
| |
|
| |
#1 Antonio Dias |
| |
|
| |
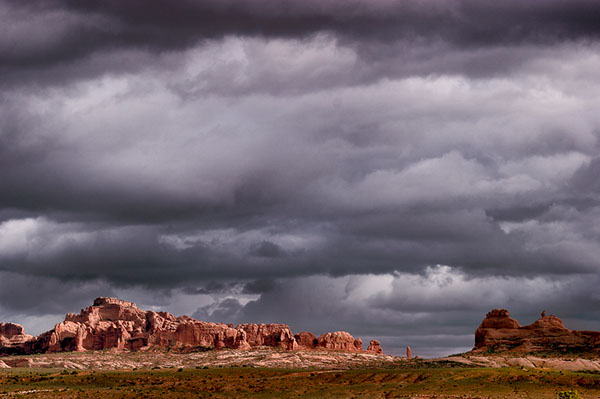
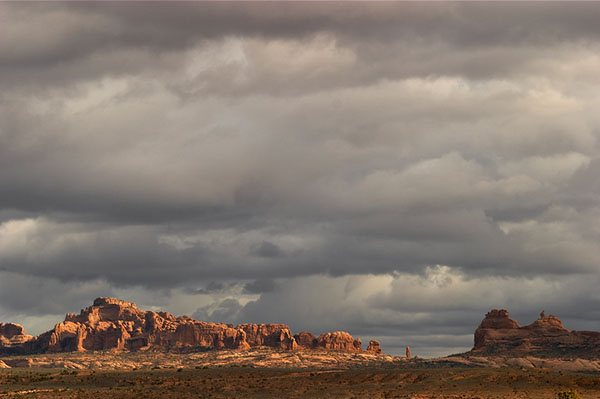
Picture from Canon EOS 10D |
| |
|
| |
|
| |
|
| |
- RAW Converter: Capture One DSLR Pro V1.2
- Gray Balance: C1 Auto Gray
- Exposure: TRC: Film standard. Color Saturation: +5%
- Focus: Soft look: 34/3
- Photo Editor: PS7.01
- Curves: 30-0, 65:31, 179:228, 227-255
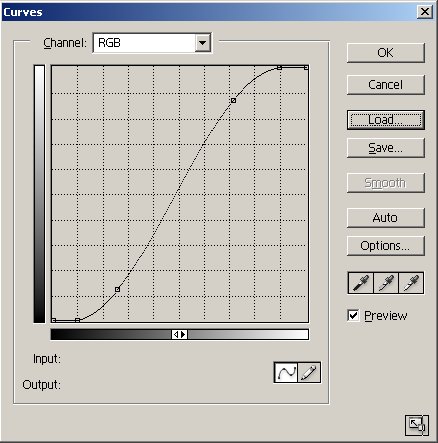
- Clarify: USM 20, 20, 4
- Sharpen: Fred Miranda's 10D CSPro - High Tweak (123,0.8,3)
|
| |
|
| |
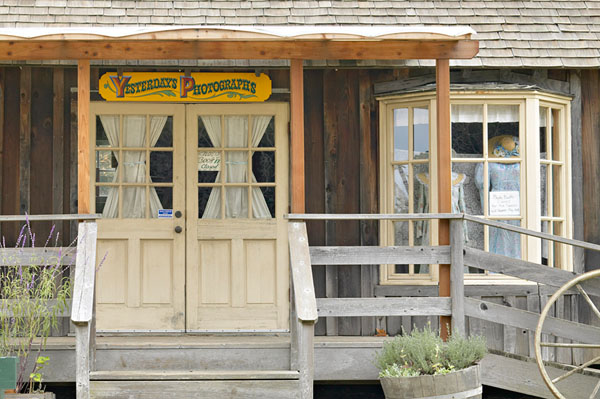
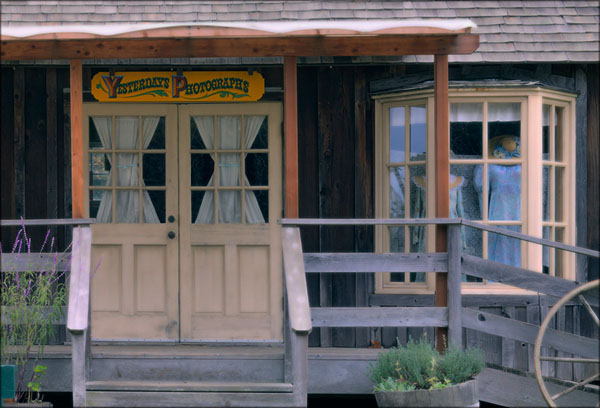
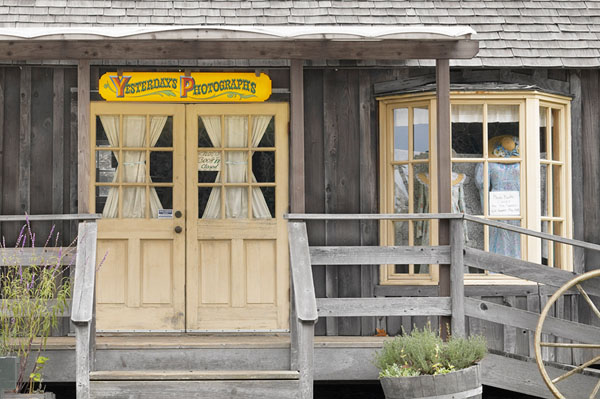
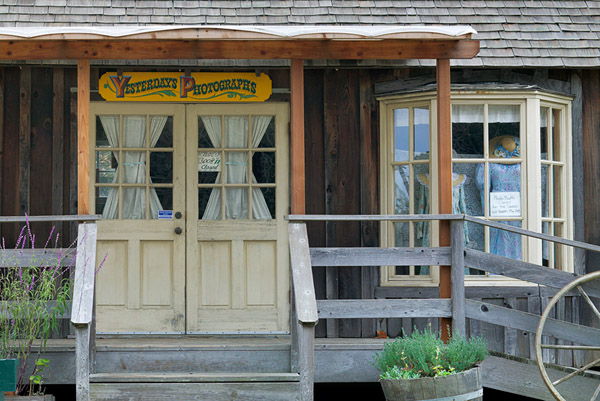
Picture from Canon EOS 1Ds |
| |
|
| |
|
| |
|
| |
- RAW Converter: Capture One DSLR Pro V1.2
- Gray Balance: Picked on white sign on right window
- Exposure: TRC: Film extra shadow. Color Saturation: +5%
- Focus: Soft look: 34/3
- Photo Editor: PS7.01
- Clarify: USM 20, 60, 4
- Sharpen: USM 50, 0.3, 0 (4 times)
|
| |
|
| |
|
| |
|
| |
|
| |
#2 Katrin Eismann |
| |
|
| |
Picture from Canon EOS 10D |
| |
|
| |
|
| |
|
| |
- I acquired the file with Photoshop Camera RAW twice - once for the
sky and once for the rocks.
- Combined them in PS with an own technique (not disclosed)
- I then used PS to enhance the tonality and sharpness.
- Then I went back to PS 7 and used Photokit Luminance sharpening
2 and reduced the opacity to 40%
|
| |
|
| |
|
| |
Picture from Canon EOS 1Ds |
| |
|
| |
|
| |
|
| |
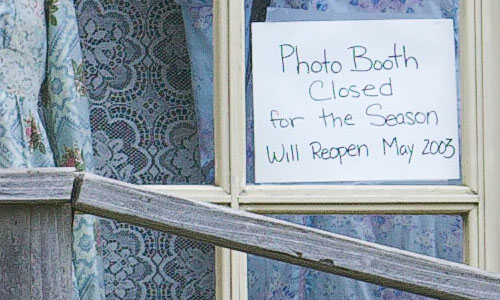
- I acquired the 16-bit file in Photoshop with Camera RAW used the
gray railing as my white balance.
- Working in Photoshop in 16 bit I applied color and contrast correction.
Converted to 8 bit and applied mild straightening of the building,
added a new layer and then merged up. Applied a slight Gaussian Blur,
added a Hue Sat layer and decreased the sat of just the magenta.
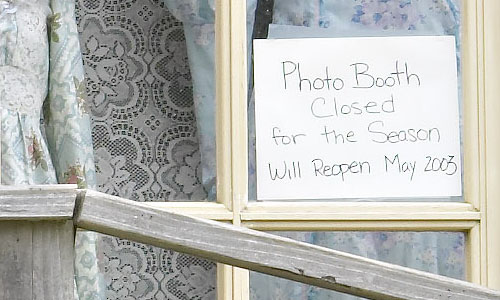
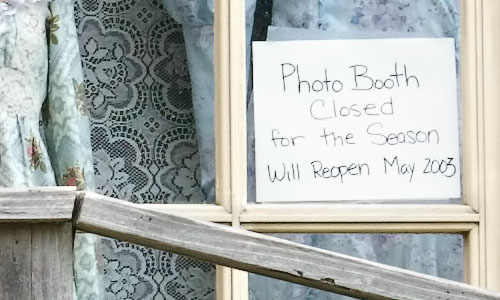
- Then I cropped, removed the AmEx card and closed sign in the windows
and added the soft black edge via Pixel Genius plug-in.
|
| |
|
| |
|
| |
#3 Don Lashier |
| |
|
| |
Picture from Canon EOS 10D |
| |
|
| |
|
| |
|
| |
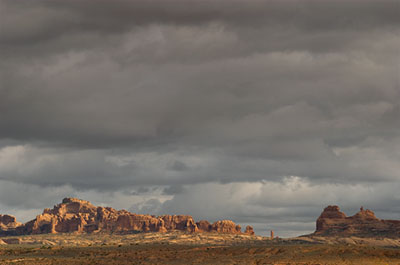
- Converted C1 DSLR Full 1.2RC1
- WB: click balance on cloud to left of right butte to get 7300K
(note: you will NOT get the same result with the slider)
- EC +0.05 CC:0
- BP:33 WP:212
- Custom Curve
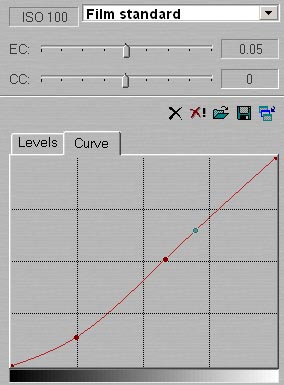
- Saturation +3.0%
- Sharpening: soft, amount 350, threshold 1
- Output jpeg high, argb
Don would then crop the photo as shown here:
|
| |
|
| |
Picture from Canon EOS 1Ds |
| |
|
| |
|
| |
|
| |
- Converted Capture One DSLR DSLR Full 1.2RC1
- WB: click balance on white paper in right window
- EC -0.40 CC 12 Saturation +0.5 (was a mistake -thought it was
on 0)
- Custom curve
- Into PS
- Dup layer
- Adj layer (curves) on bottom layer to lighten
- Eraser tool (airbrush) on top layer to lighten siding under
porch
- Flatten layers
- New adjustment layer hue/sat, sat -80
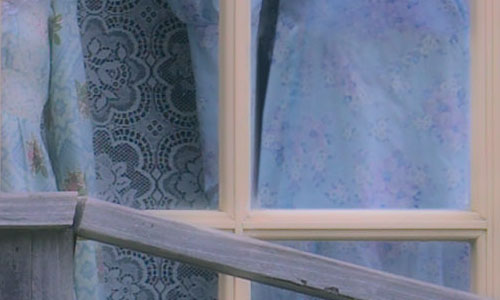
- Mask on sat adjustment layer (attached)
- Air gun mask to let original saturation show thru on window,
doors, sign, plants, wheel, step treads
- New adjustment layer, curves, with mask
- Select top half of doors, and sign with rectangular marquee
- Inverse selection, fill with black, inverse again
- Gradient from top of select down about twice height of select,
smooth bottom edge of gradient with spray gun, enhance bottom
of door drapes with spray gun (on mask).
- Burn tool, soft brush, highlights, 15% used to darken step railings
- Dodge tool, soft brush, mid tones, 20% used to light siding
under porch
a little more.
- Flatten layers
- USM, 0.5,150,1
Initial Analysis
At first blush this image looked easy - good exposure, wide tonality,
easy color, but looking at it a bit it was clear that there were problems.
Although the composition was good the image lacked unity and the eye
darted back and forth. Shadows under the porch imbalanced the tonality
making the picture top heavy. Color was distracting because of the mix
of fresh wood, relatively unbleached wood under the porch, combined
with bleached sun exposed wood.
Inspiration and Solution
The sign ("Yesterday's Photographs") was perhaps the initial
trigger, but in the bottom and right portion of the image the bleached
wood contrasted nicely with the soft colors in the bay window and I
found myself going back to some of my earliest memories - sitting on
a stool (I was
probably 4) watching my dad lovingly hand tint b&w enlargements
in his darkroom. Perfect, I thought. This will solve all sorts of problems.
Selective desaturation combined with some tonal equalization via masked
curves and dodging/burning gave the desired result.
|
| |
|
| |
|
| |
|
| |
#4 Fred Miranda |
| |
|
| |
Picture from Canon EOS 10D |
| |
|
| |
|
| |
|
| |
10D RAW file 10 quick steps (~ 4 minutes depending
on your system) NOTE: Since I didn't take this picture, I was not sure
how natural colors looked after my conversion.
- Convert the provided RAW file using the Canon RAW Converter Utility
(supplied with the camera) Settings: AdobeRGB, contrast:low, sharpness:None,
Saturation:low
- In Photoshop:
- Assign Profile AdobeRGB
- Run the first global RGB levels adjusting overall tonal range
as much as possible while saving shadow and highlight detail.
- Run action FM DV 16-bit PRO v4.0 (intensity 4)
- Run action FM Warm-cool (intensity 3)
- Run levels again, but now adjusting each individual channel
separately (You will a get wrong colors)
- Select the history brush. Go to the History palette and click
on the
step before the the individual channel editing. Go to menu: Edit/Fill
- Contents
- Use: History, Blending Mode: Color, Opacity: 100%
- Run action 10D ISOR PRO (Color noise only setting)
- Fine tune with levels history brush to add more contrast and
bring back detail.
- Run action FM SR (Shadow recovery - low) in order to bring
a bit more shadow detail
- Run action 10D CSpro (High) I used this setting because this
file is intended to print output.
Editor's note: To no surprise Fred uses his own actions.
His full set of actions can be found here. |
| |
|
| |
Picture from Canon EOS 1Ds |
| |
|
| |
|
| |
|
| |
- Convert the provided 1Ds RAW file using the Canon RAW Converter
Utility (supplied with the camera) Settings: AdobeRGB, contrast: Low,
sharpness: None
- In Photoshop:
- Assign Profile AdobeRGB
- Run the first global RGB levels adjusting overall tonal range
as much as possible while saving shadow and highlight detail.
- Run action FM DV 16-bit PRO v4.0 (setting: intensity 2)
- Fine tune with levels and history brush to add more contrast
and bring back detail whenever necessary.
- Run action FM SR (Shadow recovery - setting: Medium)
- Run action 1Ds ISOR PRO (setting: Color noise Only)
- Run action 1Ds CSpro (setting: High)
|
| |
|
| |
|
| |
|
| |
|
| |
#5 Jeff Schewe |
| |
|
| |
Picture from Canon EOS 10D |
| |
|
| |
|
| |
|
| |
- The image was converted using a hacked version of Camera Raw (see
EXIF metadata) a bit flat to allow tone adjustments.
- The tone adjustments were done in 16bit using my "Painting
From History" (see note below) technique. I locally popped up
the contrast-while preserving deep shadows. I also deepened the sky
and added saturation.
- After converting to 8bit. I used an initial edge sharpening that
is currently proprietary. I also did several PhotoKit sharpening layers;
“High Pass Sharpen 2” at 33% opacity, “Luminance
Sharpen 3” at 33% and also a “Noise Reduction 1”
at about 50% layer masked so it would only effect the sky.
|
| |
|
| |
Editor's note:About Jeff's "Painting
From History" you can read here
(800KB PDF). |
| |
|
| |
Picture from Canon EOS 1Ds |
| |
|
| |
|
| |
|
| |
- The image was converted using Camera Raw (see EXIF metadata) also
a bit flat.
- I did a little bit of “Painting From History” to adjust
the tones locally. I also upped the saturation.
- I also used a technique using an 8 bit duplicate with a Color Range
selection selecting the extremely deep shadows. I dragged the selection
to the 16 bit conversion and pinned the blacks while preserving the
3/4 tones.
- I converted to 8 bit and ran a proprietary edge sharpening that
followed that with PhotoKit; “Luminance Sharpen 3” at
33% opacity and “High Pass Sharpen 2” also at 33%.
Total time working per image (not including Camera Raw) was about 15-20
minutes per image (actual working time).
For both of these images, I was soft-proofing the images for an Epson
2200 using Luster paper through custom profiles.
|
| |
|
| |
Note by the editor |
| |
|
| |
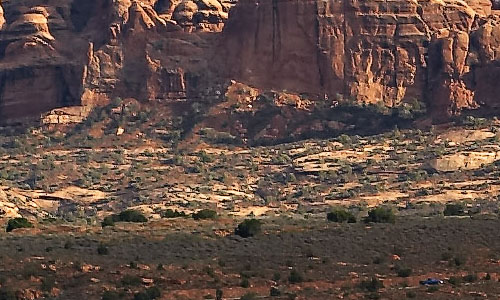
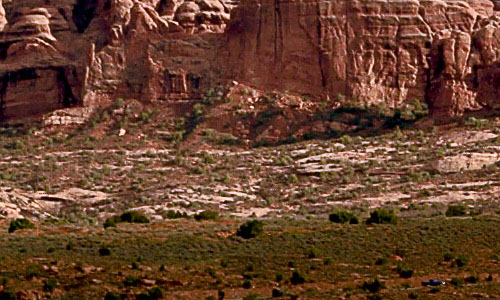
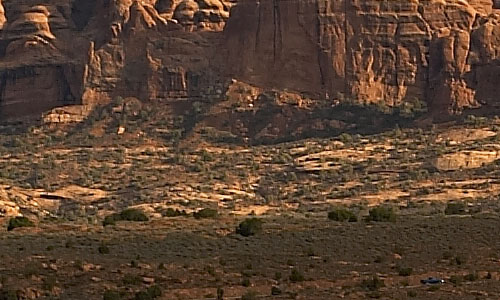
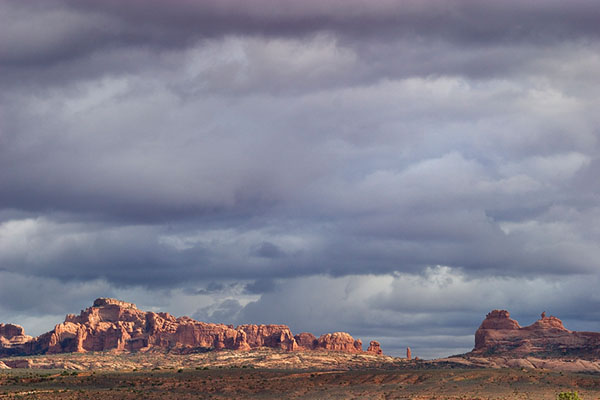
I was kind of surprised that only Katrin took the
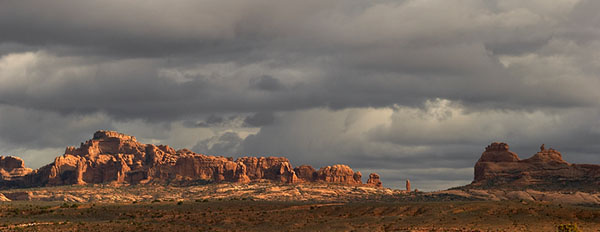
freedom to remove distracting elements from the photos. Actually the
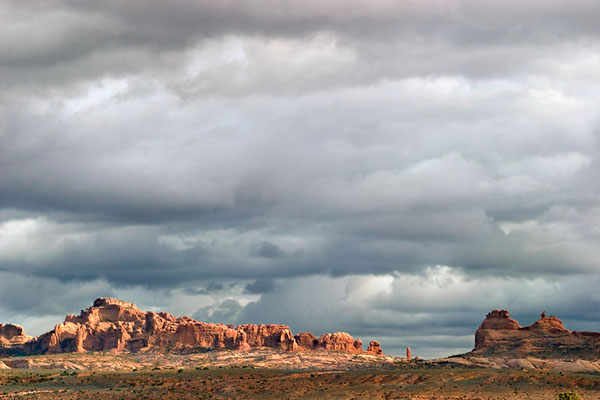
storm photo from the Arches National Park would benefit from removing
the bush (bottom right) and the car (shown in all the crops).
Also we learned a lot from this challenge ourselves. For example we
did not think we could make the storm photo into one of our portfolio
shot (now it is part of our "Arches" portfolio).
Thanks again for all who were part of this "Raw
Challenge #1" |
| |
|
| |
|
| |
|
| |
|
| |
|
| |
|
| |
|
| |
|
| |
|
| |
|
| |
|