| |
|
| |
Digital Outback Photo Contest #007

Raw Conversion Contest #4 using a Canon
1Ds Photo
|
| |
|
| |
|
| |
|
| |
|
| |
|
| |
|
| |
There will be no prize this time. |
| |
|
| |
Rational:
This contest is about sharing experience and there are hardly wrong
results. Of course we all have different opinions on how to see a scene
and how to present. Feel free to discuss the merits of the different
entries in our news
group.
In case of some outstanding result we might ask our sponsors for a
special prize, but do not count on it. |
| |
|
| |
See also our other
contests |
| |
|
| |
|
| |
To share experience it is not enough just to show the results. We need
precise step-by-step descriptions of all image editing operations that
had been performed. That is why we need to limit the used tools to the
ones that are available at Digital Outback Photo (and they have to be
available for PC or Mac):
- Photoshop (this is the standard image editor we use)
- Capture One DSLR Pro, Adobe Camera Raw or Canon SDK based converter
- Other tools (if the tool author provides a free full working copy
to Digital Outback Photo)
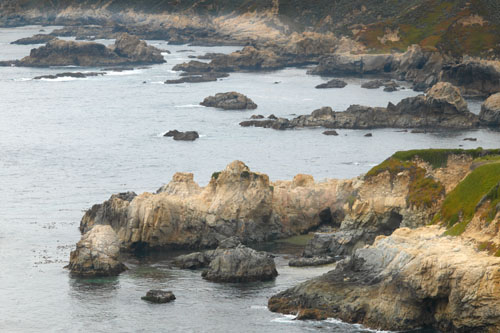
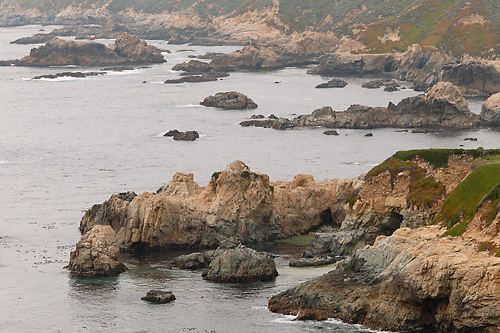
This photo was taken with the Canon 1Ds and the 70-200mm f/2.8 lens
+ Canon 1.4x tele converter.
Note: because Adobe RGB is not
a good choice to display images on the web we use now sRGB for this
contest!
Rules:
- Image should not be cropped
- All preparation should be done for a normal inkjet print and not
for web presentation
- Color Space: sRGB
- You load the full raw image (copyright Bettina & Uwe Steinmueller)
from here (10MB ZIP)
- You make the best out of it and fully document all steps (try not
to be too complex as this makes our life difficult)
- You then resize the resulting file to 500 pixels wide at JPG 8 compression
in Photoshop
- Note: Do not send the full sized image!
- Also send us the same crops (500x300) at 100% pixel level as shown
below in the sample entry
- Do not forget to include the full instructions
- We need be able to perform all steps ourselves following your instructions
- We may reject entries without any further notice if they get to
complex, the tools are not at hand or we see major quality issues.
- Send images and instructions to: contest@outbackphoto.com
|
| |
|
| |
Note: As all photos should be in the sRGB color space
it is recommended to download interesting samples and view them in Photoshop
on a profiled monitor. |
| |
|
| |
|
| |
Sample Entry (by Uwe Steinmueller) |
| |
|
| |
|
| |
|
| |
|
| |
|
| |
|
| |
|
| |
|
| |
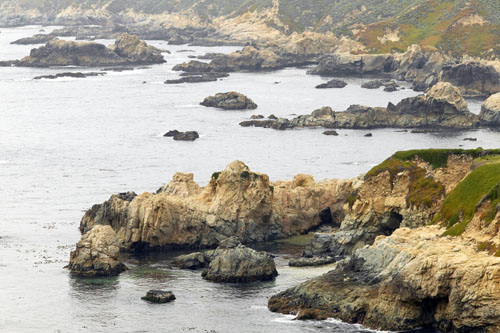
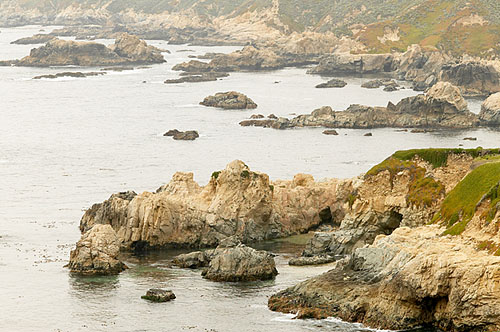
#1 Axel McBuster |
| |
|
| |
|
| |
|
| |
- In Capture One DSLR v1.2
- Reduce exposure by -.35
- Increase Saturation by 15%
- Develope the image to 100% Tif 8 bit
- In PS 7.01
- Sharpen the image using the UnSharp Mask 100% 0.8 3
- Use My Vignette (see below) method, Vignette the upper arc
of shoreline
- Burn in the vegetation across the top left at Midtones, 10%,
300pxls
3-4 swipes across - only the vegetation
- Dodge the lower light rock - Only the lighter areas Midtones,
10%, 300pxls
20-25 swipes, very careful, even up each area to match the others
(This is a subjective thing, just breathe some life into them
rocks - and then STOP.)
- Dodge the strip of rock in the upper portion. Only that rock
that has some color Midtones, 10%, 200 pxls
- Carefully, burn in the rocks at the shoreline of the upper
area and carefully the few wisps of rocks jutting out from the
shoreline along the upper area - this adds a bit of life into
them as well (Same Burn settings as above)
- Use the Sponge tool to gain some color in the strip of rocks
along the top Saturate 10% 100pxls
- Use the Healing brush to get rid of the 8-10 floating chunks
in the foreground
- Use the Healing brush to get rid of the little white streak
of water in the left center and the two wisps of floating weeds
to the right of that 50 pxls Borrow material from a matching piece
of water
- Use the Healing brush to get rid of the dark water in the lower
left third left edge 100 pxls Borrow material from a matching
piece of water
- Use the Healing brush to get rid of the tiny speck on the upper
left edge 35 pxls Borrow material from a matching piece of water
- Bump the contrast to 18%
- MyVignette
- Layer Duplicate
- Layer New
- Swap these Layers (New Layer in Middle of two color layers)
- Color the New Layer to 96 96 96
- With the Ellipse Tool Radious 250 pxls
- With Duplicate Layer
- Delete
- Set to Multiply
- Opacity 35%
- With New Layer
- Delete
- Set to Multiply
- Opacity 35%
- Flatten all three layers
- Repeat as necessary
|
| |
|
| |
|
| |
|
| |
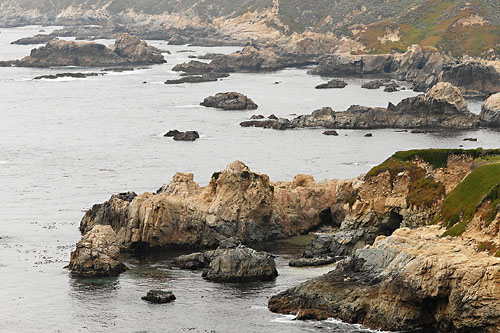
#2 Peter Burian |
| |
|
| |
|
| |
|
| |
- In Capture One DSLR
- Auto Grey Balance
- Color Cast Compensation slightly toward yellow
- Levels adjusted: to 25 for Shadows and 250 for highlights
- Contrast +7
- Sharpen: Amount 75, Threshold 1
- In PS 7.0 (layers):
- Curves: Auto
- Saturation: Green +10; yellow +20
- Unsharp Mask: 25/0.8/1 - applied twice.
|
| |
|
| |
|
| |
|
| |
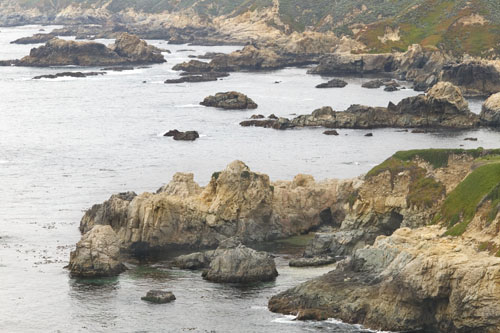
#3 Antonio Dias |
| |
|
| |
|
| |
|
| |
- RAW Converter: Capture One DSLR Pro (V1.2 RC1)
- Gray Balance: Auto Gray Balance
- Low Noise Reduction
- Sharpening - Soft Look: 50, 3
- Destination space: AdobeRGB
- 16-bit TIFF
- Photo Editor: Photoshop V.7.01

- Clarify: USM 20,30,4
- Convert to 8-bit
- Sharpening: USM 350,0.3,2. Fade: Luminosity 85%
|
| |
|
| |
|
| |
|
| |
#4 Jonathan Wienke |
| |
|
| |
|
| |
|
| |
- Opened the file twice with Camera Raw, using the eyedropper on
the waves
splashing on the rocks in upper left corner to define white point
(5500K -7 tint), 16 bits/channel, sRGB color space.
- Adjusted contrast and saturation in first copy for rocks and grass
in foreground (lower right) using Camera RAW settings only.
- Adjusted contrast and saturation in second copy for remainder of
photo
using Camera RAW settings and a levels adjustment (16-227:0-255 gamma
1).
- Ran Midtone Sharpen 16 LAB action in attached
file on both copies 300%, radius 1.5 pixels, threshold
0.
- Converted both copies to 8 bit, then pasted first copy over top
of
second.
- Added layer mask to first copy (optimized for foreground rocks and
grass), then airbrushed layer mask so that only foreground rocks and
grass are visible, the remainder of photo is the second copy (optimized
for water/background rocks & grass).
|
| |
|
| |
|
| |
|
| |
#5 Gary Yelland |
| |
|
| |
|
| |
|
| |
- Canon File viewer utility 1.2.1.13
- White balance cloudy
- Sharpness, Colour (Shot Settings)
- Sharpening Target (Shot Settings)
- Convert to 16bit tiff
- Load into Photoshop convert to Adobe RGB
- Convert to Lab s-curve in (a) channel Input -57 output -68 Input
55 output 51
- s-curve in (b) channel Input -61 output -71 Input 58 output
69
- Unsharp Mask on luminostiy A138% R0.5 T5
- Convert to RGB
- Auto Contrast
- Color Balance 0 +6 0
- Midtones
- Convert to sRGB color space
- Convert to 8bit
|
| |
|
| |
|
| |
|
| |
#6 Wai-Shan Lam |
| |
|
| |
|
| |
|
| |
- CaptureOne 1.2 Pro Beta 5 (Noise Supression to low)
- WB - Shade
- Profile - 1Ds Daylight
- Black Point - 48
- Mid Point - 0.88
- White Point - 255
- Sharpening in C1 - Std, 80, 0
- Convert to full size JPG.
- Open in PS7.01
- Crop and Resize then USM 75, 0.6, 0
|
| |
|
| |
|
| |
|
| |
|
| |
|
| |
|
| |
|
| |
|
| |
|
| |
|
| |
|