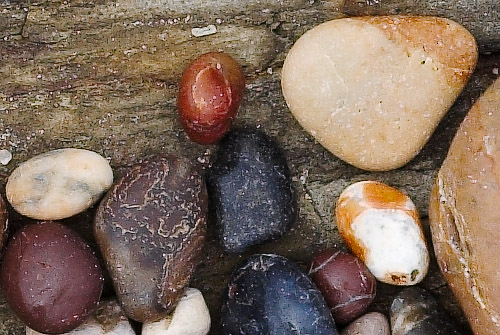
Digital Outback Photo
- Photography using Digital SLRs


Digital Outback Photo Contest #015

Contest July 2005: RAW Conversion Contest #5


Limited to 8 entries (8 entries, closed)


See also our previous contests

   
  A Note on Copyright: This image can only(!) used in the context of this contest and the only site that has the right to publish images is Digital Outback Photo. If you want to use this image for any other purposes (e.g. marketing) you can acquire a license from us.
   
   
  There are no prizes for this contest as the evaluation of the results can be too subjective.


To share experience it is not enough just to show the results. We need precise step-by-step descriptions of all image editing operations that had been performed. That is why we need to limit the used tools to the ones that are available at Digital Outback Photo:

  • Photoshop (this is the standard image editor we use)
  • Raw Converters (Pixmantec RSE, Adobe Camera Raw 3, Bibble, Canon DPP, BreezeBrowser, ..)

Photo was taken with the Canon 1Ds Mark II at ISO 100 and the sharp Canon 135mm/f2 L lens .


Pebbles (f16, 1/40sec)


500 pixel wide crop

This photo was created using:

  • RSE
  • EasyS Sharpening Toolkit

Note: This shot has a very shallow DOF and the lens is not at the optimal aperture at f/16

Rules:

  • It is your task to convert the RAW file with your RC of choice and send in the crop shown above (see yellow frame in original). Image should be only sharpened to look good on screen (capture sharpening)
  • You load the original RAW image (copyright Bettina & Uwe Steinmueller) from here (about 20MB 1DS Mk. II CR2 file)
  • Use any RC and sharpening tool you like
  • Describe the process step by step
  • Naming of the JPG: first_lastname_1854.jpg
  • Send only the instructions and the final sharpened image crop (JPG 9 in Photoshop) and your full name to: contest@outbackphoto.com
  • Colors should be in sRGB
  • No selective sharpening (like painting or color selection). Edge masks are of course ok. We would like to see techniques that work also automated.
  • The final image has to be in sRGB and RGB color mode (without any layers)


  Note: As all photos should be in the sRGB color space it is recommended to download interesting samples and view them in Photoshop on a profiled monitor and at larger magnification.
   
   
  Sample Entry (by Uwe Steinmueller)


  • Converted with RSE (sharpening = 0, detail extraction +12, WB "as shot")
  • Sharpened with EasyS Sharpening Toolkit (with mask at level "H")


  Note: The links point to our reviews or to the vendor sites of various products.


#01 Stephen Pace

Converted in C1 3.7LE w/ ETC 1d mkII profile.(don't have the 1Ds II profile)

  • exposure at - .15
  • film curve extra shadow
  • Black point to clipping (12)
  • slight S curve
  • Sharpening in C1 soft look 350/2
  • Noise and banding suppression to minimum
  • Color noise to default (15)

Photoshop

  • USM Red channel 500/.2/2
  • Green channel 500/.1/1
  • LCE Layer USM 15/24.6/0

The color is probably a little off due the 1D II profile
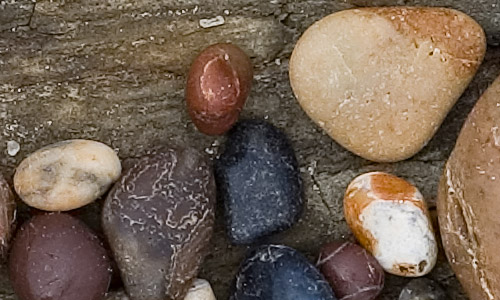

#02 Jack Flesher

RSE: sharpening 0, detail +25, shadow contrast +15, highlight contrast +15, exposure -.35

CS2: Crop to 335x500 size, curves w/ WB on bright rock,:

Sharpened with Smart-Sharpen at 150/.7

Finished with a final curves tweak, added a few points warm

convert to sRGB, convert to jpeg 9.
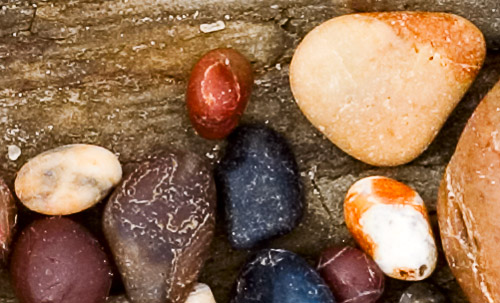

#03 Herman Teeuwen

CR: WB: As Shot, Exp: -1, Brightness: 63 (Shadows & Contrast: Auto), Detail Sharpness: 25

PS: Nik Contrast Pro, faded to 50%

Sharpened with Easy S + mask High, opacity 70%
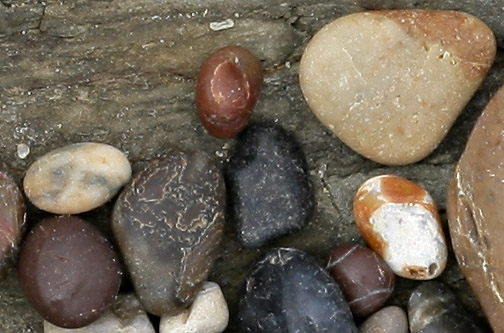


#04 Doug Dolde


  • Adobe PS CS2 ACR
    • WB: As Shot
    • Exposure: -.10
    • Shadows 20
    • Brightness: 53
    • Contrast +50
    • Sat: 0
  • Convert to J Holmes Ektaspace
  • S Curve
  • Assign J Holmes =25 Chroma Variant profile
  • Photokit High Pass Sharpen 1
  • Photokit Edge Sharpen !
  • Photokit Output Sharpen 400 pixel, Superfine Edge Sharpen
  • Convert to sRGB
  • Convert to 8 bit

#05 Ton de Kousemaeker

Breezebrowser Pro 1.3 sRGB natural EV -0.6 Autolevel 0.05 - 0.05
Photoshop CS USM 10-10-0 2 times for contrast enhance
Focal Blade 1.03 Sharpen mode Light Sharp - Very Fine Details 67 0.4


#06 Alain Briot

Conversion

  • Capture 1 3.7:
    • Saturation +13
    • Color Contrast +19
    • No sharpening
    • No noise or banding removal
    • Color temp 4400K
    • tint +14
    • Ektaspace J.Holmes
    • 16 bit
  • Photoshop:
    • Unsharp Mask, Amount 200%, Radius 0.5, Threshold 0
    • Curves: Slight S-Curve for contrast enhancement
    • Added a touch of yellow to remove slight blue cast
    • Reset black point by minus 4
    • Sharpening: PhotoKit Output sharpener> Web and multimedia > 400 pixels superfine edge sharpen

#07 Richard Crack

  • Developed in Canon DPP V1.6, Brightness Adjustment, -0.33 Stop, Dynamic range, Shadow to 46, Resized to 33" W x 22" H @ 300ppi
  • Processed in PS CS2; CS2 Smart Filter, Sharpening 150/2/0 GB More Accurate, Shadows 50/100/2, Highlight 50/40/40
  • Local Contrast Enhancement (USM 20/50/0)
  • PhotoKit Creative Sharpening, Edge Sharpen 1, each contour @ 33%
  • Cropped and resized using bicubic sharper to 500 pixels wide

#08 Winfried Schwolgin


  • RSE 1.1.3
    • sharpening = 0, detail extraction +12, WB "as shot"
    • save as 48-bit Tiff and ECI-RGB
  • Photoeditor (Picture Window Pro)
    • S Curve (Value chanel, HSV-model)
    • increase Saturation 15% ( Saturation chanel, HSV-Model),
      keeping low and high saturation
    • convert to 24 bit and sRGB
    • Advanced Sharpen Tranformation sharpenradius 1.0000,
      sharpenamt 1.2520, sharpenthresh 3 18, Amount 90%


  Thanks to all participants (including all submissions that may not get published).


For Comments post in our News Group

© 2000-2007 Digital Outback Photo