| Digital Outback Photo - Photography using Digital SLRs |
|
 |
|  |

|
 |
|
Nik Sharpener Pro Sharpening "A La Carte" Experience Report by Uwe Steinmueller (last updated 02/14/2001) |
| New Tips |
| If it comes to digital image enhancement "sharpening" an image is very difficult task and has been for me a lot of guesswork. |
|
Sharpening depends on many different parameters (and even more)
|
| Now you think I repeated the arguments from the Nik Sharpener Pro (by Nik Multimedia) manual. Yes I do! But because I believe they make very good arguments. I have seen very often that photos which looked very over sharpened on the screen printed nicely. Probably some people in service bureaus who know their target devices inside out might do a great job just using traditional Photoshop sharpening. Although even these people might like the power of the Nik Sharpener Pro. |
| The experts always told that sharpening is the last step. With the Sharpener Pro it does not make sense any other way as you have to know the target size, DPI, quality of your fully resized original, eye distance ....So from now on it will be my last step which means a change in my workflow. As I do not want to repeat all my Photoshop tweaking over and over again the photos get stored in their final state in maximum original resolution. If I then need a print the photo gets upsampled and finally sharpened for the target device. If it is for the web the photo will be downsized and sharpened for the web (Nik Sharpener Plus provides a special filter just for the Internet as target). |
| A first Take |
 |
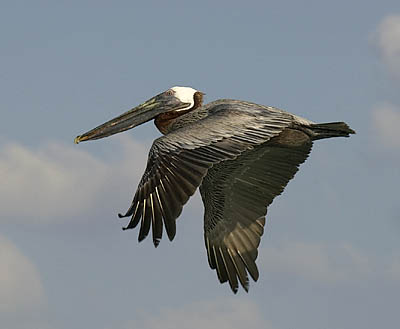
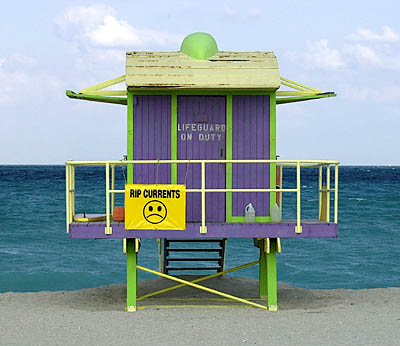
| The above photo is on my web site (www.photodotcom.com month May) as of 11/16/2000. The next photo shows the result before it was sharpened. |
 |
| The third photo shows the final fully automatic Nik sharpened image. The Nik Sharpener Pro performs an automatic scan to determine the grade of details in the photo. |
 |
| How much the first photo is lacking sharpness is evident once you see the better sharpened version. |
| We hope the first sample demonstrates how well you can even improve the photos for your web presence. Again we can learn from Michael Reichmann's experience at his www.luminous-landscape.com where he reviewed the Nik Sharpener Pro and uses it since then. |
| Here is a second example (before and after) also from the same web page The newly sharpened samples are not just a sharpened version from the first version (which would involve sharpening twice) it was created from the original camera files. |
 |
 |
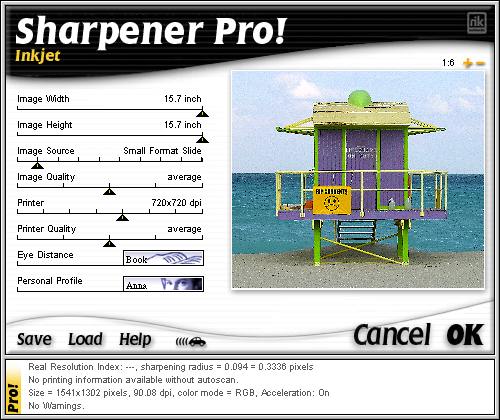
| The Settings |
|
The "Autoscan" version performs an automatic detail scan and uses that information for the sharpening. If you want to know all the details please download a demo version. When I first downloaded the non Pro demo version some months ago the problem for me was that their aggressive copyright mechanism (it makes the sharpened image unusable by blending in icons) made a judgment quite difficult for me. I have no idea how it looks in the current version.
|
 |
|
|
Most of these settings are quite obvious in their meaning. I would like to get into two of them 1) Eye distance is also very logic as you cannot sharpen that aggressive if you watch the photo from a closer distance (because sharpening is a destructive process by its nature it destroys fine details to emphasize others more important ones). On the other side you won't put your nose onto a billboard to watch it. 2) The image personalities reflect the different tastes people have. "Anna" likes smoother sharpening (me too), "John" is a bit more aggressive and "Zap" as his name suggests. So be careful to select the profile which pleases you best. I would like to be even less aggressive than Anna for the Internet filter. |
|
Do I like this product? Yes, a lot. The only drawback I can see is it's price $329. But if you look how important sharpening is for your digital workshop and the time you save not guessing than it is probably ok. I know that feeling which you have once you got the D1 body for $5000 and then realized that you need a lot more (good lenses, Microdrives, Software, ...). In digital software only the combination of best hardware and best software gets you the results you want. In the beginning you are forgiving and then you want more. Once you used Nik Sharpener Pro you want not to go back. So check your account before you try it out.
|
| Final Comment: I believe the product would be even better if it would be implemented as a 16 bit filter: probably some later version. |
| Off Topic |
| As we are also looking into the Nik Color Efex Filters at the same time and the first photo serves as a good sample to show case the Polarization filter we add one more version. This time it was processed by the Color Efex Polarization filter just before the final sharpening. |
 |
| Printing Experience |
| It is difficult to see the value of this tool on the screen. Printing with the Olympus P-400 dysub printer got very good results using the "Offset / Autoscan" sharpening filter. |
| Using the "John" personality which looks a bit over sharpened on the screen is even better than the "setting" for this printer. The photo gets more three dimensional look. |
| Tips we got from Nils Kokemohr (Author of Nik Sharpener) at PMA 2001 |
| 1. Nils uses mostly the "Anna" setting |
| 2. If you sharpen for Lightjet or Fujix use the "Laser" filters |
| 3. If you think that the sharpening is to strong you can reduce the effect by "fading". In Photoshop 5.x it can be found in the "Filter" menu and in PS 6.0 in the "Edit" menu. This feature is only active as a next step after sharpening. |
| For Comments post in our News Group |
 First
of all there are several different filters which all (except the Internet
filter which is fully automatic) work in principle the same way.
First
of all there are several different filters which all (except the Internet
filter which is fully automatic) work in principle the same way.