| If I were to do a simple poll on the various forums
in regards to questions on digital technique, I feel that sharpening
would have to be a topic that would land in the top 5.
You will see so many questions on sharpening. Should you sharpen in
camera at the time of image capture, or afterwards during the raw conversion?
If you apply noise reduction, should the sharpening be applied before
or after the noise reduction? So, you can see that the subject of sharpening
can insert itself in many different places in the digital workflow
of an image.
There are many different sharpening tools out there to use, and all
the tools I am aware of are designed to work in an image editing program
like Photoshop. Some of these load as filters under the plug-ins folder
in Photoshop and then use the Photoshop Unsharp Mask filter to sharpen
the image. Others, like the tool I am reviewing, GF Fractals Sharpening,
are created as Photoshop actions and are loaded via the actions palette.
Nik Sharpener is the only exception to this that I know of. Nik loads
as a Photoshop filter, but uses its own algorithms to sharpen the image.
Recently, Noel Carboni, a developer of various Photoshop actions,
came up with a new spin on sharpening. To do this he hit on a visual
sensation everyone who has printed has noticed before. If you view
two sizes of a print, say 8x10 and 5x7, more times than not, the 5x7
will seem sharper. This is assuming that the images are exactly the
same. As you shrink the size of the image, your perception is that
the image itself has gotten sharper. Noel’s idea was to turn
this around. Take the image, increase its size, sharpen it, and then
bring it back to its starting size.
I worked with Noel as he was working on this sharpening solution. He
started by enlarging the image to 400 % of its original size but due
to the amount of computer resources required settled on 250%. Noel
worked with many resizing tools and settled on Genuine Fractals as
the tool to resize the image. Once the image is at the larger size,
Noel developed a series of steps to sharpen the image, using various
Photoshop filters, such as the Unsharpen Mask. He then drops the image
back to the starting size. The end result is an amazingly clean and
very sharp image.
What are the requirements to run Noel’s Fractal Sharpening action?
You only need Photoshop and the Genuine Fractals (GF) software. GF
has been around for a long time, and some may consider it rather “long
in the tooth”. However it is very stable software and does a
good job for image resizing. GF loads into Photoshop as a filter, and
its primary design point was resizing images, either larger or smaller
than their starting point. To do this, you open the image you want
to resize in Photoshop and then save it in a unique format with a .stn
file extension. You then reopen the image and GF will automatically
launch, providing to the user an interface to allow them to resize
the image. The larger the size you are making the image, the longer
it takes Genuine Fractals to complete the process. So, to grow an image
to 250%, you can expect the process to take some time. GF is very processor
dependent. If you are going to work with Noel’s action, I would
recommend at least 1.5 GHz for your processor, and the larger the better.
Genuine Fractals doesn’t use much memory, but it grabs the entire
processor. It’s also not written to take advantage of Intel’s
hyper-threading processor design instead it is just one big single
thread.
To really check out the sharpening effect on the image, I feel you
need to work with it at a 100% view, so all the crops I show in this
review will be at 100%. The need to view at 100% is just as important
for checking your sharpening before printing. When you view at 100%,
you can always see exactly how the sharpening affected the smaller
details in your image. Don’t get fooled by viewing the image
on the screen at a “fit to screen” view, as you will miss
a lot.
Noel’s sharpening tool is an action and I will assume that everyone
reading this understands both how to load an action and launch one.
If you need help here, check out Uwe’s website for more basic
information on Photoshop actions.
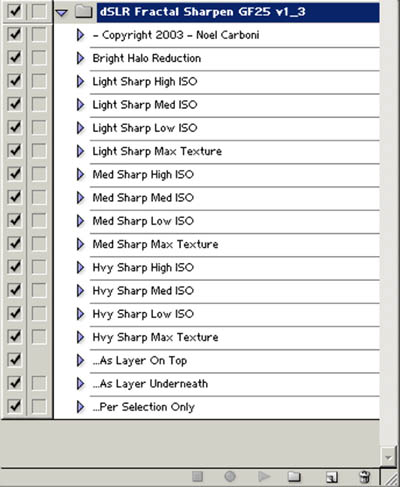
Image #1
Image number 1 is a screen shot of what you will see when you launch
Noel’s action. Notice that the action has many separate levels.
These levels are dependent on both the ISO selected at the time of
capture and the amount of sharpening you desire. In general practice,
you don’t want to sharpen an image taken at ISO 400 as much as
you would want to sharpen an image taken at ISO 50 or 100. The reason
for this is noise. Most tools will pick up noise as a detail, and sharpen
it. This is a problem as sharpened noise will look terrible. By this
selection process, the user can easily escape this issue.
Noel also added a step to help correct haloing with his “bright
halo reduction” step. Haloing is a common problem with all sharpening
tools. Haloing is created when a tool over-sharpens a part of an image.
The effect produces a halo of lighter pixels around the object, thus
the name. You will pick this effect up most often on thin or small
objects like fine tree limbs. The effect is made worse if the object
being sharpened is against a light background. See the example below
with image number two.
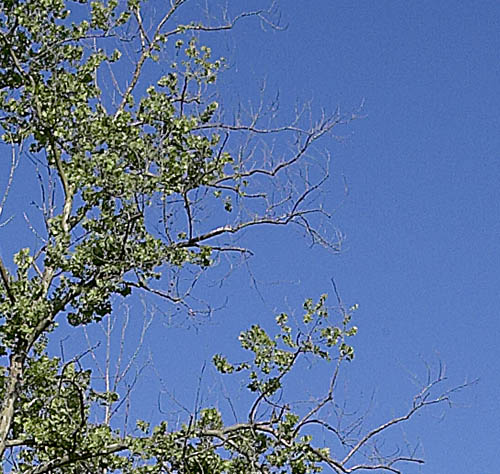
Image #2
In image number 2 I have sharpened a series of small tree limbs against
a light sky and the tool has over sharpened the limbs and created a
faint halo around the limbs. When printed this looks bad and is sign
of a poorly sharpened image. The only way to fix the problem after
sharpening is to either brush back darker parts of the image against
the limb which would take forever and is very tedious, or to blur the
image, which defeats the whole sharpening process.
Noel’s “bright halo reduction” step removes the
haloing problem as you run this step first. It adds a very slight amount
of blur to the image. The blurring is by no means enough to remove
details, but it will prevent the later sharpening steps from over sharpening
and creating halos around smaller details. The “bright halo reduction” should
only be used if you have smaller details that might be at risk of developing
haloing. After this step, all that is needed is to pick one of the
various levels of sharpening, which matches the ISO of the image taken.
Noel gives you three basic levels of sharpening, light, medium and
heavy. Within each sharpening level, you also pick from three ISO settings,
low, medium and high. Noel also offers a 4th setting for “max
texture” within each of the three ISO ranges. For my work with
the Canon 1Ds, I use the following correlation of settings most often:
ISO Type of Shot Setting for GF Sharpen
100-250 Landscape/Scenic Hvy Sharp Low ISO
100-250 Close up/Macro Med Sharp Low ISO
100-250 Portrait Work Low Sharp Low ISO
250-500 Landscape/Scenic Med Sharp Med ISO
250-500 Close up/Macro Low Sharp Med ISO
250-500 Portrait Work Low Sharp Med ISO
500+ Landscape/Scenic Med Sharp High ISO
500+ Close up/Macro Low Sharp High ISO
500+ Portrait Work Low Sharp High ISO
These are just my basic settings and I may alter from these depending
on the image in question, but they are a good starting point to work
with Noel’s action. Now let’s work with an image and see
what the results are.
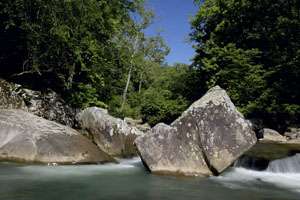
For this review, I selected an average 1Ds image from my work. This
was an 11mp raw file, ISO 100, converted in Capture One. During the
conversion no sharpening was applied. This is a standard practice for
my workflow. Since it’s a raw file, no in camera sharpening was
applied. This is a good test for a sharpening tool as it has lots of
smaller details, but also has large open areas, where you don’t
want much sharpening done.

Image #3
Take a look at image number 3; I picked this image as I feel it’s
a good test for Noel’s action. It has a large amount of fine
detail and it also has some large solid masses to sharpen. In the middle
of the image you can see that there are some branches that will possibly
pick up some haloing against the blue sky. The water below the rocks
will be a test too since most tools will try to pick up the slight
amount of noise present and sharpen it.
Step One—Selection of Output Print size
The first step is to determine what your final print size will be.
So change the dpi of the image to accommodate this. I will be printing
this image on an Epson 1280, on Super A3 sized paper, (13 x 19 inches).
I do not use a borderless setting in my printing as I like to have
a ¼ inch margin with which to handle the print during dry mounting.
Because of this, I will select a dpi of 211. This will give me a print
of 12.8 x 19.2. I will lose a slight amount of the image on the sides,
but not enough to matter. I would rather do this, than resample the
image to be a perfect fit.
Step Two—Bright Halo Reduction
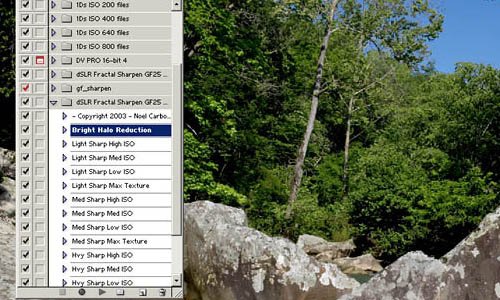
Image #4
In Image number 4 you can see that I have opened the Fractal Sharpening
action and have selected the “bright halo reduction” option.
Hit the play button and let this part of the action run to completion.
When it’s finished, you will be brought back to the main screen,
with the action palette open. This part of the action takes very little
time on a moderate system.
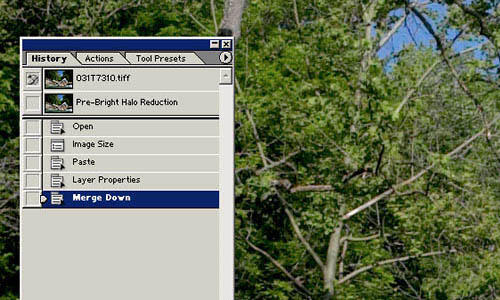
Image #5
I have included a quick view of the history palette in image number
5, so you can see what steps were run. The effect of the “bright
halo reduction” is very slight on most images. However, with
the history Palette open, you can click back and forth between the
first and last step to see the effect on the image.
Step Three—Running the GF Sharpening Action
You are now ready to run the main sharpening action. For this, all
you have to do is select from the list of sharpening settings the option
that best fits your image. In this case, my image was taken at ISO
100, and there is not much noise present, expect in the blue of the
sky. In the image, there is a lot of detail that I would like to see
sharpened. This includes the various tree leaves in the background,
but also the lichen formations on the rocks. I don’t really want
to see the water in the foreground sharpened or the solid blue of the
sky. In the middle of the image, you can see several smaller branches
which stand out against the bright blue of the sky. Since I have already
treated the image with the bright halo reduction step, I am not as
worried about the small branches in the center of the image being over-sharpened
and thus developing haloing. For this sharpening step, I choose “Hvy
Sharp Low ISO”.
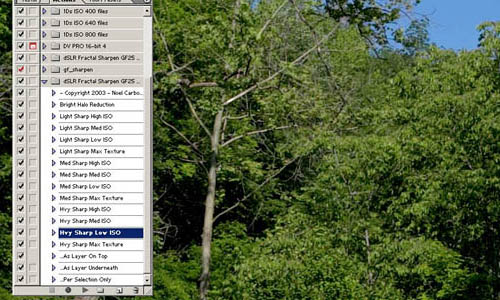
Image #6
After selecting the sharpening option from the action menu hit the
play button and let the action run as shown in image number 6. This
is the step that takes the most time. This is not a reflection on Noel’s
action but instead on the speed at which Genuine Fractals takes to
run. As I mentioned before, GF is a very processor intensive filter.
I would recommend that you not have any other applications or Windows
OS processes running during this step (except you use a dual processor
machine). Also make sure that you watch the process indicator box on
the bottom right of your screen. This will allow you to monitor the
actions’ progress.
One thing to note, if you minimize Adobe while the action is running,
then don’t try to bring it back to the front for a while as more
than likely Photoshop will produce a screen freeze. This doesn’t
mean your system has locked up, but instead, your Windows OS can’t
free up enough resources to bring your full screen session back. The
action is still running in the background and if you wait around 8
minutes, then it will be finished and you can reopen your full Photoshop
session.
Step 4 Four—Adding an Adjustment Layer and Fine Tuning
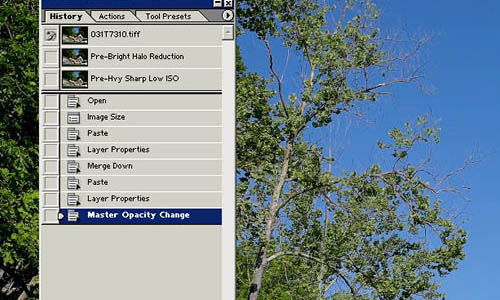
Image #7
Once the action has finished, you will be presented with the final,
sharpened image. By looking at image number 7, a screen shot of the
history palette, you can see how easy it is to switch back and forth
between the sharpened and unsharpened image. This is a nice feature
as it allows a quick transfer back and forth so you can check various
spots to see if you like the overall sharpened effect.
Fine tuning a sharpened image most often involves fading the effect
of a sharpening filter. With an action, if you put the sharpened image
in its own layer, you can then fade the intensity of the layer to act
as a fade. Noel included a final step in his action that allows you
to do just this.
When the action has finished sharpening, go back to the main action
palette and select either of these options,
--as layer on top
--as layer on bottom
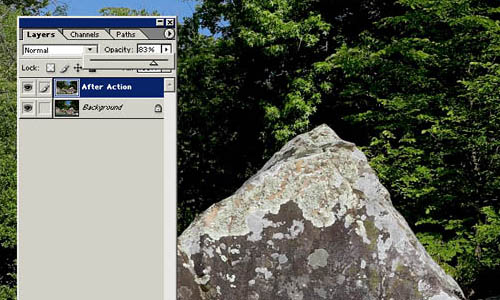
Image #8
It’s my preference to put the sharpened image in a layer on top.
Once you select either of the options, you will be presented with a
layered solution. Your original image will be in one layer and the
sharpened image in the other. You can now fade the intensity of the
sharpened layer as shown in image number 8 to fine tune the amount
of sharpening. Once you are finished, you can either save the image
with the layer intact or flatten it. I prefer to keep the layer intact
as I may want to change the sharpening later on and this means I don’t
have to go through the entire process again.
Now that we are finished and have a sharpened image, let’s end
by taking a quick look at some before and after crops.
I choose 4 separate crops of the image which I feel are good representations
of what Noel’s Fractal Sharpening Action can accomplish.
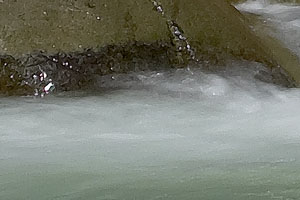 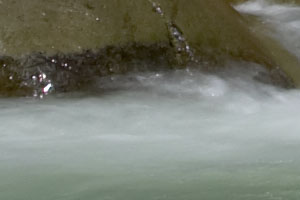
Sharpened/Unsharpened (Images 9/10)
In this comparison, image number 9 was sharpened and image number
10 is the base image with no sharpening applied. What to look for here
is if the tool has picked up unnecessary noise in the water and sharpened
to the degree that the noise is detracting from the image. By looking
at the sharpened image, number 9, you can see that the rock at the
top of the image was nicely sharpened and a lot of its smaller details
now stand out. In the foamy area below the rock, the sharpened image
shows some nicely enhanced features of the water. Noel’s tool
did not attempt to over sharpen the water below the foam, but it did
pull out some nice wisps and curls in the water and these now add to
the image.
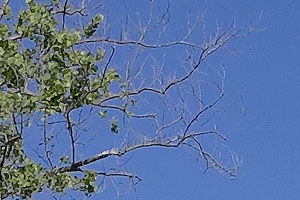 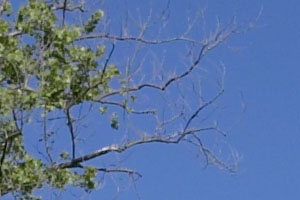
Sharpened/Unsharpened (Images 11/12)
Images 11 and 12 are crops taken from the middle of the original image.
This part of the image has a lot of smaller branches in the distance
and many small tree leaves. Here you can see just how well the Fractal
Sharpening Action works on this type of detail. Since I ran the “bright
halo reduction” step first, the tool has been able to sharpen
all the individual tree limbs but not produce any haloing. Even more
important is that the blue sky in the background was untouched. So
many sharpening tools will take a solid color like a blue sky and actually
add noise. It’s as if the tool can’t determine what should
be done in this space and gets confused. This type of added noise or
what I call “digital confusion” can be very distracting
from the overall image as it will have an un-natural look to it. Images
11 and 12 are an excellent test for a sharpening tool and Noel’s
Fractal Sharpening did a wonderful job here.
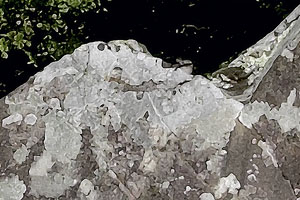 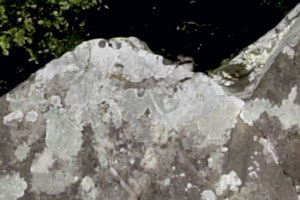
Sharpened/Unsharpened (Images 13/14)
Images 13 and 14 are crops from the middle foreground of the original
image. Here you have both a piece of the rock in the foreground and
some of the distant bushes. The goal here is to pull as much detail
out of the bushes and rock, but not to create a heavy edge to the rock.
Some sharpening tools will be excessive on edges, especially edges
where you have a transition. In this example, there is a transition
from the bright rock of the foreground to the darker green of the bushes.
In these crops you can start to see the real power of Fractal Sharpening.
The rock in the foreground just leaps out at you. Notice all the finer
details of the rock that are now visible and the edges of the various
lichens on the rock. Everything is crisp and sharp. Now move to the
background and look at the bushes, again an amazing amount of detail
is present. No over sharpened look to anything, as there is not any
haloing or digitized look to the bushes. Also note that there wasn’t
a color shift in the bushes either. Sometimes as you increase the sharpness,
you will start to pick up a color shift as the actual sharpening process
is changing the way the pixels are viewed by Photoshop. This effect
is easy to see as details in the distance will all get lighter color
to them. Also notice that the darker areas to the upper right of the
sharpened crop didn’t pick up any more noise. The Fractal Sharpening
action was able to do some excellent selective sharpening here.
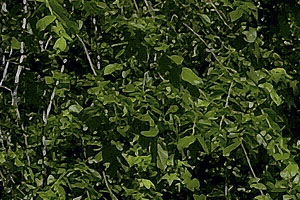 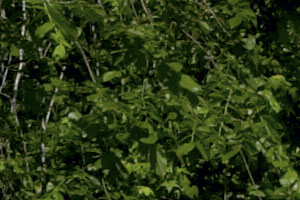
Sharpened Unsharpened (Images 15/16)
I wanted to include these last two images, 15 and 16 as they show
just how well Fractal Sharpening will work on individual leaves. If
you look at the sharpened crop, image number 15, you can see that Noel’s
tool has made the details on the leaves stand out beautifully. You
can see the individual folds and veins of the leaves. On the smaller
tree limbs notice that you can see all types of details that are not
very clear on the unsharpened image.
Conclusion
I have to say; yes I am very impressed with Fractal Sharpening. If
you own Genuine Fractals, it’s a no brainer, here, go to Noel’s
site and buy this tool, since at $15.00 it’s a deal. If you don’t
own Genuine Fractals, I would strongly recommend that you go out and
purchase it just so you can use this action, it’s that good.
The last time I checked on the www.lizardtech.com site, the base license
of Genuine Fractals cost 159.00. They also offer a “lite” version
of GF, but you are limited to a file size of 10mb.
If you are a Mac user, then don’t fret, Noel has a version of
Fractals Sharpening that works with the Mac. The pre-requisites are
the same, a copy of Photoshop and Genuine Fractals for the Mac.
But all not is rosy. If you are working with larger files, then this
tool will take a good bit of time to run. This speed is totally dependent
on how fast your system will run Genuine Fractals. The image I worked
on for this review was an 11mp 1Ds image that was 32mb and a 8 bit
image. If you take an image much larger than this and work it with
Fractal Sharpening, you can expect a longer processing time.
On my 1.8 GHz, W2K machine, Fractal Sharpening took around 10 minutes
to complete. On my 850 MHz laptop, with W2K, the same image took over
25 minutes. So if you are working up a lot of large images, then Fractal
Sharpening might not be a good tool to use, unless you have a lot of
system power to throw behind it. Again, this is due to Genuine Fractals’ run
time. I have worked with GF now over 4 years, and Lizardtech with GF
version 2.5 is still using the same slow out dated algorithm that they
started with.
There is a newer version of GF which is called Genuine Fractals 3.0
I don’t know if GF 3.0 has an improved algorithm which would
provide a faster run time. I have asked Lizardtech many times over
the year if 3.0 has any changes to improve the speed but they have
not given me an answer. The FAQ on their website only references the
older version 2.5.
With my larger 67mb to 100mb images created by stitching, I routinely
split the image into two separate pieces and then run Fractals Sharpening
on the two sections. It’s a simple step to reassemble the two
after the sharpening is finished.
So I leave it up to you, try it and see what you think, I believe
that you will be impressed with your results.
PROS CONS
| PROS |
CONS |
| |
|
Excellent results
Simple Action Design
Price $15.00
Ability to save in a layer built in
|
Slow speed of Genuine Fractals
Pre-Requisite of Genuine Fractals being installed
|
Other Reviews
Review Note by Uwe Steinmueller
For further information:
Noel’s Fractal Sharpening can be found here:
http://actions.home.att.net/dSLR_Fractal_Sharpen.html
More information on Genuine Fractals can be found at:
http://www.lizardtech.com/solutions/gf/
I have enjoyed working with Noel on this action. If anyone has any
questions for me, I can be reached at:
pcaldwe@aristotle.net
|