The first two parts of this series examined
how to manage new images that I bring into my workspace (panoramic
images as well as images copied over from my travel notebook).
Part 3 examines how to organize my existing images with a specific
purpose in mind: Photo Blogging.
Photo-Blogging
Yes, I go with the times. I photo-blog (check
out my blog at http://www.marinphotoblog.com) And there are multiple
reason
for doing so, from having to work
with my images all the time to being able to publish my work in
a new output format (the web, as opposed to print) to forcing myself
to get out of my comfort zone by doing what I’m not so good
at (street shooting, people, sports) and not just doing the same
old landscapes and panoramas. It’s actually a very interesting
experience, so I’m glad that I started my blog.
But photo-blogging
also creates some interesting workflow challenges:
- Some of my
images that are not good enough for printing (e.g. too much
cropping needed and thus not enough pixels for printing),
but are still good enough for posting on the web. So they exist,
but not in my archives.
- Some non-keepers tell a story and are
perfect to be posted on a blog, but not good enough for print
- Some
keepers, esp. landscapes, are not that interesting when scaled
down to 600 pixels wide
- Since the theme of my blog is images
from the county I live in, some of my best images are not “eligible”,
since they were taken somewhere else
- Keeping an editorial calendar
and thus tracking images as posted, candidates or potential
candidates
- Using a set of keywords on my blog that might not
match the keywords I use in my image archives
- Do I need to
keep derivatives for photo-blogging?
Thus, the
real workflow challenge for me is organizational and not so much
how Lightroom could help me to get an image up on
my blog. In fact, my hosting provider has such a buttoned-down
implementation
of Wordpress (the blogging software) that I have to use their
interface and have no other means of posting, be it from Lightroom
or any
other imaging software package.
To get an image ready for posting,
I run the image through an action on Photoshop that resizes an
image in 3 steps from its
original
size to an image which is 600 pixels wide (600 pixels is my own,
arbitrary standard for posting all my images on the web.) During
each step, the image will be sharpened with a decreasing amount.
More than 90% of all the images sharpened with this action look
usable and do not have to be manually resized and sharpened.
Once completed, I save them as JPG and use a browser to post
the image
to the web. There’s nothing that Lightroom can do to help
me with this task. And while I save the JPGs in a separate folder,
I don’t manage them in Lightroom, since I don’t have
to keep derivatives!
But there’s plenty that Lightroom can
help me with with regards to organizing my images. Here’s
how I implemented it:
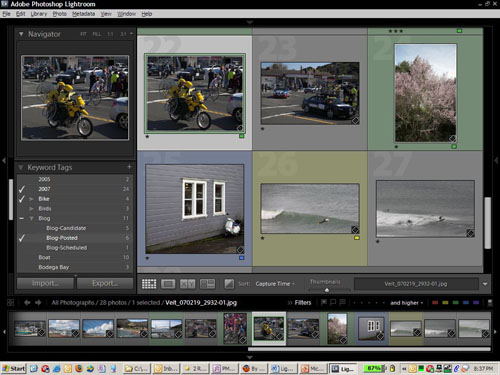
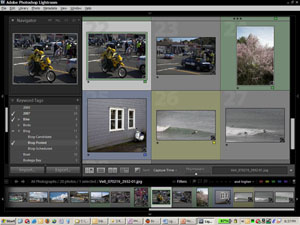
Color-Labeling and Keyword Tags help to organize images for my
photo blog
For my keepers, I’ve always used Photoshop’s
rating system that allows me to assign stars to my images. I
have not used the color labeling in the past, so I simply color-labeled
my images that I tagged for my blog: Green for posted, Yellow
for
Candidates and Blue for Scheduled.
Even more importantly, I built
a keyword tag hierarchy and assigned the keywords “Blog” and
the nested keywords “Blog-Posted”, “Blog-Scheduled” and
Blog-Candidate” to all my images that are on my blog or
will potentially appear there. Whenever I post a candidate, I
remove
the “Blog Candidate” keyword and then drag the image
on “Blog Posted” to change the keywords to reflect
its new status. With “Export XMP Metadata To File” switched
on, all these keywords are immediately written into the image
file (or an XMP sidecar file for any RAW images), so the
keyword
structure is somewhat visible outside of Lightroom and Photoshop
as well.
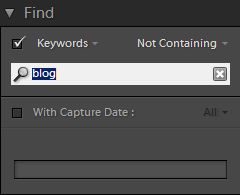
No problem to select all the images that are NOT in your blog
yet
Of course, I can use my keyword tags in any searches. If I
want to see all my images associated with my blog, I just click
on “Blogs” in
the Keyword Tag sections to see what’s associated with
my blog. Even better, if I want to see all my images that are
not
associated (which I often want to do when planning an editorial
calendar), I can use Lightroom’s Find function and search
for all images not containing the keyword “blog”.
The power of metadata search at work!
The keyword tag system is
scalable. If I were to start a second photo blog called “Sonoma
Photo Blog”, I’d create
a nested keyword tag for “Marin Photo Blog” under
the “Blog” keyword
and then drag all the existing images on it. Then I’d create
another nested keyword “Sonoma Photo Blog”. For any
new image, I’d drag it to the blog keyword as well as the
status keyword (Posted, Candidate, Scheduled). It’s that
easy.
However, the color labeling is not scalable, since Lightroom
only supports one set of 5 color labels. While not strictly necessary
(the keyword tags would suffice), I like the visual cue to see
whether an image is posted in my blog. Maybe Adobe will implement
multiple instances of meta-tags in a future version, so you could
have color-labeling or rating based on the metadata instance
you
are using?
I realize that there are different ways to implement
this functionality. My implementation not only works for me,
but it seems to also
be future-proof. And that’s all I’m asking for!
The
last part of this series will look into posting large collections
of images on the web. |