| Motivation
Our top selling tools are:
From the outside it is often not that easy to draw the line. Lets look at their different roles:
This leaves the often asked question: How do Detail Resolving and Sharpening relate to each other in the image workflow? We now think that it is best to run EasyS Plus first (gets the fine structures) and the run EasyD Plus or Detail Extractor. If this is the case then integrating both parts into one tool makes a lot of sense. The new EasyDS Detail & Sharpness Resolver is the logical answer to this workflow demand.
Note: EasyDS stands for Easy Detail & Sharpening
Installation
The DOP EasyDS Detail & Sharpness Resolver comes as a Javascript file for Photoshop CS3/CS4 (we only support CS3/CS4).
- Full version is named: DOP_EasyDS_DetailSharpnessResolver.jsx
- Demo version is named: DOP_EasyDS_DetailSharpnessResolver_Demo.jsx
There is also a script: DOP_EasyDS_DetailSharpnessResolver_NOUI.jsx that we cover later
Installing the scripts
The scripts need to be copied to the Photoshop CS3/CS4 folder and here to Presets/Scripts (or to the equivalent locations for other languages). After restarting CS3/CS4 you should find the script under File->Scripts. If you do not find it there you did not put the script into the proper location.
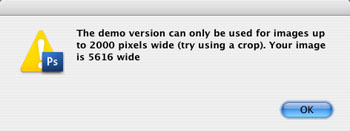
Note: The free demo version can only handle images up to 2000 pixels wide. The commercial version does not have this restriction. You will get this warning message if you use larger images with the demo version:
Using the DOP EasyDS Detail & Sharpness Resolver
Using the script
Using the script is simple. Best you have the top layer selected. Open the script from File->Scripts

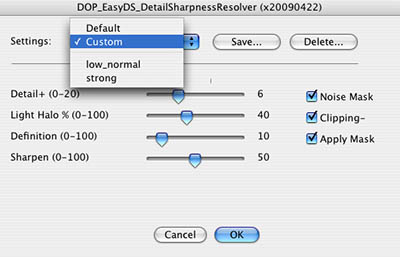
The DOP EasyDS Detail & Sharpness Resolver provides 4 sliders and 3 optional options.
Note for EasyD Plus users: The top 3 sliders and top 2 check boxes behave exactly like in EasyD Plus (there is no control for shadows in this tool).
EasyDS first performs some sharpening (using EasyS technology) and then runs like EasyD Plus on top,
What are these parameters?
- Detail +: Adds some extra low radius sharpening to the image
- Light Halo %: Details get visible by creating a stronger local micro-contrast in the image. This means that some parts of the image get darker and some get brighter. Sometimes the image looks better if the brighter parts would be less pronounced. This slider allows controlling the bright component from 0 to 100%.
- Definition: Add more pop or sometimes called “Clarity” to the image. The image looks sharper or more defined to our eyes. Stay at lower values to avoid halos.
- Sharpen: This controls how much sharpening using EasyS Plus tools is done before the detail resolving is performed
- Noise Mask: If the image has large smooth areas the Noise Mask feature should be activated. This way the noise in these areas gets less pronounced. We most often use Noise Mask on. See also in the samples a more detailed discussion.
- Clipping-: If checked the image gets mapped into the range 8-247. This means there are no clipped extreme highlights and shadows (we have this option often on).
- Apply Mask: If you use the noise mask it is applied to the layer.
If the effect is too strong you can do two things:
- Lower the opacity of this layer
- Run the filter again at lower values.
After you run EasyDS Detail & Sharpness Resolver it will create a new layer:
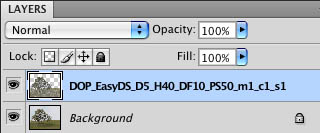
The layer name shows all the settings used. Here is an example:
DOP_EasyDS_D5_H40_DF10_PS50_m1_c1_s1
D+10: Extra Detail 5
H40: 40% bright component
DF40: 10 definition
PS50: Sharpening 40 (using EasyS tools)
m1: Noise mask created
c1: Clipping- checked
s1: Apply noise mask to layer
Presets
You will find that images from a camera model and of a certain style require all the same settings. That is why we support named presets.
You can save named presets of any settings you like:
You can save, recall and delete presets.
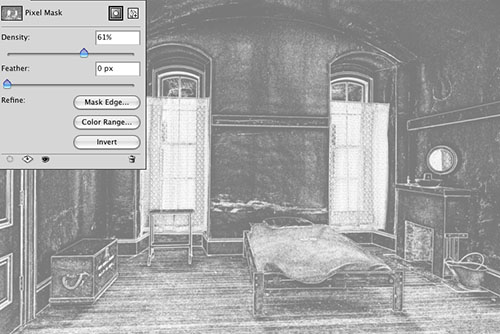
Changing the noise mask density
Because we use a noise mask we also can change the mask density. The lower the density of the mask the less the seemingly (because some detail can look like noise) noisy areas are protected and the detail & sharpness will show stronger.
Photoshop CS4 has a new way to change the mask density (non-destructive):
Changing the density of a mask is also not hard in CS3 (but it is destructive). Just select the mask and apply a curve of this kind:
Workflow Tips
- It is wise to sharpen very little in your RAW converter before you use EasyDS . All halos you have created before will get amplified.
- If the enhanced image shows too much noise remove the noise from the shadows before running EasyDS.
- The default values will work just fine on many types of images. Start using the defaults.
Note: If you run EasyDS multiple times with the exact same settings you need to rename the previous layer before you proceed.
What about previews?
EasyDS does not show previews. But there is an easy way to work around this.
- Duplicate the image (with flatten)
- Crop the section you like to inspect
- Run EasyDS on the crop (will be much faster)
- Iterate till you like the settings
- Close the duplicate image
- Run EasyDS on the full image (the last recent settings you used on the duplicate image will show up)
Creating Scripts for Batch Processing
Sometimes you want to run EasyDS with certain settings without using the dialog (e.g. for batch processing). With EasyDS you can actually create your own custom scripts.
Use the script DOP_EasyDS_DetailSharpnessResolver_NOUI.jsx as a template:
var runScript = app.path + "/" + localize("$$$/ScriptingSupport/InstalledScripts=Presets/Scripts") + "/DOP_EasyDS_DetailSharpnessResolver.jsx" ;
var defSetting = "LastUsed";
$.evalFile(runScript); |
This script actually runs using the last settings that are automatically recorded as a preset called "LastUsed".
Now if you want to create your own script you do the following:
- Create a preset in EasyDS (e.g. "strong")
- Open the "DOP_EasyDS_DetailSharpnessResolver_NOUI.jsx" script.
- Replace "LastUsed" by your own preset name (here "strong"). Leave the rest of the script unchanged.
- Save the script with a new name to your CS3/CS4 script folder
var runScript = app.path + "/" + localize("$$$/ScriptingSupport/InstalledScripts=Presets/Scripts") + "/DOP_EasyDS_DetailSharpnessResolver.jsx" ;
var defSetting = "strong";
$.evalFile(runScript); |
Samples
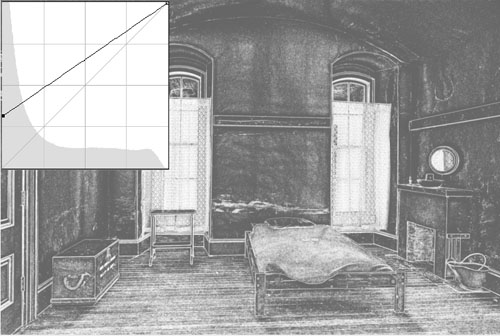
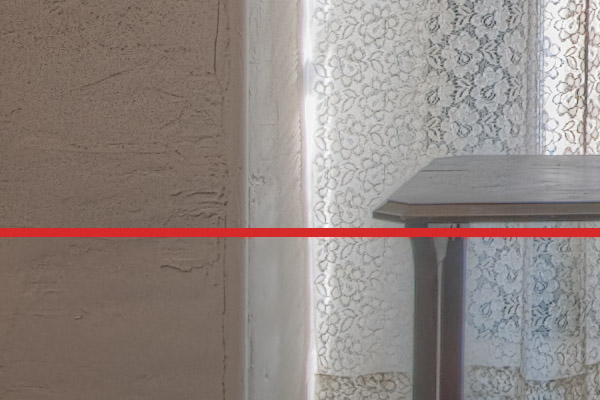
Sample #1
21MP Canon 1Ds3 image

Before/After using EasyDS default settings at 100% pixels
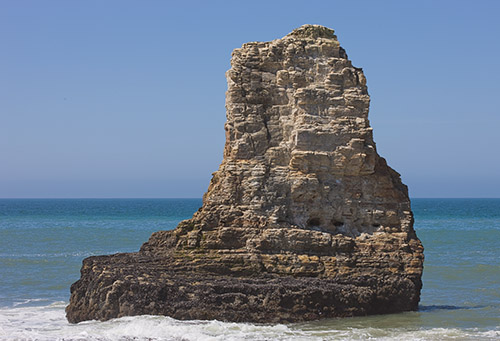
Example #2
21MP Canon 1Ds3 image
Before/After using EasyDS default settings at 100% pixels
If you feel like it you could lower the layer opacity. You can see how very fine details are resolved and sharpened.
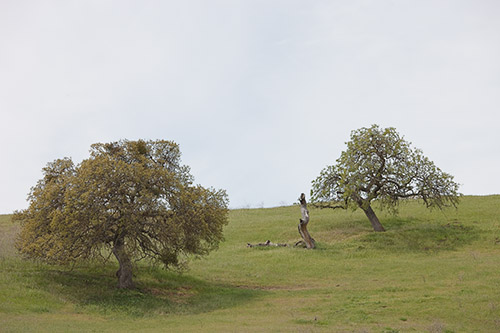
Example #3
10MP Olympus E-3 image
 Before/After using EasyDS default settings at 100% pixels Before/After using EasyDS default settings at 100% pixels

On the left without noise mask and right with noise mask
This is an example that shows how the noise mask protects noisy regions.
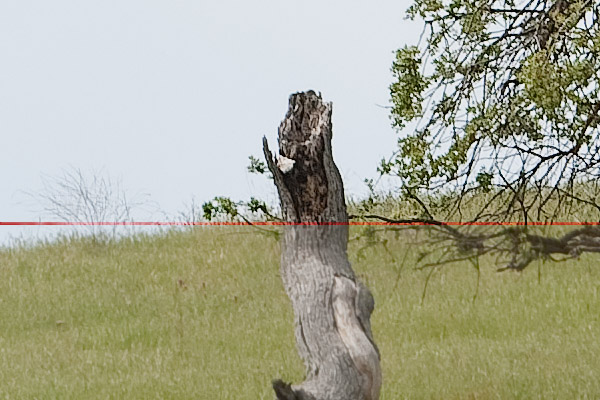
Example #4
24MP Nikon D3x HDR image
Before/After using EasyDS default settings at 100% pixels
Top with noise mask density tuned down (CS4), bottom 100% noise mask
By lowering the noise mask density you can gain detail. Watch that you don't just get the noise amplified.
Conclusion
If you want ultimate control using EasyS Plus and EasyD Plus maybe the way to go. But EasyDS offers a good hybrid solution at a good value. To honor our loyal EasyS Plus and EasyD Plus customers we offer EasyDS to them at a good discount.
As always try before you buy. |


