DOP EasyD Plus DetailResolver is an improved version of our popular EasyD DetailResolver. The new version includes all the functionality of EasyD. The top two sliders and top two check boxes do the same as in EasyD. Actually if the “Definition” and “Shadow Brighter” sliders are set to zero it behaves like EasyD.
Note: EasyD stands for Easy Detail
We continue to offer EasyD.
Installation
The DOP EasyD Plus DetailResolver V1.0 comes as a Javascript file for Photoshop CS3/CS4 (we only support CS3/CS4).
- Full version is named: DOP_EasyD_Plus_DetailResolver.jsx
- Update version is named: DOP_EasyD_Plus.jsx
- Demo version is named: DOP_EasyD_Plus_DetailtResolver_Demo.jsx
Note on updating
If you own a licensed version of DOP EasyD Detail Resolver 1.0 you can buy an update. This earlier version of EasyD has to be properly installed on your machine. Then the update script DOP_EasyD_Plus.jsx script turns it into a full version of EasyD Plus. If you get this dialog
it means that you have no full licensed version of EasyD properly installed on your machine.
Installing the script
The script needs to be copied to the Photoshop CS3/CS4 folder and here to Presets/Scripts (or to the equivalent locations for other languages). After restarting CS3/CS4 you should find the script under File->Scripts. If you do not find it there you did not put the script into the proper location.
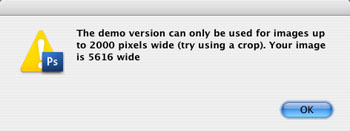
Note: The free demo version can only handle images up to 2000 pixels wide. The commercial version does not have this restriction. You will get this warning message if you use larger images with the demo version:
Using the DOP EasyD Plus DetailResolver
Using the script
Using the script is simple. Best you have the top layer selected while working with the EasyD Plus tool. Open the script from File->Scripts

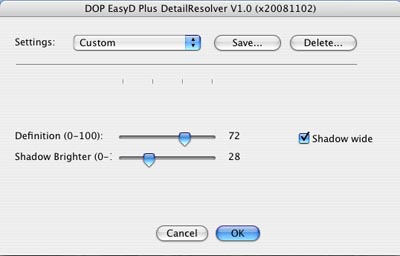
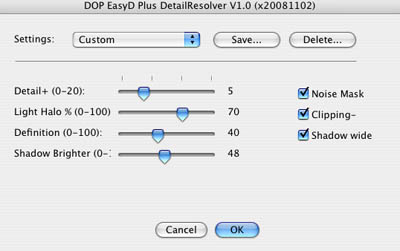
The DOP EasyD Plus DetailResolver provides 4 sliders and 3 optional option.
What are these parameters?
Identical to the sliders in EasyD:
- Detail +: Adds some extra low radius sharpening to the image
- Light Halo %: Details get visible by creating a stronger local micro-contrast in the image. This means that some parts of the image get darker and some get brighter. Sometimes the image looks better if the brighter parts would be less pronounced. This slider allows controlling the bright component from 0 to 100%.
- Noise Mask: If the image has large smooth areas the Noise Mask feature should be activated. This way the noise in these areas gets less pronounced.
- Clipping-: If checked the image gets mapped into the range 8-247. This means there are no clipped extreme highlights and shadows (we have this option often on).
New functionality in EasyD Plus:
- Definition: Add more pop or sometimes called “Clarity” to the image. The image looks sharper or more defined to our eyes.
- Shadow Brighter: Opens up the shadows. We added this functionality to allow more open shadows while improving detail and definition.
- Shadow wide: Allows a wider tonal range of shadow to be effected by “Shadow Brighter”.
If the effect is too strong you can do two things:
- Lower the opacity of this layer
- Run the filter again at lower values.
After you run EasyD Plus DetailResolver V1.0 it will create a new layer:
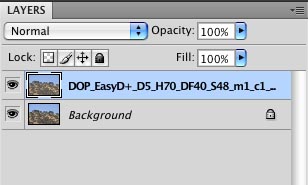
The layer name shows all the settings used. Here is an example:
DOP_EasyD+_D5_H70_DF40_S48_m1_c1_s1
D+10: Extra Detail 5
H70: 70% bright component
DF40: 40% definition
S48: Shadow brightening 48%
m1: Noise mask applied
c1: Clipping- checked
s1: Wider shadow effect on
Presets
You will find that images from a camera model and of a certain style require all the same settings. That is why we support named presets.
You can save named presets of any settings you like:
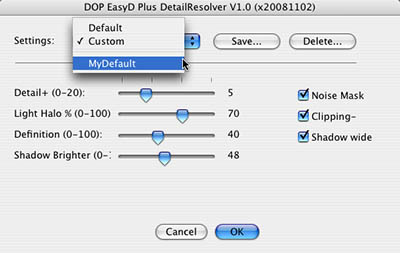
You can save, recall and delete presets.
Workflow Tips
- It is wise to sharpen very little before you use the EasyD Plus. All halos you have created before will get amplified.
- If the enhanced image shows too much noise remove the noise from the shadows before running EasyD Plus.
- The default values will work just fine on many types of images. Start using the defaults.
Sample #1
The challenge of this photo was that the crabs are under water. EasyD Plus showed better local contrast and definition to do the scene some justice.

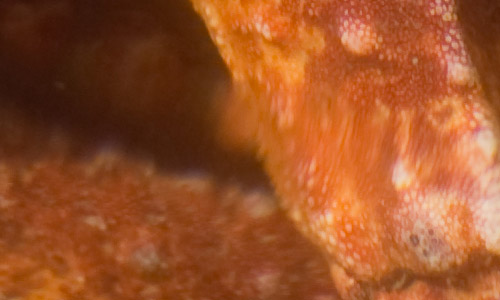
Before (from a Nikon D700 at 100% pixels)
We used the default settings for this image.
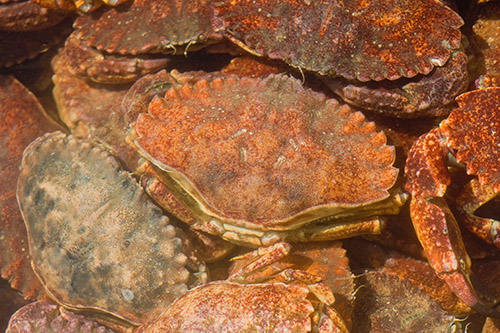
After
Sample #2
We photographed these kind of scene many, many times. For our eyes these trees looked like "Feathers" against the golden hills. But to give the same impression in our image we need to show the fine structures of the trees and separate them from the hill. To our eyes EasyD Plus exactly delivers this.
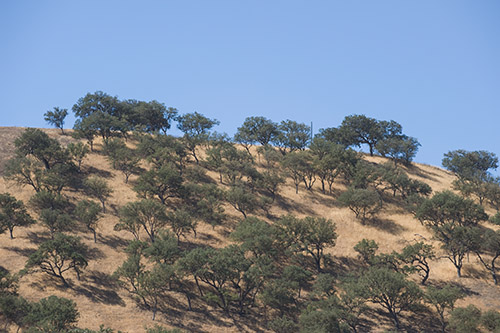

100% pixel crop
Settings: Slightly more open shadows

After
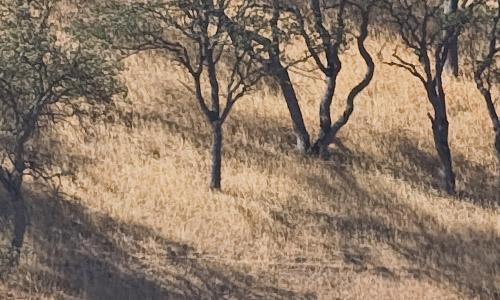
After: 100% pixel crop
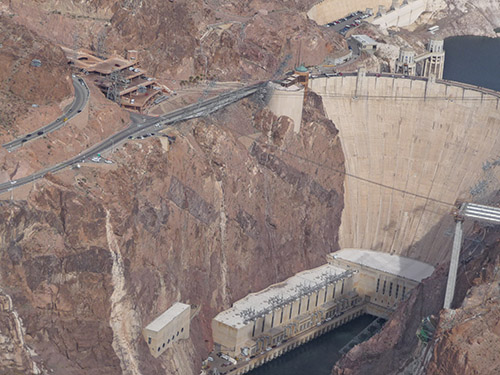
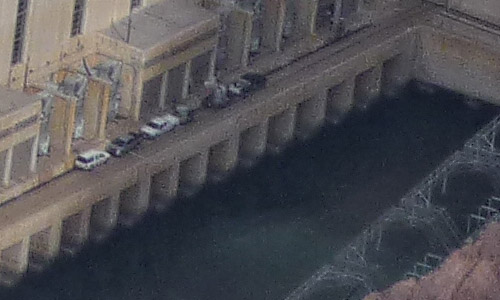
Sample #3
This is a photo from a helicopter in JPEG using P&S camera.
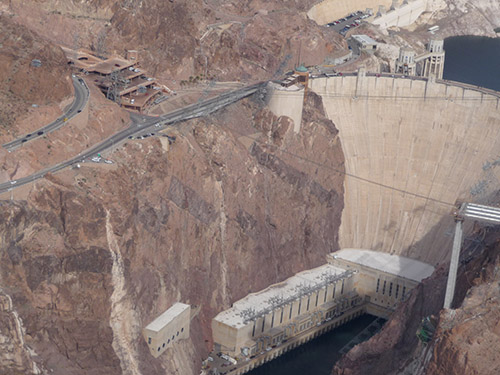
Before
Before 100% pixels
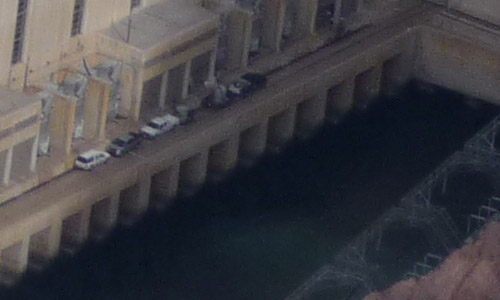
After
After at 100% pixels
Of course EasyD Plus cannot undo the limitations of the noise and grain of the small sensor. But clearly the image became way more usable. |


