In November 2002 we had the very first review
of Capture
One and time has proven that Capture One was a very
influential raw converter as all the other converters played
catch up. As of now Capture One is still a very fine raw converter
but
Camera Raw, Canon DPP and Bibble are getting close.
Today we introduce the first version of a completely new raw
converter: the Pixmantec RawShooter essentials (RSE)". We
think that this will also mark a new milestone for raw converters.
You have
probably never heard of Pixmantec and be skeptical how they will
be able to challenge the current well established raw converters.
There is one very strong indicator: the same developer who originally
created Capture One (Michael Jonsson) is one of the founders
of Pixmantec
and architect of RSE. RSE is based on a completely new architecture/design
to build
tools for photographers. RSE is the first step to create new
photographer's tools by Pixmantec.
If you work with RSE you will realize that the design goals
were:
- World class raw conversion
- Simplicity
- Easy workflow
- Photographer centric (means intuitive use for photographers)
We personally regret that there is currently no Mac version
available. These are business decisions which we do not plan
to comment. We still hope for all Mac users that there maybe
a version
with this technology in the future.
Disclosure: We work as beta testers for Pixmantec.
RawShooter essentials
RawShooter essentials
RSE looks like a very basic and
simple application. Don't get fooled as simplicity is a priority
design goal and way harder to make than bloated applications.
RSE will be for a limited period
of time available for free. The only thing you need to do is
to register
your
application. Sounds like a strange business model, right? The
idea behind this is that as many as possible users give RSE a try
and then decide to buy the next version that will add more workflow
and imaging features. For the record, we start now using RSE
as our main raw converter. This means that RSE indeed contains
most "essential" features that we would expect from
any good raw converter.
Camera raw formats used in our
preview:
- Canon D30, D60, 10D, 20D, 300D, 1D, 1D Mk. II, 1Ds, 1Ds Mk.
II, Pro 1
- Nikon D100, D70, D2h, Coolpix 8700
- Olympus E1, E300
- Konica Minolta A2, 7D
- Adobe DNG
Note: The Pixmantec data sheet mentions some
cameras that are right now not supported (e.g. Fuji and Kodak).
Maybe in future releases.
Note: We used the RSE on
a couple of thousand raw files from many different cameras.
Getting Started (setup)
Note: Even if
we cover a lot of details this is not a manual or tutorial. Although
most users of other raw converters should find their way after
reading this article.
After the installation you have
to register and RSE is ready to go. There is not a lot to setup
but we did the following:
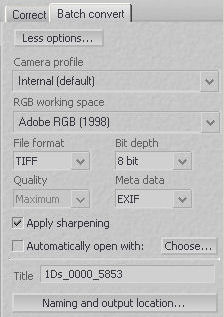
- Select the "Batch convert" tab.
- RGB Working space: We use either
8bit Adobe RGB or 16 bit ProPhoto RGB
-
All as shown on the screen shot
-
This is the first raw converter that we use with sharpening
"on". Later we may only add some minor sharpening with
EasyS
-
You can also open the converted files
directly into Photoshop. We don't use it most of the
time as we have a different browser watching the folder
with the converted files
-
You can also use own camera profiles.
We think the internal profiles are quite good. This
article will not feature how to use own profiles but
RSE fully supports such profiles and their creation
process (see preferences).
Note: Select the the .EXE file
and not the shortcut: e.g. Photoshop.exe from the Photoshop folder.
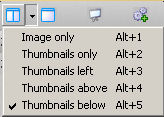
- Open the "Naming and output location dialog"
- We have a special folder for all converted files
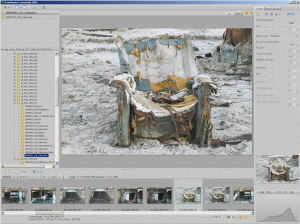
The RAW File Browser
Note: As the name
says this is a browser for raw files only.
The raw file browser supports quite
a few features. First you can select from 5 layouts that you can
switch on the fl. We use option #5 in film strip mode:
Our main layout looks like this:
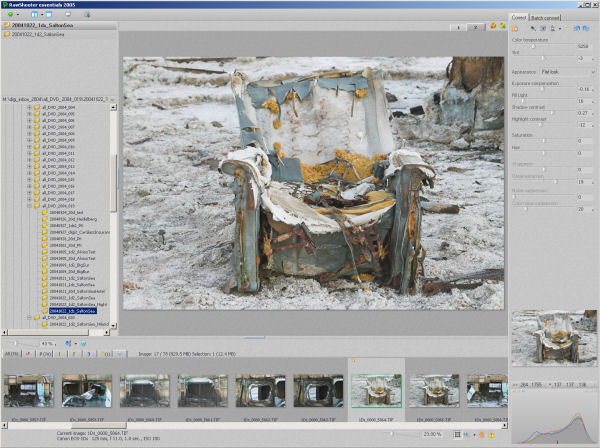
Viewing option #5 with film strip mode
On the left you find the folder
browser and the favorites list:
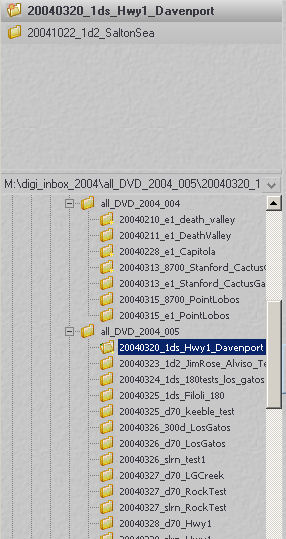
At any time you can add a folder
to the list of favorites (either right context menu or via drag/drop).
Favorites are crucial to get fast to your last projects.
Once you select a folder RSE will
start to create previews and thumbnails. RSE is probably very
fast but still using folders with many large raw files will
take some time. There are two indicators in RSE that the preview
building is still in progress:
Busy wheels
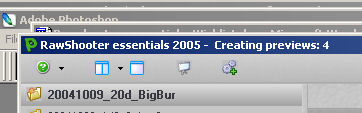
Window top border shows how many previews are still to be created
Once the previews have been created
the workflow is pretty fast. The film strip area allows to organize
your images in different priorities:
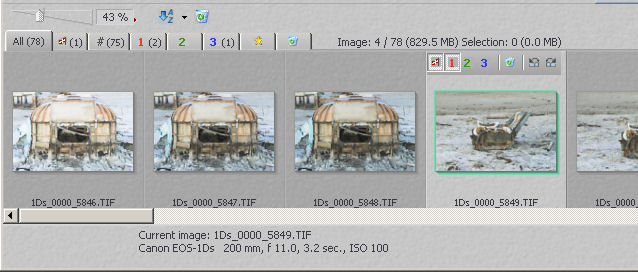
Film strip
There are 8 tabs on top:
- All images in the folder
- All flagged images in the folder
- All images that have no priority and are not marked for deletion
- Images of priority 1, 2 or 3 (you can easily tag all files)
- Recently processed images
- Images marked for deletion (if you then finally delete them
they are gone for good)
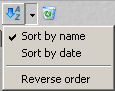
The film strip toolbar allows to control the appearance:

- Size of the thumbnails
- Sorting order (name or date)
- Finally delete the images marked for deletion
For any single image you can perform the following operations
on the thumbnails:
- Flag image
- Set priority 1, 2 or 3
- Mark for deletion
- rotate by 90 degrees left or right
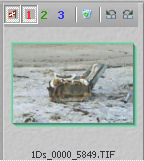
Once we have selected a folder and want to work on a single
image we use the full image view (TAB toggles between both views):
Work view
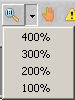
You can scale the image up to 800%.
100-400% are pre defined settings:
RSE allows to conveniently toggle
between "fit View" and the last selected zoom level
by using "Shift + TAB".
If you work with zoom levels the
navigator panel helps to find the right spots:
Here are the controls for the main
view:

- Zoom level
- Fit to screen
- Zoom presets
- Hand tool (better use the space bar)
- Show under/overexposure warning colors (can also be activated
on demand using the Ctrl key)
Preview Size
Unlike Capture One RSE provides full sized previews for all
cameras. Working with 100% views or larger is also much more
convenient
than in Capture One (check out the slide show - see below).
Deletion Workflow
Deleting files is a much needed and critical process. In RSE
you can mark files for deletion on a folder by folder basis.
Once you have marked all files that you want to delete for a
certain folder you can revisit all these files in the "marked
for deletion" tab (e.g. present them in a slide show - see below).
To undelete a file just uncheck the deletion mark on the thumbnail
pane. Once you are certain that you want to delete the files
click on the waste basket icon and remove the images for good
(they won't show up in your system waste basket).
Important Keyboard Shortcuts
- TAB: toggle browser to image view
- Ctrl: show overexposure indicator colors
- Ctrl+TAB: toggle between zoom and fit size view
- Alt+E: Auto exposure (good start)
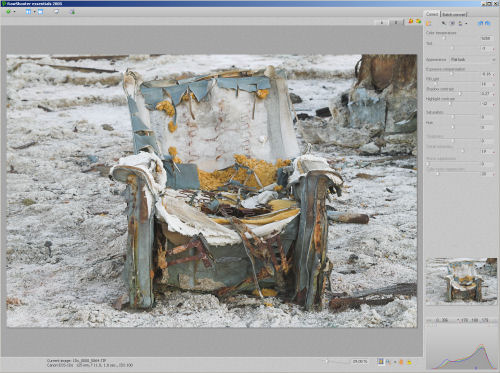
Image Corrections
All the correction tools are on one "Correct" tab:
All essential image corrections fall into the following
categories:
- White Balance (WB)
- Exposure and Tonality
- Color tuning
- Sharpness and detail
- Noise handling
Future versions of RS (RawShooter) will most likely feature
also:
- Moire removal
- Chromatic Aberration (CA) handling
- .......
The "Correct" toolbar:

From left to right:
- Apply settings to other selected images
- Activate WB gray balance tool (we just use shift+click instead)
- Set WB to "as shot" in camera"
- Auto WB and auto exposure. Auto exposure often provides a
good starting point (Alt+E)
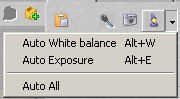
- Back to last settings
- Forward to last active settings
Because we are here at some undo/redo feature it is a good place
to show a very powerful RSE tool: Snapshots
You can create as many snap shots as you like and all these snapshot
settings are stored for later use.
Note: RSE stores all image settings in a sub
folder with the name: ".RWSettings" and all settings files have
the file
name with the suffix "*.rws".
Note: We only use appearance "Flat look" as
we think this provides us the most control. Don't worry RSE allows
you easily to bring a "flat" image to life.
Setting White Balance (WB)
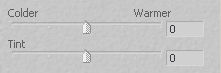
WB by Colder/Warmer
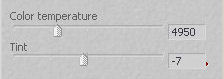
WB by color temperature
White balance works as usual. The
key correction methods are via color temperature or clicking
on a
light neutral
gray object (don't use overexposed white areas). The color temperature
is by default set to make the colors colder/warmer. You can change
this method in the preferences to sliders using absolute color
temperature. We actually like the default colder/warmer method
because we think that WB is in most cases a very subjective decision.
We found that "as shot" WB is often very good. We also like to photograph
a gray card or Color Checker and use the gray balancing eye dropper.
We are just missing some predefined and user WB presets.
Note: The navigator
pane will show how the image would look like if you would click
the WB eye dropper at the current position.
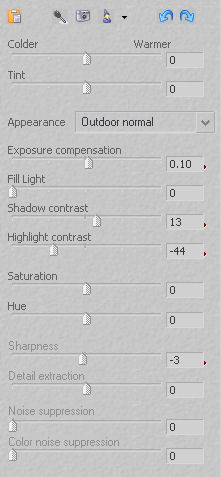
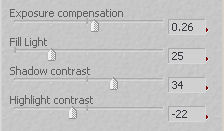
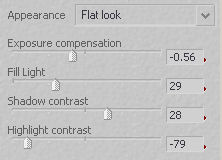
Exposure and tonality

Besides WB that you need for good
colors exposure and tonality controls are key to get a good photographic
look in your images. RSE has different controls and we first had
to learn hot to use them. Most raw converters support controls
that are in principle a variant of levels and curves. Here RSE
works
differently. They actually operate adaptive (pixels are evaluated
in their scene context, more like the Photoshop Shadow/Highlight
tool). It seems actually more complicated to describe than to experience
yourself.
To get the best out
of your
image you
have to find the best
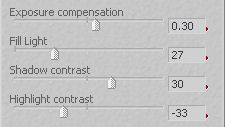
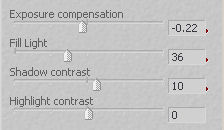
setting for all four sliders:
- Exposure compensation
- Fill Light
- Shadow contrast
- Highlight contrast
Keep in mind that it is best to make use of all 4 sliders and
to avoid the extremes. You should mainly do a visual correction
but RSE also show supporting histograms (3 types, click to change
the display type):
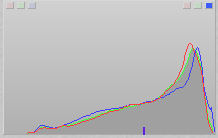 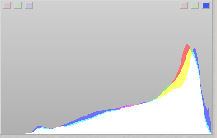 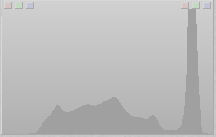
We like to use the version #1. On the top you also
find three indicators for the highlights and shadows. They signal
whether a certain channel is clipped. In our sample about the
blue channel is clipped in the highlights.
The best way to learn using the controls is to
play with your own images. We have seen stunning improvements.
The only attribute that we find to describe the results is: "more
3D like look"
Here some first guidelines: Note: All values can be entered
numerically. If you click the cursor in one of the fields you
can use the mouse scroll wheel for fine adjustments.
- Exposure compensation: Is your image to bright then tone
down the EV. If it is to dark try first Fill Light to brighten
the image
- Fill Light: For most images it is a good idea to stay below
a value of 50. Consider sometimes to lower EV and then to turn
Fill Light up. Fill light will also help to open up your shadows.
Note: For low contrast images we leave the
slider to 0.
- Shadow contrast: More likely to tune up to get more depth
and contrast (punch).
- Highlight contrast: Here you can tone down aggressive highlights
Again these four sliders work hand in hand. You should always
work with all of them.
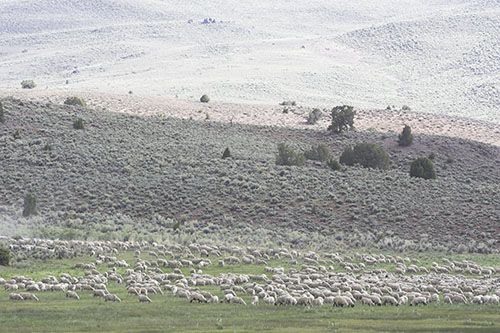
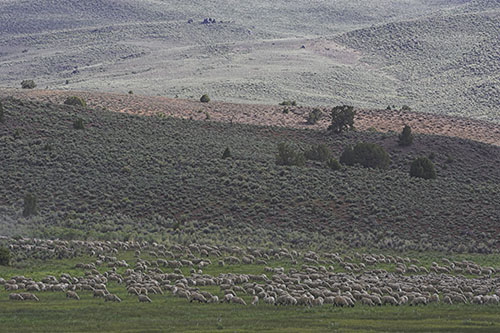
Sample 1
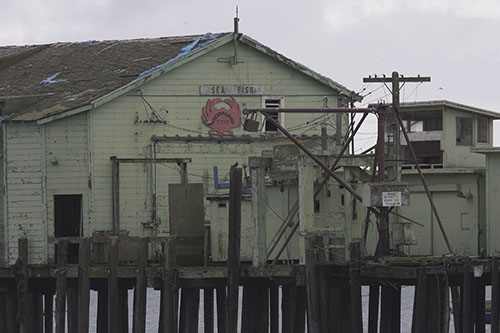
Dull overcast shot (Canon 1D Mk. II)
RSE settings
Result
The Fill Light feature is a key
tool for working on your images.
Sample 2
Typical shot with deep shadows (Canon 1Ds Mk. II)
Corrections
Corrected
We spent before a lot of time getting
the right tonality for this image (both in the raw converter
and then masking in Photoshop). Took about 30 seconds in RSE
(no kidding).
Sample 3
Overexposed Canon 1D Mk II shot
Corrections
Corrected
We hope the corrected photo shows
why we wanted to take the picture in the first place.
Saturation and Hue
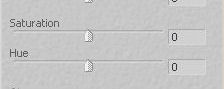
Here you can do minor saturation and hue tweaking.
We have both sliders most of the time set to zero.
Sharpness and detail
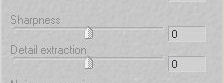
Hard to say how RSE reaches its level of very natural sharpness.
Both top of the class debayering and normal sharpening are involved.
- Sharpening: We normally leave it to 0. Zero does not mean
that RSE does not sharpen but this level is considered to get
a very natural sharpness with low sharpening artifacts. We
use RSE at this level 0 and the do final minor sharpening in
EasyS.
- Detail extraction: This allows the user to set the RSE bias
for fine detail or noise. The finer detail you want the more
also fine noise will be undetected and vice versa.
Here is a sample comparison to our previous favorite for detail
rendering Capture One:
Full 1Ds image 70-200mm f/2.8 lens, tripod, mirror lockup
100% magnification with C1 + strong EasyS sharpening
100% magnification with RSE + very light EasyS sharpening
It is amazing how images look if
they come directly from RSE with sharpening level at 0 (remember
this does not mean there was no sharpening). Images have some
sort of more 3D natural look.
Note: The goal
of RSE is not that you would not be able to get nearly the same
results with other raw converters and sophisticated work in Photoshop.
The key point is that it is easy, fast and good from just RSE.
Noise reduction
Actually removing noise is easy. We hear you yelling
:-). But removing noise and keeping detail is the real challenge.
Even more difficult is to also do noise removal in near real
time.
Honestly we have not played enough with RSE for
a final judgment and also do not use that many high ISO shots.
But RSE maybe the first raw converter that will be good enough
for most of our photos without third party noise removal tools.
The developer of RSE had to invest a lot of work
into noise removal as the tonality feature allows to brighten
shadows a lot. This operation is also pulling out the noise which
is mostly in the shadows. Opening up shadows needs good noise
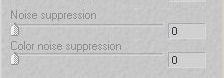
removal. The two sliders deal with the two most common types
of noise:
- Luminance noise
- Shadow noise
We will use the noise removal too in our sample session below.
Batch
Processing Once you have set all parameters
you can add this image to the batch queue. The processing is
then done in the background while you work on the next image.
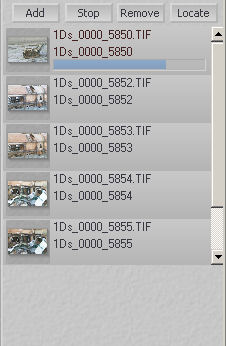
At any time you can watch the batch queue and
add, stop or remove batch jobs.
Sample session
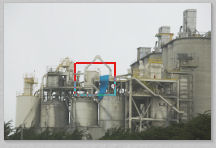
This is a sample shot and really
of any artistic value:
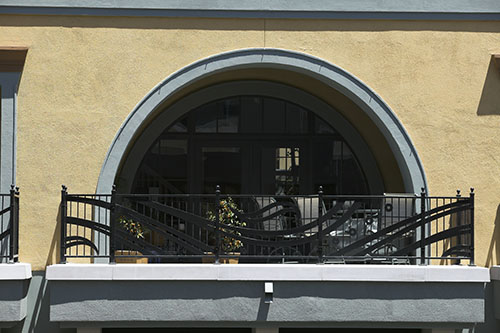
1Ds at ISO 160
We find the shadows a bit too
dark and used the RSE tonality sliders to open them up.
Opened shadows
But open shadows also means
more noise:

200% magnification
This called for some RSE noise
reduction:

Reduced noise
This sample was only intended to get you started
with your own images. Don't overdo the noise reduction.
Slide Show
There is also another nice feature: a slide show.
The slide show is useful for two purposes:
- View your pictures
- Set priorities and tag files for deletion

Slide show

Controls
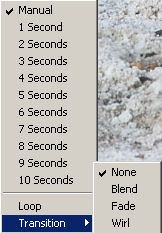
Timing and transitions
The slide show maybe the best
way for an initial preview of your images.
Note: Best you wait till all
previews for that folder are generated as otherwise the slide
show can be slow.
Some
items on our wish list
- Tool to remove Chromatic Aberrations (CA) and purple fringing.
RSE reduces it already to some degree
- Default settings per camera and even ISO
- 100% desaturate for easy B/W mode
- Use of different profiles per snapshot
- Copy/Paste of settings via clipboard
Remember this is the first introductory offering of RawShooter.
We hopefully see many future evolutions with even richer feature
sets.
Conclusion
We think that the
new Pixmantec raw converters are a very welcome development.
RSE shows how
a state of the art raw converter should function. We go so
far to say that this is the raw converter to beat if it comes
to image quality and workflow. We also like the speed and
ease of use. RSE will
hopefully also help photographers in their transition to
RAW.
Highly Recommended (*)
(*) Of
course not
only because RSE is free right now.
You can download RawShooter
essentials from here.
3/18/2005
RawShooter essentials 1.1.1 released
4/7/2005 RawShooter essentials
1.1.2 released
The version 1.1.2 is ready for free
download from Pixmantec.
Check which problems are fixed
and which cameras are supported from readme file.
Read our
original preview.
5/27/2005 RawShooter essentials
1.1.3 released
The version 1.1.3 is ready for free
download from Pixmantec.
The main new features are improved
copying of settings (via Ctrl+c/v) and a preview cache that
allows faster comparison of 2-4 images (depends on the preference
settings). The speed of preview generation was improved as
well as bug fixes and other improvements.
Check which problems are fixed
and which cameras are supported from readme file.
Read our
original preview.
|