| |
|
| |
Digital Outback Photo Contest #012

Contest March 2004: Sharpening Contest #3
|
| |
|
| |
|
| |
|
| |
Limited to 8 entries (8 entries
and terminated) |
| |
|
| |
See also our other
contests |
| |
|
| |
A Note on Copyright:
This image can only(!) used in the context of this contest and the only
site that has the right to publish images is Digital Outback Photo. If
you want to use this image for any other purposes (e.g. marketing) you
can acquire a license from us. |
| |
|
| |
|
| |
There are no prizes for this contest as the evaluation
of the results can be too subjective. |
| |
|
| |
To share experience it is not enough
just to show the results. We need precise step-by-step descriptions
of all image editing operations that had been performed. That is why
we need to limit the used tools to the ones that are available at Digital
Outback Photo (and they have to be available for PC or Mac):
- Photoshop (this is the standard image editor we use)
- Commercial and non commercial sharpening actions and plugins
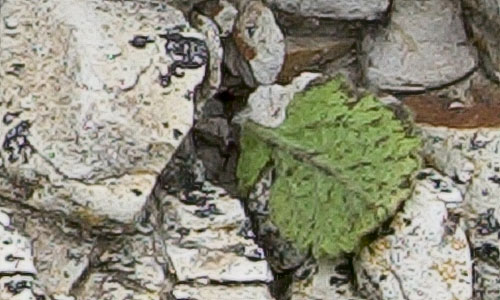
Photo was taken with the Canon 1Ds.
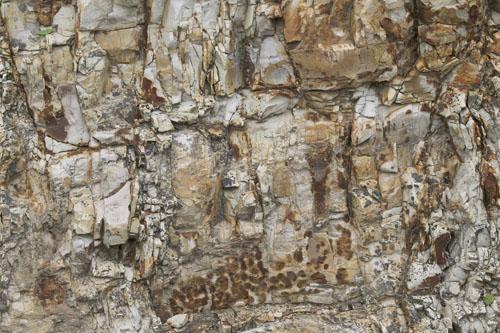
Davenport Rock Resolution Test

500 pixel wide crop (from not sharpened and upsized image)
This crop was created using:
- ACR 2.1 upsized to 6144x4088
- upsized in PS bicubic to 8000x5323 (means 33x22" at 240 PPI)
Why this contest? The question is how much detail/sharpness can be
gained if you upsize this file that much. See also our original
resolution test. Rules:
- It is your task to sharpen the crop shown above
- You load the cropped image (JPG, copyright Bettina & Uwe Steinmueller)
(link removed)
- Use any sharpening technique you like
- Describe the process step by step
- Send only the instructions and the final sharpened image crop (JPG
8 in Photoshop) and your full name to:
contest@outbackphoto.com
- Do not change any colors
- The final image has to be in Adobe RGB and RGB color mode (without
any layers)
|
| |
|
| |
|
| |
|
| |
|
| |
|
| |
|
| |
Note: As all photos should be in the Adobe RGB color
space it is recommended to download interesting samples and view them
in Photoshop on a profiled monitor and at larger magnification. |
| |
|
| |
|
| |
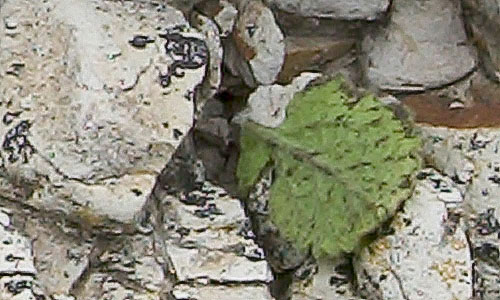
Sample Entry (by Uwe Steinmueller) |
| |
|
| |
|
| |
|
| |
|
| |
|
| |
|
| |
|
| |
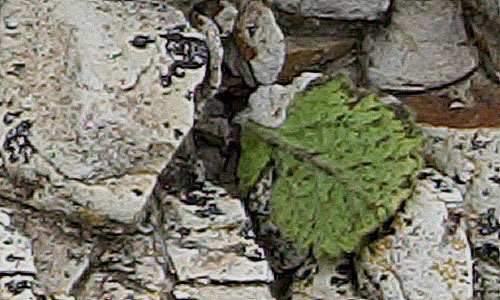
#01 Sam Gay |
| |
|
| |
|
| |
|
| |
- USM @ 150%, 1.0 piexel 0 Threshold
- Photokit Edge Sharpening #2 @ 100%
- Flatten Image
- Photokit Luminance Sharpening #3 @ 100%
- Flatten Image
|
| |
|
| |
|
| |
|
| |
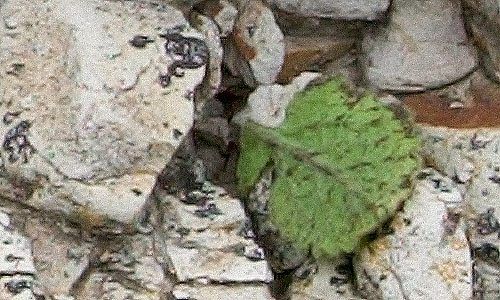
#02 Gary Yelland |
| |
|
| |
|
| |
|
| |
- Apply custom filter
-1 -3 -2
-1 16 -2
-1 -3 -2
Scale 1
- Brightness -20
|
| |
|
| |
|
| |
|
| |
#03 Daniel Richard |
| |
|
| |
|
| |
|
| |
USM
Amount 500%
Radius 1.0
Threshhold 4
- Repeat USM at same settings
- Fade USM 35%
|
| |
|
| |
|
| |
|
| |
#4 Antonio Dias |
| |
|
| |
|
| |
|
| |
Image Source: Digital Camera
Blur Width: 3
Amount: 300%
|
| |
|
| |
|
| |
|
| |
#5 Paul Philpot |
| |
|
| |
|
| |
|
| |
- Mode: 16bit
- Mode: LAB color
- Select Lightness channel
- USM Amount 35%, Radius 15, Threshold 0
- USM Amount 70%, Radius 1, Threshold
0
- USM Amount 180%, Radius 1, Threshold 0
- USM Amount 50%, Radius 1.5,
Threshold 0
- Mode: RGB
- Mode: 8bit
|
| |
|
| |
|
| |
|
| |
#06 Gene Rajanen |
| |
|
| |
|
| |
|
| |
Overall image
Sharpen Edges;
sharpen= 738
Radius= 4.4
Gaussian and Compensation= on
- Selected leaf, placed on its own
layer, ran
Focal blade; Deblur Pro
Fix= 27, 29, 0, 0
Surface= 786, 1.7, Gaussian and Compensation on
Edges= 690, 1.3, Gaussian and Compensation= on
- Inversed the leaf selection and ran Focal blade Expert mode;
Background settings on Surface tab= 438, 1.2, 0, 0
|
| |
|
| |
|
| |
|
| |
#07 Brad Nichol |
| |
|
| |
|
| |
|
| |
- Convert to Lab Mode
- Use Gaussian Blur on both color channels 2px
- Duplicate layer, choose
lightness channel
- USM 0.7px, 150%, 0 Threshold
- USM 0.3px, 350%, O Threshold
- USM 0.2px, 400%, 0 Threshold
- USM 90px, 8%, 5 Threshold
- Duplicate Layer
- Add noise 4.8% (uniform distribution), blend this
@75% with first
duplicate layer
- Final sharpen for edges only by using radius 0.3px,
500%amount and
15 threshold.
- Blend 85% with original layer.
|
| |
|
| |
|
| |
|
| |
#08 John Hill |
| |
|
| |
|
| |
|
| |
- High res, narrow edge capture sharpen, done twice
- Creative Narrow
edge brush sharpen with selective sharpening at 50%
opacity
- Output sharpen for web using 400 pixel action.
|
| |
|
| |
|
| |
|
| |
Thanks to all participants (including all submissions
that may not get published). |
| |
|
| |
|
| |
|
| |
|
| |
|
| |
|
| |
|
| |
|
| |
|
| |
|
| |
|