Introduction
I tried the new profiles that Bill Atkinson
recently posted on his site at http://www.billatkinson.com
More interestingly,
I tried them with the Epson 4800 and had excellent results. So far
I specifically tried the profiles created with the
Gretag McBeth measurement device and software, the GM1, GM2 and
GM3 profiles.
Here are the exact names of these profiles:
- 9800 PGL 1440 Std
BA GM1.icc
- 9800 PGL 1440 Std BA GM2.icc
- 9800 PGL 1440 Std BA GM3.icc
One thing I learned is that these profiles
need to be used with the Perceptual color intent option, and not
with the Relative
colorimetric
intent that I also
use (those are the two only rendering intents I use). I also leave
Black Point Compensation unchecked with Perceptual.
Here's a screen
shot of the settings I use in the Photoshop Print with Preview dialog
box:

Print with Preview dialog box in Photoshop CS2
Should
you linearize your printer with Epson ColorBase?
Bill mentions
linearizing your printer with Epson ColorBase prior to using the
profiles. I wanted to know how much
of a difference linearization
actually
made,
so I printed the same image, with the same profile, before and
after linearizing the printer with ColorBase. The two
prints were very
close to each other.
This may be because my printer was already very close to specs,
or because ColorBase
linearizing makes only minor adjustments (it did in my case).
At any rate let me say this: if you have an Epson 4800
and you do not have access to a densitometer (which is necessary to
linearize
your
printer with
ColorBase),
try using Bill Atkinson's profiles without doing a ColorBase
linearization. You may be pleasantly surprised with the results.
In turn, if the
results are unacceptable,
you will know that linearization is necessary. And of course,
if you do have access to a densitometer, it is best to linearize
your
printer
first.
I can also report that Bill's profiles work very well
with the Epson 4800. I printed the same image with the Epson profiles
that came
with the printer
(the "canned" Epson
profiles) and with Bill’s profiles, and I can see a marked
improvement in neutral colors as well as in the overall color
and contrast of prints done
with Bill’s profiles.
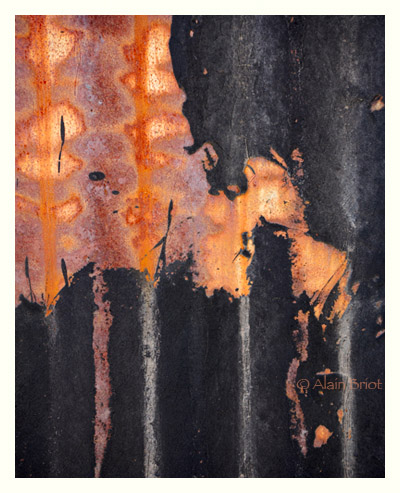
Abstract 1, Tucson Barrio3
So many profiles, so little
time
The daunting part of Bill's collection of profiles is
their sheer number. You have 32 profiles for Epson Premium Glossy
Photo paper
and 48 profiles
for Epson
Premium Luster and Epson Premium SemiMatte.
Here is the
approach I recommend to make this process a little less daunting:
First,
the best thing to do is to work with a single paper, in my case Epson
Premium Glossy which I like very much.
Second, narrow it further
down to a specific brand of measurement device and software. In my
case I chose
Gretag McBeth. Third, in Photoshop use View> Proof Setup> Custom> Device
to Simulate and select the profile of your choice.
Don't forget to choose the Perceptual
Rendering Intent and to uncheck Black Point Compensation
and Preserve RGB Numbers. This allows you to do a soft
proof on screen to see
the changes
that each profile
brings to your image. This custom previews shows you
a close screen approximation of what your print will look like.
In
the same dialog box you can also visualize the difference between
profiles by quickly going from one profile
to another in the list
under Device to
Simulate. Since profiles for each specific specific
brand of measurement device and software
are located below each other, switching back and
forth is easy. What I do is place the Custom Proof dialog
box to the
right
of my screen,
and the image
I
am working on to the left of the screen, so that
the list of profiles do not hide the photograph.
Fourth, read the PDF
file that accompany each profile. It details the specifics of each
profile. Pay particular
importance
to
differences listed for each
profiles. For example, the difference between the
GM1, GM2 and GM3 profiles is the Gamut
Mapping:
- Colorful for GM1
- Chroma Plus for GM2
- Classic for GM3
I found this very helpful since these 3 gamut mappings
follow the gamut mapping of my scanner profiles,
which were also
created with
Gretag
McBeth measurement
device and software.
Here is a screenshot of the Custom Proof Setup
Dialog box in Photoshop CS2:
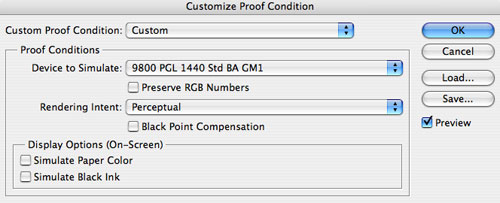
Custom Proof Setup
Dialog box in Photoshop CS2
This sums up my experience with Bill
Atkinson’s new profiles
at this time. I plan to continue testing them,
this time trying out profiles created
with another
brand of calibration software and hardware.
If
you have any questions, or want to share your own experience with
these profiles, do
not hesitate
to
contact me:
alain@beautiful-landscape.com
http://www.beautiful-landscape.com

This is one of the many techniques we will teach during the 2006 Summit.
We will also work with you 1 on 1 and help you with your own images
and with how to use this technique, and many others, in your own work. Click
here to read a detailed description of the 2006 Digital
Fine Art Summit. Joseph Holmes will join the Summit 2006 as a guest
instructor means you can ask this world class printing expert directly.
About the Fourth Annual Photography & Fine Art
Printing Summit
The 4th Photography & Fine Art Printing Summit will take place
November 10th to 13th, 2006, in Page, Arizona. Seats are limited. In
addition to studying color management and color spaces, we will also
do field photography in stunning locations such as Antelope Canyon,
Lake Powell and Horseshoe Bend, as well as study Raw conversion, Photoshop
processing, image optimization, printing. We will also conduct print
reviews of your work created during the Summit. Find out all the details
of this unique learning and photographing opportunity on the 2006 Summit
page. |


