Digital Outback Photo
- Photography using Digital SLRs


Workflow Technique #022

"PhotoKit SHARPENER: Systematic Sharpening à la Carte"

review by Uwe Steinmueller


There are few subjects in digital photography that are as complex and controversial as sharpening. Why? The easy answer is: There is no single perfect way to sharpen an image. You probably already know this, so why mention? Because the old discussion "My sharpening is better than yours" does not help.

Sharpening is so important because every scan or digital image needs sharpening. On the other side sharpening an image is a destructive process as it changes image content to give the illusion of greater sharpness. How is it done? Sharpening adjusts contrast at edges (creates already the problem what is an edge and which one need to be improved). For more information read the PhotoKit SHARPENER manual.

Sharpening means to walk a fine line between destroying the image and improving the appearance of sharpness.

To better understand the problem we need to look at the factors that influence successful sharpening:

  • digital image resolution
  • noise and artifacts in the image (don't want to amplify those through sharpening)
  • lens quality
  • motion blur (we don't talk about the obvious blur but more about subtle shake)
  • subject matter (many small details like landscapes, more smooth areas like in portraits)
  • subjective taste of the photographer (very important factor)
  • print size, printer device and viewing distance (Here clearly Nik Sharpener gets our credit for making these important factor aware to many photographers).

It seems pretty obvious that there is no simple "one fits all" all solution to sharpening.


PhotoKit SHARPENER
 

We reviewed the PhotoKit toolset some time ago and still find it very, very useful. The same group of people (e.g. Jeff Schewe and Bruce Fraser) has now released PhotoKit SHARPENER. We still find the easy to read articles written about sharpening by Bruce Fraser the best we have seen so far. This makes one thing crystal clear: These guys understand sharpening.

Photokit SHARPENER is implemented as a Photoshop automation plug-in and once you understand the use of this tool you will wrap many operations into Photoshop actions.

Don't think that we just got PhotoKit SHARPENER a few days ago. We actually work with it for quite some time.

Price: $99.95 for the complete set.

 
PhotoKit SHARPENER is Systematic
 

PhotoKit Sharpener breaks sharpening down into 3 essential steps:

  • Capture Sharpening
  • Creative Sharpening
  • Output Sharpening

Capture sharpening recreates the sharpness lost in the capturing process (scanning or raw conversion) with as little damage to image detail as possible.

Creative sharpening addresses the desire to change local sharpness or add sharpening related effects to the photo.

Output sharpening fine tunes the image for the output on different printing devices or for the web/multimedia.

Actually this sounds so logical that it is hard to understand that we did not do it that way all the time. Yet there is still this old - and we now believe wrong - rule that sharpening has to be last step (only the output sharpening will be). Lets cover now the different steps.

 
Capture Sharpening
 

Goal

Recreate the sharpness lost in the capturing process (scanning or raw conversion) with as little damage to image detail as possible.


We know some people now will say that they had been a long time an advocate for doing "some" sharpening right after capture. The important difference is that PhotoKit SHARPENER lets you define your own context specific "some" sharpening.

The goal is very clear, capture sharpening should apply as much sharpening as possible without doing any harm to essential (this is and should be of course subjective) image details.


Capture sharpening depends mainly on the capturing technique, resolution and noise level. We only use

  • Digital Mid-Res Sharpen for 6MP cameras
  • Digital High-Res Sharpen for more MP

We personally are not so much interested in reducing noise in the sharpening process as we usually stay with ISO 100-200.

Like in Photokit the result of the sharpening is non destructive. That means it is created in a new layer (actually a layer set).

All the different sharpener sets then allow to select one of three options:

  • Narrow Edge (means fine details are important)
  • Medium Edge (in between narrow and wide)
  • Wide Edge (not so much detail oriented: e.g. portraits)

Wide edge will get the sharpest impression but might destroy very fine details. But you will see that you even get more control.

Best we show an example.


1Ds photo at Point Lobos


Crop not sharpened (processed with Capture One DSLR)


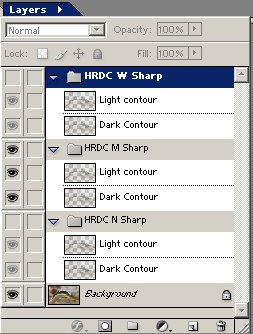
We run the Digital High-Res Sharpen with Narrow Edges and get the following layer structure:


Different from PhotoKit sharpening we get more flexible layers. There is a layer set having two layers:

  • Light Contour
  • Dark Contour

As we mentioned sharpening is enhancing contrast and PhotoKit SHARPENER has the light side of the edges in one layer and the dark side in a second one. Also note that both layers are created with a default opacity of 66%. What does it mean? You can turn the opacity up and improve contrast or down and smoothen the contrast. You can also control the black/white contour at different levels (one up and the other down).

Note: Of course you can also change the opacity of the full sharpening layer set.

But there is even more to it. Both layers come with settings for blending options:


Blending Options for the Light Contour

These blending options ensure that sharpening is not performed in the extreme highlights and shadows and rather focuses on the mid-tones. I recommend not to touch these settings as they are the result of some extensive research.

Here is a result:


Sharpened crop


It is probably easy to understand that this tool is flexible and powerful. But some might think it is also complex. Don't worry too much:

1. The defaults do a rather good job

2. Once you like some settings, create an action and use it.


Check it out yourself

To allow you to check the layer flexibility you can download the above sample as PSD file (packed in a ZIP) from here (about 4MB).

The PSD image contains three layer sets for the narrow/medium/wide edge Capture sharpening:

Activate only one layer set at a time and also change the light/dark contour opacity.

Note: If you activate also lower layer sets your will add sharpening from the lower layers as the light/dark layers have only 66% opacity.


We like our prints rather subtle sharpened and often only use the Capture Sharpener routines. But there is much more.
 
Creative Sharpening
 

Creative Sharpening again has many options:

  • Sharpening Brushes

  • Smoothening Brushes
  • Sharpening Effects

We personally rarely use creative sharpening (we like some sort of simplicity or is it laziness?). But we will revisit these options in the future. Our favorite set is the Sharpening Effects:

Don't miss to use "Super Grain". Very interesting, how adding sharp grain can improve your photo.

 
Output Sharpener
 
Once you image is well (optimal for your personal style and desire) sharpened you can then optimize the output for the different printing devices.
 

  • Continuous Tone
  • Halftone
  • Inkjet
  • Web/Multimedia

We are only using the sets for Inkjet and the web.

 
Inkjet Output Sharpeners
 

For inkjet output you select by resolution of your print (measured in PPI and not the printer resolution, select the nearest one) and whether it is matte or a glossy paper.

Keep in mind that you will get again a new sharpening layer set that you can tweak to your requirements.

 
Web Sharpeners
 

If you downsize images from let's say 3000x2000 to 500 pixels wide in Photoshop then you need to sharpen the resulting file. Here the web sharpeners can assist you to get better results.

 
Summary
 
We like the systematic and flexible approach that PhotoKit SHARPENER brings to high quality sharpening.
 

No question, Highly Recommended


Other Reviews


For Comments post in our News Group

© 2000-2007 Digital Outback Photo