Notes by Uwe are in italic.
Let’s return to our discussion on tonal range, contrast, and
brightness with a brief look at the features in Adobe Camera Raw II
(often referred to as ACR II).
The Camera RAW interface was an optional plug-in for Adobe Photoshop
7. It was included as part of Adobe Photoshop CS, and if you still
need a reason to update, ACR II is an excellent justification. It is
my preferred method for converting RAW images. I formerly used Breeze
Browser for my Canon RAW images, but it was a hassle to convert RAW
files into TIFFs and then load them into Photoshop in order to convert
them to PSDs.
Many of the discussed issues are also valid for other raw converters.
But be aware that the behavior of the controls may be different. 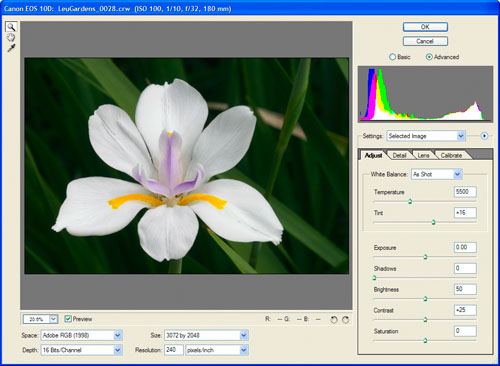
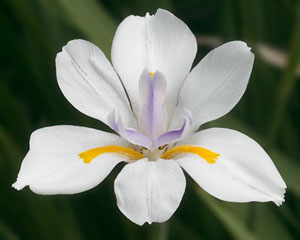
Figure 1. The Adobe Camera RAW II interface offers digital photographers
an efficient
workflow and lots of control.
With ACR II, you just open the image in Photoshop CS like any other
image. I typically double-click on their thumbnail in the integrated
browser. When RAW images open, the Camera RAW dialog is displayed.
The Camera RAW interface provides photographers with lots of flexibility.
Our interest in this tutorial will focus on the image display, the
histogram, and the Adjust tab. There are many other features to ACR
II, however.
The Zoom and Hand Tools work just like they do in Photoshop CS. You
can use them to focus in on important parts of the image as you make
adjustments in Photoshop CS. The White Balance Tool is the eyedropper
icon at the upper left, just below the Hand Tool. You can use it to
quickly set the white balance for an image by selecting a feature that
you know should be neutral tone of gray. In Figure 1, you would likely
select one of the white iris petals.
White balance is an important step in color correction. Do not overlook
its importance in determining tonal range, however. I mentioned the
White Balance Tool, where a neutral tone is obvious. Where a neutral
tone is unavailable or not so obvious, the Camera Raw dialog provides
three white balance sliders. Temperature and Tint sliders appear on
the Adjust tab, and, if you place ACR II in advanced mode, you will
find the Shadow Tint slider lurking on the Calibrate tab.
Figure 2 shows a second image in ACR II. The highlights are clumped
to the right edge for the red channel. Some clipping is evident. The
image was shot using Canon’s “Auto” white balance
setting, which reads the image data and then sets the temperature setting.
Figure
2. Canon’s “Auto” white balance setting results
in an image with clumped and
clipped red pixels.
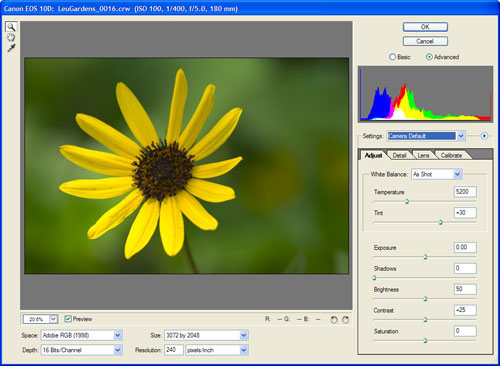
Adjusting the Temperature and Tint sliders can sometimes fix problems
with clumping and clipping. For example, cooling the image in Figure
2 pulls the information in the red channel back from the extreme right
edge of the histogram.
We very often take a picture of a gray card or Color Checker to
apply the right white balance. 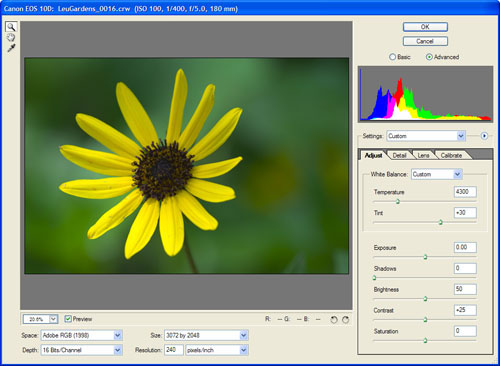
Figure
3. Reducing the white balance temperature 900° K keeps
the red channel from
clumping and clipping.
This is a very critical operation
as we would only use a WB change to get the subjective and emotionally
WB we want for the artistic purpose and not to solve clipping issues.
That is why we correct EV first and then change WB to our taste.
We may then need more fine tuning of the EV later. Mitch's sample
is very good as it shows how much the white balance can change
the
emotional
expression of an image. There is not really a right or wrong white
balance as it only depends on what the photographer wants to express.
Adjusting the white point for the image – that is, the very
brightest pixel(s) for the image – by making adjustments to the
white balance, can have important consequences. There is an obvious
effect on the petals of the Black-Eyed Susan in Figure 3. Their hues
changed. So did the hues in the bokah (i.e., the blurred background
outside the depth-of-field for the lens). Both evidence more blue.
We could instead protect the highlights from clipping by reducing
the exposure slider. Changes to the Exposure slider are linear shifts
in brightness. It works like the Brightness tool in Photoshop. The
Exposure slider is measured in photographer-friendly units: Exposure
Values (EVs).
A reader pointed out that the ACR exposure slider adjusts the white
point and keeps the black point fixed. The Photoshop Brightness tool
shifts both black and white point.
Figure 4 is the result of setting the Exposure slider to -1/3 EV,
the equivalent of a 1/3 stop reduction in photographic exposure. The
histogram for the red channel is improved; the image is only slightly
darkened as a result of this maneuver. The hue of the flower petals
is preserved, compared with adjusting the white balance (see Figure
3) to fix the red channel.
The clumped and clipped red information was evident in the highlights
in Figure 2 as a slight posterization. The -1/3 EV adjustment (-0.33
on the Exposure slider) made those features of the image continuous.
That is a good trade-off in this case. A slight reduction in brightness
preserved highlight detail and avoided posterization.
ACR II is without question one of the very best tools available for
restoring highlights. Most RAW converters treat pixels where any channel
clips to 255 as a white pixel (RGB = 255, 255, 255). ACR II does not.
With negative values for the Exposure slider, ACR II will try to recover
highlight details for any pixels that clipped. If only one or two channels
were clipped, ACR II may be able to restore the highlights.
After adjusting the Exposure slider, you may also need to fine tune
the Brightness and Contrast sliders to restore “pop” to
the image. The Black-Eyed Susan in Figure 4 would benefit from tweaks
to the Brightness and Shadows sliders.
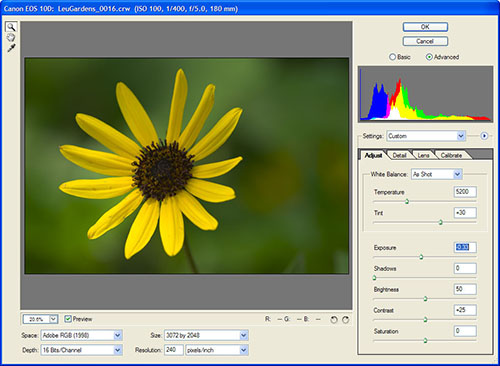
Figure 4. The Exposure slider is used to reduce the exposure by 1/3
stop (-1/3 EV).
If you hold down the Alt/Option key as you drag the Exposure slider,
clipped features of the image will be displayed. In the case of Figure
5, the clipped highlights appear in red, indicating that only the red
channel is clipped. The color of the clipped highlights indicates which
channel is clipping for a particular portion of an image.
• White: 255 in all three channels.
•
Red: 255 in the red channel.
•
Green: 255 in the green channel.
•
Blue: 255 in the blue channel.
•
Cyan: 255 in the green and blue channels.
•
Magenta: 255 in the red and blue channels.
•
Yellow: 255 in the red and green channels.
If the highlights warnings are not white, you might be able to restore
highlight details. How successful you will be able will depend on how
severely the information was compressed, how widespread the damage,
etc.
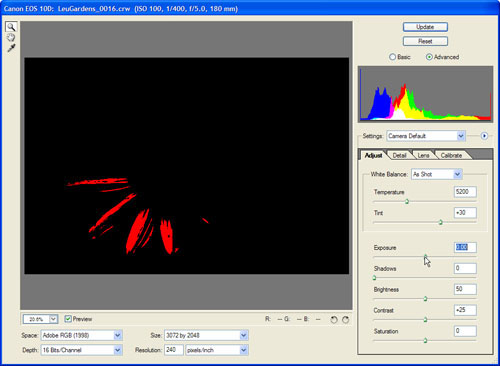
Figure 5. The highlights affected by the clumped/clipped red channel
information.
Be careful with the Exposure slider. You can clip the highlights if
you are careless with your adjustments. Be sure to watch the histogram
as you pull the Exposure slider. If you approach the extreme right
edge of the histogram, hold down the alt/option key. Stop just short
of the point where the image changes from black to significant areas
of color or white. A few small white areas, in appropriate locations,
can be evidence of specular highlights. Those can be desirable features.
You need to check at that point. If the image is instead posterizing
or some inappropriate portions of the image are clipping, you need
to back off on the Exposure setting.
If you increase the Exposure setting by more than +0.75 EV, you will
very likely increase noise in the shadows and may even see evidence
of posterization in the shadows. With RAW images, you are working on
data that has not been gamma-adjusted. As a consequence, large, positive
EV changes with the Exposure slider will spread out the existing shadow
values more than other image tones.
Adjusting the Shadows slider is the equivalent of adjusting the black
point slider in the Photoshop Levels dialog. Again, care is required.
You can lose image detail by clipping shadows. Holding down the alt/option
key as you pull the Shadows slider will display any clipped shadows.
If none of the channels is 0, the color of the preview will be white.
As with the Exposure slider, the color of the clipped shadows preview
for the Shadows slider indicates which channel is clipping for a particular
portion of an image, but it is a little tricky! You need to know your
complementary colors.
• Black: 0 in all three channels.
•
Cyan: 0 in the red channel.
•
Magenta: 0 in the green channel.
•
Yellow: 0 in the blue channel.
•
Red: 0 in the green and blue channels.
•
Green: 0 in the red and blue channels.
•
Blue: 0 in the red and green channels.
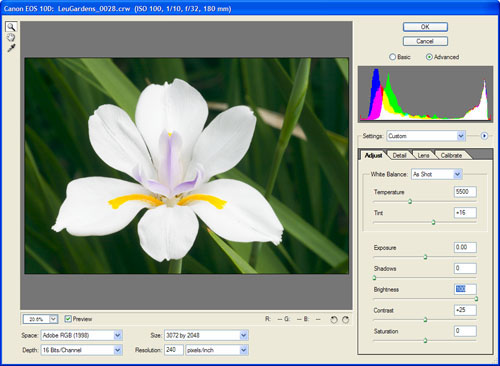
Figure 6. Even a Brightness setting of 100 does not result in clipping.
The Brightness slider also adjusts overall brightness for an image.
So, how does it differ from the Exposure slider? The Brightness slider
does not alter the white point or black point for an image.
When you alter the white point for an image, you change the number
of pixels with RGB = 255, 255, 255. Alter the black point and you change
the number of pixels with RGB = 0, 0, 0. You can adjust the Brightness
slider as much as you like and you will not cause additional clipping
of the shadows or the highlights. Figure 6 is a white iris with the
Brightness slider pulled to a setting of 100. None of the image features
clipped. With the Brightness slider, tonal information in the highlights
and shadows will compress rather than clip.
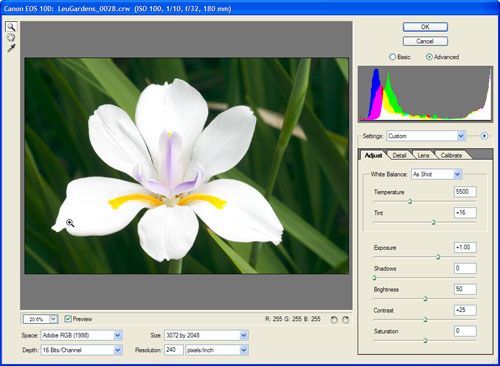
Figure 7. Clipping is evident with a +1 EV increase in the Exposure
slider.
Compare the resulting histogram in Figure 6 with the histogram in
Figure 7. The histogram in Figure 7 results from a +1 EV increase in
the Exposure setting for the same RAW image. Clipping of the highlight
information is clearly evident at the extreme right of the histogram.
When you want to adjust the tonal range for an image, you use the
Exposure and Shadows sliders in ACR II. The Brightness slider in ACR
II functions like the Gamma slider in the Photoshop Levels dialog.
It is a safer tool to use, since it will not clip information. Do not
confuse it with the linear Brightness dialog in Photoshop. The Brightness
slider in ACR II makes non-linear adjustments, redistributing the tones
without any additional clipping.
The Contrast slider adjusts the contrast in the middle tones for a
RAW image. If you are familiar with the Photoshop Curves dialog, the
Contrast slider works in a way similar to applying an “S” curve
to an image. The effects are more pronounced in the middle tones, less
so in the one-quarter and three-quarter tones, and hardly at all in
the shadows and highlights. The white point and black point for the
image are not affected at all. When you want to affect image contrast
in ACR II, the Contrast slider is the adjustment you want to tweak.
It will lighten values brighter
than middle tone and darken values below middle tone.
Yes, the contrast slider is using a s-curve. We won't call this
a midtone contrast correction as it effects the shadows and highlights
too. In
our article about contrast we show a more typical
midtone contrast curve.
Figure 8 is another image evidencing a clumped/clipped red channel.
The highly saturated yellow-oranges were a challenge for the Canon
10D in the warm, morning sunlight.
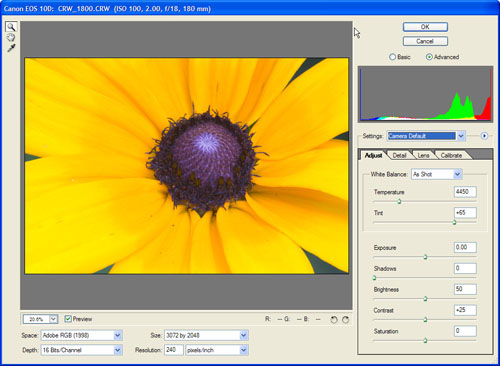
Figure 8. Another Black Eye Susan with clumped/clipped red channel
information.
The darker orange tones in the center of the flower are not posterized.
The flower had two tones to the petals, with the center having more
orange. I saw no visible evidence of damage from the clumped/clipped
red channel, so I contemplated my options: use ProPhoto RGB color space
to accommodate the saturated yellow-oranges, cool the image by adjusting
the Temperature slider, or reduce the exposure a bit with the Exposure
slider. I decided to cool the image just a touch and to reduce the
exposure.
After reducing Exposure by -2/3 EV and lowering Temperature from 4450
K to 4000 K, I decided to make further adjustments in ACR II to add
more “pop” back to the image. I boosted Brightness from
50 to 60 and Contrast from +25 to +50. Saturation was also increased
from 0 to +25. The result appears in Figure 9.
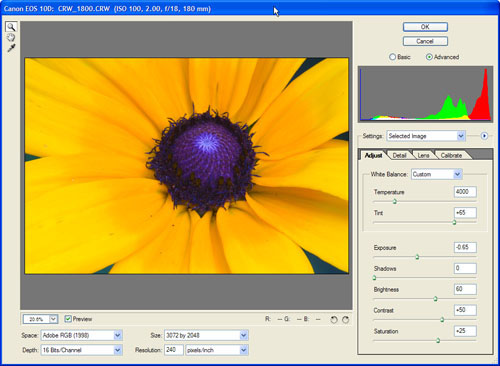
Figure 9. The same Black Eye Susan after ACR II adjustments.
I left myself a little editing headroom, but to prove the point that
you can go a long way in ACR II, I decided not to make any further
adjustments to color or tone in Photoshop. I made a few dabs with the
Healing Brush and then applied a 5.0 pixel Highpass Filter sharpening
followed by a gallery frame effect. (See Figure 10 below.)
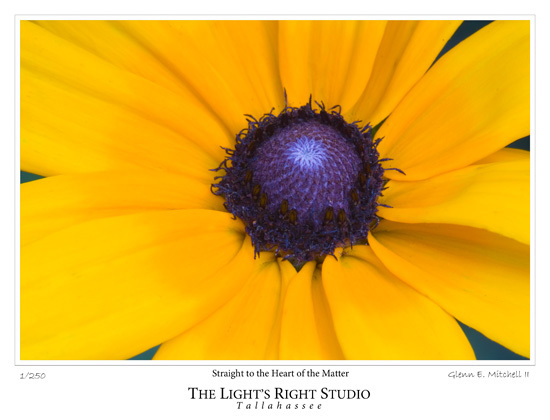
Figure 10. Occasionally you can do all of your color and tone adjustments
in ACR II.
When you start with a good solid exposure, you can occasionally do
all of your color and tonal corrections in ACR II. Corrections in ACR
II can add a lot of efficiency to your workflow, especially if you
shoot weddings or do other forms of high production photography.
Making Full Use of ACR II
If you do not adjust white balance and make basic tonal adjustments
in ACR II, you are not taking full advantage of its abilities to
adjust tonal range, contrast, and brightness. ACR II is not a replacement
for Levels, Curves, and Hue/Saturation adjustments in Photoshop,
but it does offer important advantages for making initial changes
to tonal range, contrast, and brightness.
Adjustments to the Exposure slider affect the image information while
it is still linear with regard to brightness. Changes to the white
point with the Exposure Slider tend to affect the middle tones and
shadows less than adjustments to the white point slider on the Photoshop
Levels dialog.
If you use the Exposure slider in ACR II, you should also perform
basic contrast adjustments in ACR II with the Brightness and Contrast
sliders. The more extreme the change to Exposure, the more important
it is to use the Brightness and Contrast sliders in ACR II to fine-tune
the shadows and highlights. Your changes will all be done while pixel
values are linear with regard to brightness when you use ACR II.
When you need to recover highlight information, the tools in Photoshop
are no substitute for the Exposure slider in ACR II, followed by fine-tuning
with the Brightness and Contrast sliders. In other cases, I tend to
leave myself some editing headroom. The Shadows slider, for example,
can be touchy. I use the quick and easy workflow in ACR II to bring
a good quality image into Photoshop, where I use adjustment layers
and selections to further refine the image.
In Part III, I will describe the use of Levels and Curves adjustment
layers to further enhance tonal balance, contrast, and brightness.
|