At some point
in time, most all photographers capture an image they will want to
output as a large print. As digital photographers, we
sometimes desire a final print size that is larger than our base file
or native-sized image will comfortably allow, so we have to somehow
manufacture more image information for the file in order to print it
larger. The process we use to accomplish this is called “interpolation.” Interpolation
is also referred to as a “resample,” “upsize,” “upscale” or “uprez.”
Digital cameras (and scanners) capture images at some maximum “native” level
of resolution. This means there are a fixed number of pixels available
in an original file to be used in reproducing a print. Since we need
some minimum number of pixels in every inch of a print to render detail,
the maximum output size we can obtain from any given native file is
limited by the total number of pixels in that original file. Creating
the additional information necessary to accomplish is where the interpolation
process comes into play. The good news is there are several methods
of accomplishing this task; the bad news is there is little agreement
as to which is the best method…
Whenever the topic of interpolating digital files for the purpose
of large print output is mentioned, you usually hear arguments break
out over which method is the “best” one. The most popular
methods of interpolation mentioned are usually some form of stepped
bi-cubic interpolation in imaging programs such as Photoshop, or the
use of programs specifically dedicated to accomplishing this task like
the Genuine Fractals interpolation product or Q-Image’s printing
program. While most of these traditional methods work fairly well,
they all have their shortcomings. Over time I have tested virtually
every method available, and generally found myself preferring a carefully
run, stepped Bicubic interpolation routine, with selective sharpening
at various intervals between the upsizing steps. This is a time-intensive
process and requires above-average Photoshop skills to achieve a respectable
final result, yet it often runs faster than the other options. However,
with the introduction of Photoshop CS, it became possible to streamline
this process even further. I feel the method developed and shared below
generates a more intricately detailed image than other methods do,
it runs faster than most of the other options, it is very easy to use,
and best of all a method that does not cost you anything if you already
own the latest version of Photoshop, Photoshop CS!
So what is different in CS that allows it to accomplish this task
so well? Really, only two things:
1) CS allows us to do more work in
16-bit mode than earlier versions did, and
2) it gave us two new
interpolation routines, Bicubic-Smoother and Bicubic-Sharper.
In previous versions of Photoshop, we usually had to convert our image
to 8-bit mode fairly early in the workflow, long before we got to the
end of processing our base image. This left us with an 8-bit file to
interpolate. With CS, we can pretty much stay in 16-bit mode to the
very end of the base processing, at least most of the time, meaning
we will have a full 16-bit file to interpolate. More color data in
the file means less color rounding errors during the uprez, which in
turn means a smoother-toned final interpolation. However as beneficial
as 16-bit is, it is a relatively minor improvement for interpolation
purposes if the original file has been processed carefully, and fortunately
it is not a necessary step to achieve superior interpolation results.
By contrast, the new interpolation routines are the real improvements
that make this new process possible. With normal Bicubic interpolations
in earlier version of Photoshop, if we upscaled to our target image
size in one giant step, we would often get interpolation artifacts,
which usually presented themselves as jagged edges or blotches in the
final image. Using several smaller steps would help alleviate these
artifacts. The new Bicubic-Smoother option in CS has been designed
to avoid that tendency, and moreover you can now apply it in one giant
step to get your image to its new target size. Similarly, during a
downscale using one giant step with normal Bicubic usually left you
with a very soft image. We again used steps, and sharpened in-between
specific incremental downrezzes to avoid losing the original sharpness
we worked so heard to obtain. Bicubic-Sharper also overcomes this problem
and allows the original image sharpness to be maintained during the
downscale, even if it is done in one giant step. In fact, if you step
downsize using steps with Bicubic-Sharper, you can end up with a grossly
over-sharpened image when you get to your desired final size – so
it is advisable to use it only in one step.
Before we get into the process itself, I should mention my experience
hovers mainly around upscaling Canon digital camera files. I have only
had limited experience working with Nikon NEF raw files, and it was
not all that positive. About the best I could do was get to 16x24 before
the images just fell apart. By contrast, I have successfully uprezzed
4MP 1D images to 24x36 and they looked very good. I assume that given
more time with the NEF, I could tweak my procedure so they uprezzed
better, but since I shoot primarily with Canon digital cameras I have
not devoted any time to doing so.
First, I generally use Bibble or ACR to convert my raw images, but
whatever conversion software you prefer is fine. During the conversion
step I do apply some initial, slight sharpening in the converter.
Sharpening affects local contrast, which in turn can affect overall
contrast, so I don’t over do it – and I also tend to
keep my contrast setting on the low side during raw conversion. This
allows for maximum latitude in the converted image for later processing
in Photoshop. There I will adjust contrast towards the end of the
process via curves. The most important thing during conversion is
not to have so much initial sharpening that you impart halos in the
converted image – halos will be disastrous in the final interpolated
image, as they will create serious detrimental artifacts during the
interpolation process.
Next I get my image fully "print ready," including sharpening,
at its NATIVE RESOLUTION. Sharpening at this stage is contrary to what
most folks do, but I believe they are stuck on their workflow based
on past experiences with older interpolation routines. I used to sharpen
after the interpolation as well, but with this new procedure I have
done the comparisons for myself and found that sharpening at this stage
of interpolation generates a better final print – and generating
the best final print is my ultimate goal. My image adjustments include
in this approximate order, PTLens for optical corrections, noise reduction
if needed, cropping to desired proportions and composition without
rescaling*, cleaning/cloning, any local adjustments, curves, color
and finally, sharpening**. I sharpen to the same level I normally would
to print the image so I now have my image fully print-ready at whatever
its native file resolution is.
Rescaling Note: When you use the crop tool, set it to your desired
proportions only, and be sure to leave the “resolution” box
empty. This will perform your crop at the native resolution without
any resample. Depending on your camera, and assuming you maybe cropped
your original file to 16x24 proportions, the native resolution may
now only be 100 PPI – not enough for a print. That's okay, it's
at your final desired proportion and we’ll adjust the resolution
later during the upscale.
Sharpening Note: For the above sharpening
step I use EasyS, a sharpening plug-in available from this site. I
find that
EasyS does a superb job of sharpening and does NOT impart halos, though
Photoshop’s USM is adequate if you know how to use it properly
and apply it carefully.
Now I uprez the image in CS via “Bicubic Smoother” to
roughly 20% OVER what I intend for my final print size. I perform
this uprez in one large step, not smaller incremental steps. We can
use the measured dimension or the pixel dimension boxes to scale
the uprez in the Image Size dialog box. I also set my desired image
resolution at this time. So, if my final desired print size is 16”x24” at
300PPI resolution, I set the resolution box in Image>Image Size
to 300PPI. I then set the image size to 20% over my desired target.
Since I desire 16x24 as my final print size in this example, I would
up the width in this step from 24” to 29”. (Note: Make
sure "Constrain Proportions" is checked when you do this – this
may mean that when you set the 29” dimension in the width box,
height may change to 19.1 or 19.5 inches. That’s okay, it’s
what it’s supposed to be so don't try to reset it.) Finally,
make sure "Resample" is checked and the method selected
is "Bicubic Smoother". Click okay.
After my computer has finished this resample, I sharpen again, paying
particular attention to edges. I sharpen them to the point where they
clean up visibly, but as always, I avoid adding any halos. To sharpen
at this step I use USM on the “Luminosity” blend mode and
usually fade the result to 80% opacity before merging. (You can accomplish
this without reverting to layers in Photoshop by going to Edit>Fade
USM immediately after applying the USM.) Note that on a large uprez,
the amounts of USM required may be much stronger than you are used
to applying for normal sharpening. Also note that the image may not
look very good at "actual pixel" view at this point, so it
is a good idea to go to View>Print size to preview your result – it
should look pretty good here and will get significantly better in the
following step.
Now I am ready to downsample to my final desired print size. I do
the same thing here I did before, but this time I set the width to
my desired final size (24” in our current example), keeping resolution
at the same setting used in the uprez (300PPI in this example). However,
this time I resample via “Bicubic Sharper”, and again do
this in one step.
The combination of interpolating up to 20% beyond what my final desired
size is, sharpening, then downsizing to my actual final image size
is a simplified form of fractal sharpening. I have found this step
very effective in generating a highly-detailed, but smooth-toned final
print.
Once this last downrez is complete, I am done – and I should
have a 16x24 at 300PPI that looks very, very good when printed.
Example Interpolation
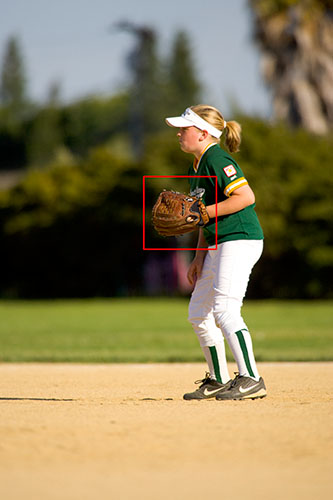
Here is an image from my 1DMKII. I will crop a portion to show it
enlarged for the different steps in the process. Relevant gear/exposure
data for those interested: camera was the 1DMKII, lens was the Canon
200/1.8 with 2xII converter attached for an effective 400mm focal length;
ISO 250; exposure was 1/2500th @ f4; raw capture mode; AWB. Note that
I did all of the processing on a 16-bit tiff file in Adobe RGB color
space, then after the processing, the final images were converted to
the web jpegs you see here.
1) Here is the full frame original image, with the 500x500 pixel portion
we are going to interpolate outlined in red:
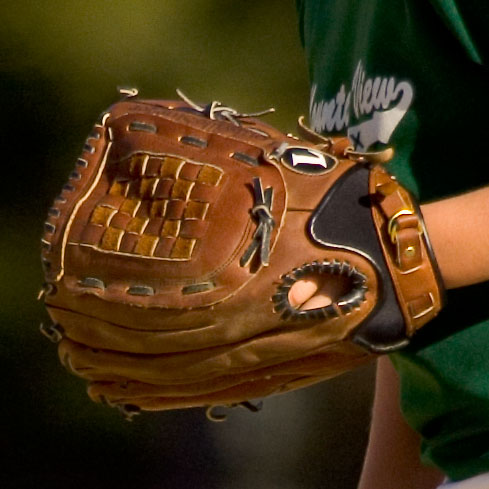
2) Here is the actual 500x500 pixel crop we are going to uprez, shown
at “actual pixel” resolution, fully post-processed and
sharpened with EasyS, but still at its native resolution:
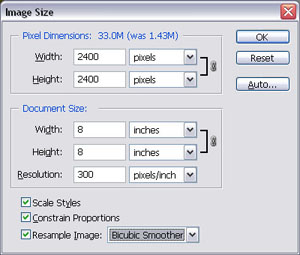
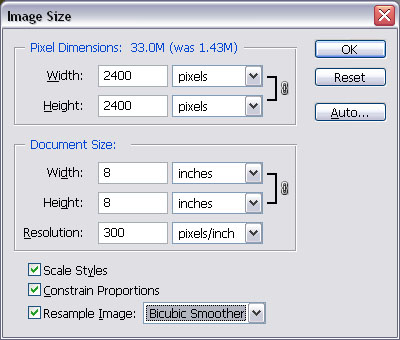
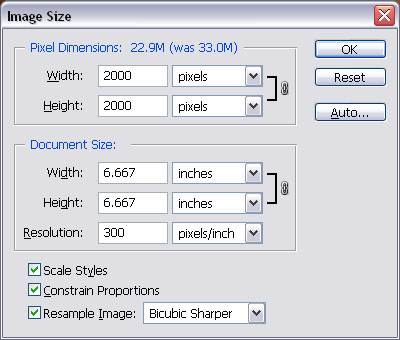
3) Here is a screenshot for the 16x uprez that follows.
To increase the area of the image by 16x, we increase each dimension
by 400% or 4x. Since the original file is 500x500 pixels, and since
we are interpolating it up to 20% over our desired target size, we
set the target size to 2400x2400 pixels. (Here is the math: 4x500=2000,
2000+20% = 2400):
4) The file is now sharpened with USM targeting the edges, and then
faded to 80% in the luminosity mode – this is the fractal sharpening
step.
5) Now it’s downrezzed to our final desired 2000x2000 image
size:
6) Here is the final image, uprezzed 16x (400% in each dimension),
processed as described above, but now viewed at “print size” resolution.
Please note that what you are now looking at on your screen represents
an approximate 61/2”x61/2” section from the final print
printed at 300PPI resolution, and would translate to a final print
sized 32x48 inches if we were viewing the entire image (!):
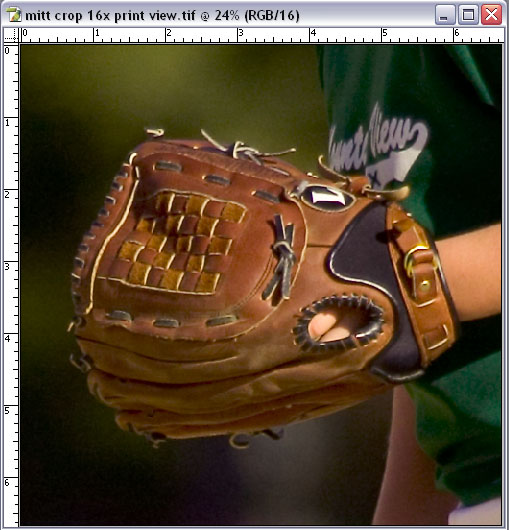
(You may detect what appears to be a slight color shift in the above
image relative to the original and 4x uprezzed versions. This is due
to saving a screen capture of the working tiff as a jpeg directly and
not from the interpolation process itself.)
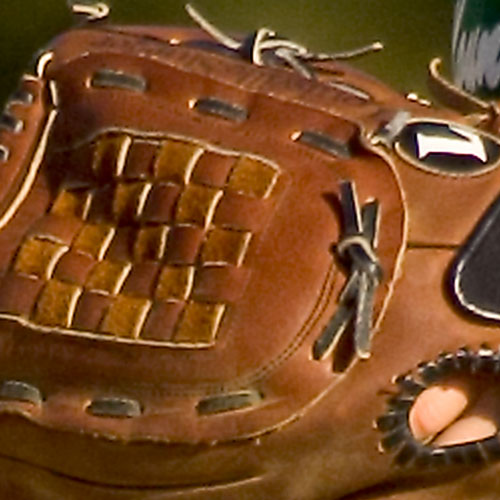
7) Here the crop has been uprezzed 4x (200% in each dimension) with
roughly the center half cropped out to fit on the web page, processed
as described above. It is being viewed at “actual pixel” resolution
so you can see an actual pixel representation after a typical uprez.
The full image after this interpolation would print out to almost 16x24
at 300PPI:
Addendum: Initial uprezzing during raw conversion.
Many times you will see a recommendation to do a first uprez during
the raw conversion process. With the process described above, I made
it clear I process to the camera’s native file size. First, this
keeps my files smaller during post-processing which in turn means the
operations I perform in post run faster. Second, while uprezzing during
conversion will give you a larger initial image to work with, it can
also impart undesirable artifacts in certain areas of the image. I
have tested it with ACR on my Canon files and can detect virtually
no difference between doing it there and doing it later in the main
CS program in MOST images. However, I have found certain situations
where it generates additional undesirable artifacts, hence the reason
I do not use it myself as a general practice. These artifacts will
grow worse if you plan to make the image even larger later in the process
using any interpolation routine.
Regardless, you may want to experiment with your own raw files. You
can usually get to about 200% of native size during raw conversion.
Results may vary by file as well as equipment, so it's worth testing
for your camera and image processing combinations, especially if you
only need a slight upscale for your image.
Here is a sample of a “bad” artifact obtained while doing
a 200% uprez in ACR on a 1Ds file. First the full-frame image, downsized
for web. This image was taken with my 1Ds and 400DO lens, 1/800th @
f4.5, ISO 100:
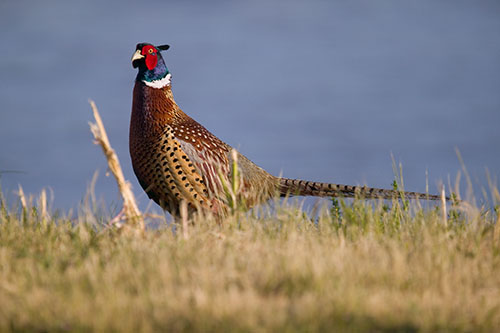
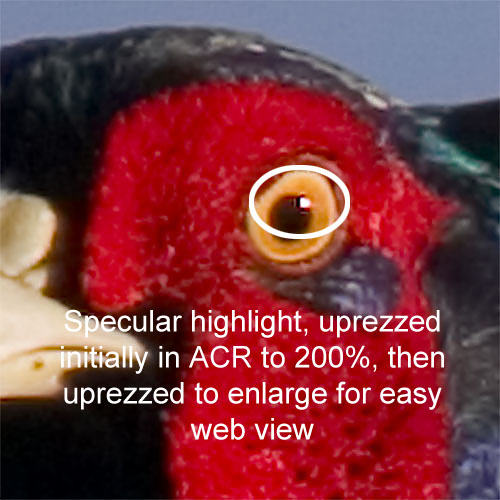
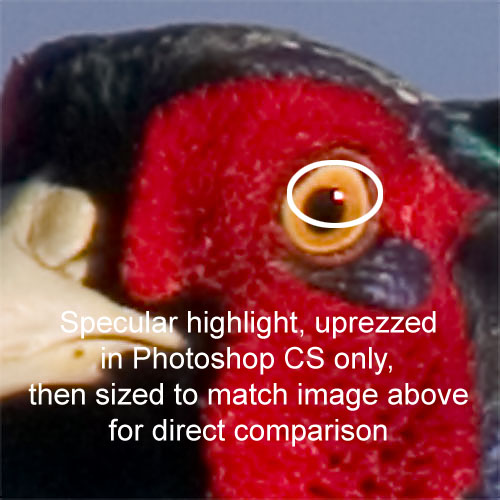
And here are miniscule crops from that image, showing a specular highlight
in the pheasant’s eyeball. The first was converted to 2x (142%
in each dimension) during raw conversion in ACR, and then enlarged
via Bicubic-smoother for critical web view. The second was converted
to native size in ACR, and then similarly enlarged via Bicubic-smoother
to match the first image’s scale. The highlight artifact is easily
visible in the image that was interpolated during raw conversion in
ACR:
|